

Utilizzare una luce attivata dal movimento in case, uffici o spazi pubblici al coperto può ridurre significativamente lo spreco di elettricità, aggiungendo al contempo un'esperienza di illuminazione automatizzata e senza mani. Nella maggior parte dei casi, un interruttore con sensore di movimento è la soluzione ottimale per l'uso interno perché è facile da aggiornare e sostituisce l'interruttore a parete esistente, e l'interruttore con sensore a parete è più accessibile per consentire agli utenti un controllo manuale.
Indice
- Passaggio 1. Preparare gli strumenti per l'installazione
- Passaggio 2. Posizionare il sensore di movimento
- Passaggio 3. Collegare il sensore di movimento alla luce
- Passaggio 4. Regolare il sensore di movimento
A volte è necessario rilevare il movimento da una copertura più ampia dove un interruttore con sensore di movimento non è sufficiente a causa dell'area di rilevamento limitata sulla parete. In questo caso, un sensore di movimento a soffitto o un rilevatore di movimento indipendente rilevatore di movimento posizionato sulla parete, in grado di rilevare le persone fino a 360 gradi con una zona di sensibilità più ampia, può risolvere perfettamente il problema.
Un altro vantaggio dell'aggiunta di un sensore di movimento, ovvero un sensore di presenza, alla luce esistente è la possibilità di avere un'illuminazione automatica ON/OFF, completamente senza mani e adatta a locali pubblici e uffici. Inoltre, un sensore di presenza a soffitto richiede solo i cablaggi disponibili per l'installazione ed è più flessibile quanto al posizionamento, mentre gli interruttori con sensore a parete devono essere installati in una scatola a parete preesistente.
Passaggio 1. Preparare gli strumenti per l'installazione
Prima di aggiungere un sensore di movimento alla luce, preparare questi strumenti per velocizzare il processo.
- Un sensore di movimento
- Cacciavite
- Opzionale
- Spelafili/Tagliafili: per tagliare i cavi se necessario
- Connettori per cavi: la maggior parte degli interruttori luce con sensore di movimento include di serie i connettori per cavi nella confezione degli accessori
- Tester di tensione: per identificare il cavo sotto tensione e verificare l'assenza di tensione
- Nastro isolante: per contrassegnare il cavo sotto tensione
- Scatola di giunzione: per il fissaggio e l'installazione del sensore di movimento
Passaggio 2. Posizionare il sensore di movimento
Interrompere l'alimentazione della luce a cui si desidera aggiungere un sensore di movimento. Individuare il punto di installazione del sensore di movimento tra la sorgente di alimentazione dell'abitazione e la luce.
Installare una scatola di giunzione e, se necessario, tagliare il cavo di fase e il cavo neutro per l'installazione e il fissaggio del sensore di movimento.
A questo punto, contrassegnare il cavo di fase e il cavo del carico.
Potrebbero Interessarti Anche

- Tensione: 2 batterie AAA
- Modalità Giorno/Notte
- Ritardo spegnimento: 15min, 30min, 1h(predefinito), 2h

- Sensore di presenza PIR da soffitto con uscita relè a contatto pulito
- Alimentazione a bassa tensione 12/24VDC o 12/24VAC
- Contatti relè isolati COM, NO e NC per ingressi EMS, HVAC e controllo edifici

- Interruttore con sensore di movimento a microonde da soffitto a incasso in Bassa Tensione CC
- Ingresso 12 VDC / 24 VDC con intervallo 10-30 VDC
- Corrente di lavoro max 10A con ritardo temporale, soglia Lux e sensibilità regolabili
- Interruttore con sensore di movimento a microonde da soffitto a incasso per carichi più elevati
- Ingresso tensione di linea 100-265 VAC, modello da 10A
- Rilevamento a microonde a 5.8 GHz con ritardo temporale, soglia Lux e sensibilità regolabili
- Interruttore con sensore di movimento a microonde da soffitto a incasso
- Ingresso tensione di linea 100-265 VAC, modello da 5A
- Rilevamento a microonde a 5.8 GHz con ritardo temporale, soglia Lux e sensibilità regolabili
- Dimmer con sensore di presenza PIR RZ037 da soffitto per alimentazione a 220V
- Corrente di lavoro massima 3A con carico nominale di 660W
- Il pulsante LUX controlla l'ON/OFF del sensore di luce e la luminosità di regolazione impostata dall'utente
- Dimmer con sensore di presenza PIR RZ037 da soffitto per alimentazione a 110V
- Corrente massima di esercizio di 3A con carico nominale di 330W
- Il pulsante LUX controlla l'ON/OFF del sensore di luce e la luminosità di regolazione impostata dall'utente

- Interruttore da soffitto con sensore di movimento a microonde a bassa tensione CC
- Ingresso 12 VDC / 24 VDC con intervallo 10-30 VDC
- Corrente di lavoro max 10A con ritardo temporale, soglia Lux e sensibilità regolabili
- Interruttore da soffitto con sensore di movimento a microonde per carichi più elevati
- Ingresso tensione di linea 100-265 VAC, modello da 10A
- Rilevamento a microonde a 5.8 GHz con ritardo temporale, soglia Lux e sensibilità regolabili
- Interruttore da soffitto con sensore di movimento a microonde
- Ingresso tensione di linea 100-265 VAC, modello da 5A
- Rilevamento a microonde a 5.8 GHz con ritardo temporale, soglia Lux e sensibilità regolabili

- Interruttore con sensore di movimento PIR da soffitto a incasso a bassa tensione CC
- Ingresso 12 VDC / 24 VDC con intervallo 10-30 VDC
- Corrente massima di esercizio di 10A con ritardo temporale, soglia Lux e sensibilità regolabili

- Interruttore con sensore di movimento PIR da soffitto a incasso per carichi più elevati
- Ingresso tensione di linea 100-265 VAC, modello da 10A
- Rilevamento a 360 gradi con ritardo temporale, soglia Lux e sensibilità regolabili
- Interruttore con sensore di movimento PIR da soffitto a incasso
- Ingresso tensione di linea 100-265 VAC, modello da 5A
- Rilevamento a 360 gradi con ritardo temporale, soglia Lux e sensibilità regolabili

- Kit interruttore e ricevitore wireless per il controllo dell'illuminazione ON/OFF da interno
- Ricevitore 100-230VAC, 50/60Hz con corrente nominale di 5A
- Interruttore wireless alimentato da batteria CR2032 con comunicazione a 2,4 GHz
- Rilevamento presenza (Auto-ON/Auto-OFF)
- 12–24V DC (10–30VDC), fino a 10A
- Copertura a 360°, diametro di rilevamento 8–12 m
- Ritardo di spegnimento 15 s–30 min
- Sensore crepuscolare Off/15/25/35 Lux
- Sensibilità Alta/Bassa
- Modalità presenza Auto-ON/Auto-OFF
- 100–265V AC, 10A (neutro richiesto)
- Copertura a 360°; diametro di rilevamento 8–12 m
- Ritardo di spegnimento 15 s–30 min; Lux OFF/15/25/35; Sensibilità Alta/Bassa
- Modalità presenza Auto-ON/Auto-OFF
- 100–265V AC, 5A (neutro richiesto)
- Copertura a 360°; diametro di rilevamento 8–12 m
- Ritardo di spegnimento 15 s–30 min; Lux OFF/15/25/35; Sensibilità Alta/Bassa
- Riaprire l'alimentazione e utilizzare il tester di tensione senza contatto per verificare ciascun cavo nero nella scatola di giunzione. Il cavo di fase è alimentato, mentre il cavo del carico collegato alla luce non lo è.
- Interrompere l'alimentazione e verificare con il tester di tensione senza contatto.
- Se necessario, contrassegnare il cavo di fase con del nastro isolante.
Passaggio 3. Collegare il sensore di movimento alla luce
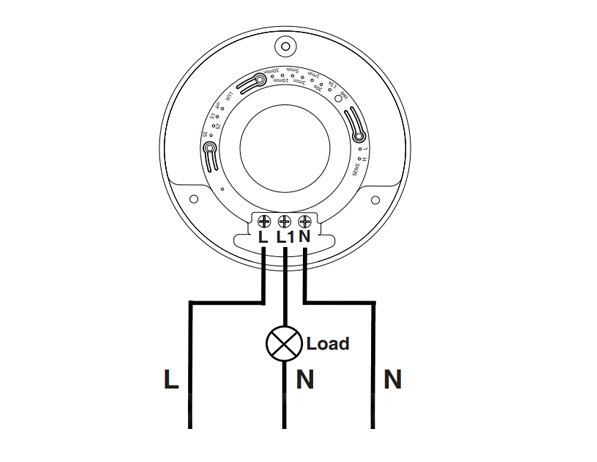
Questo è uno schema di cablaggio standard per sensori di movimento ed è applicabile alla quasi totalità dei collegamenti di questo tipo. Il cablaggio è estremamente semplice, analogo a quello per l'installazione di un interruttore con sensore di movimento.
Cerchi Soluzioni per il Risparmio Energetico Attivate dal Movimento?
Contattaci per sensori di movimento PIR completi, prodotti per il risparmio energetico attivati dal movimento, interruttori con sensore di movimento e soluzioni commerciali di presenza/vacanza.
Sono necessari solo 3 cavi. L indica il cavo di linea o di fase, ovvero la sorgente di alimentazione dell'abitazione. L1 indica il cavo del carico che alimenta le luci. N è il cavo neutro; è sufficiente collegarli insieme.
- Collegare il cavo di fase dell'impianto al cavo di fase del sensore di movimento.
- Collegare il cavo del carico della luce al cavo del carico del sensore di movimento.
- Collegare il cavo neutro dell'impianto al cavo neutro del sensore di movimento.
Passaggio 4. Regolare il sensore di movimento
A questo punto, avvitare parzialmente il sensore di movimento nella scatola di giunzione e ripristinare l'alimentazione per testare la configurazione ottimale.
Eseguire alcune prove e regolare le impostazioni del sensore di movimento sui valori ottimali, quali ritardo spegnimento, sensibilità di rilevamento del movimento e sensore crepuscolare LUX.
Orientare il sensore di movimento per assicurare la copertura dell'area di rilevamento desiderata. Completare l'installazione e serrare a fondo le viti del sensore di movimento.








I’ve never heard of a “load wire”. Only HOT (black) Neutral (white) and ground (green). What is a load wire?
Hi Patrick,
A “load wire” is the wire that connects the sensor with the load. In this case, the load is the light connected and driven by the motion sensor.
Say you want to control your light with a motion sensor.
The motion sensor draws power from the hot wire and it needs to send the power to the light via the load wire. Now the sensor can control when to keep the light ON or OFF because the light is directly powered by the motion sensor.
A load wire may have different colors, usually red or black. Some motion sensors may have hot wire and load wire the same color and they are interchangeable. You need to refer to your sensor’s manual for this part.
Most motion sensors have a load wire and control the lighting in this way. If your motion sensor does not have a load wire, it is mostly a wireless sensor that needs to be integrated into a smart home system so that the light is controlled by other means.
Nice article very well written. It answered the questions i had. Thank you.
How much would an electrician charge for something like this?
Hi, I don’t understand how connecting one wire (load) to the light makes it work what about the neutral wire from the lights
Cuando ce cobra por estos trabajos