

Utilizing a motion-activated light at homes, offices, or public indoor spaces could significantly reduce electricity waste while adding a hands-free, automated lighting experience. Most of the time, a interruptor de luz con sensor de movimiento is the optimal solution for indoor use because it’s easy to upgrade and replace your existing wall switch and the wall sensor switch is more accessible for users to have manual override control.
Contenido
- Step 1. Prepare Tools for Installation
- Step 2. Place the Motion Sensor
- Step 3. Wire the Motion Sensor to the Light
- Step 4. Adjust the Motion Sensor
Sometimes we need to detect motion from a broader coverage where a motion sensor light switch is incompetent with the restricted detecting area on the wall. In this case, a ceiling mount motion sensor or a standalone motion detector located on the wall, which can detect people from up to a 360 degree with a larger sensitivity zone, can perfectly solve our problem.
Another benefit of adding a motion sensor, i.e., a sensor de presencia, to your existing light is that you can have automatic ON/OFF lighting, which is completely hands-free and suitable for public rooms and offices. Additionally, a ceiling occupancy sensor only requires available wirings for installation and is more flexible with where you place it, while the wall sensor switches must be installed into a pre-existing wallbox.
Step 1. Prepare Tools for Installation
Before we add a motion sensor to the light, prepare these tools first so we can speed up the process.
- A motion sensor
- Destornillador
- Opcional
- Alicates de corte: para cortar cables si es necesario
- Conectores de cables: la mayoría de los interruptores de luz con sensor de movimiento los incluyen de forma predeterminada en el paquete de accesorios
- Voltage tester: to identify the hotwire and ensure the voltage is off
- Cinta aislante: para marcar el cable de fase
- Junction box: for fixing and installing the motion sensor
Step 2. Place the Motion Sensor
Turn off the power to the light which you want to add a motion sensor to. Find a place where you want to install the motion sensor between the power source from your house to the light.
Install a junction box and cut the hot wire and neutral wire for installing and fixing the motion sensor, if needed.
Now we mark the hot wire and load wire.
Quizás le interese

- Tensión: 2 pilas AAA
- Modo Día/Noche
- Temporización: 15 min, 30 min, 1 h (por defecto), 2 h

- Sensor de presencia PIR para montaje en techo con salida de relé de contacto seco
- Alimentación de baja tensión de 12/24VDC o 12/24VAC
- Contactos de relé aislados COM, NO y NC para entradas de EMS, HVAC y control de edificios

- Interruptor con sensor de movimiento por microondas empotrable en techo de baja tensión DC
- Entrada de 12 VDC / 24 VDC con rango de 10-30 VDC
- Corriente de funcionamiento máxima de 10A con retardo de tiempo, umbral de Lux y sensibilidad ajustables
- Interruptor con sensor de movimiento por microondas empotrable en techo para cargas más elevadas
- Entrada de tensión de red de 100-265 VAC, modelo de 10A
- Detección por microondas de 5,8 GHz con temporizador, umbral Lux y sensibilidad ajustables
- Interruptor con sensor de movimiento por microondas empotrable para techo
- Entrada de tensión de red de 100-265 VAC, modelo de 5A
- Detección por microondas de 5,8 GHz con temporizador, umbral Lux y sensibilidad ajustables
- Regulador con sensor de presencia PIR RZ037 de techo para alimentación de 220V
- Corriente de funcionamiento máxima de 3A con carga nominal de 660W
- El botón LUX controla el encendido/apagado del sensor de luz y la regulación de brillo ajustada por el usuario
- Regulador con sensor de presencia PIR RZ037 de techo para alimentación de 110V
- Corriente de funcionamiento máxima de 3A con carga nominal de 330W
- El botón LUX controla el encendido/apagado del sensor de luz y la regulación de brillo ajustada por el usuario

- Interruptor con sensor de movimiento por microondas de techo para CC de bajo voltaje
- Entrada de 12 VDC / 24 VDC con rango de 10-30 VDC
- Corriente de funcionamiento máxima de 10A con retardo de tiempo, umbral de Lux y sensibilidad ajustables
- Interruptor con sensor de movimiento por microondas de techo para mayor carga
- Entrada de tensión de red de 100-265 VAC, modelo de 10A
- Detección por microondas de 5,8 GHz con temporizador, umbral Lux y sensibilidad ajustables
- Interruptor con sensor de movimiento por microondas de techo
- Entrada de tensión de red de 100-265 VAC, modelo de 5A
- Detección por microondas de 5,8 GHz con temporizador, umbral Lux y sensibilidad ajustables

- Interruptor con sensor de movimiento PIR para montaje empotrable en techo de CC de bajo voltaje
- Entrada de 12 VDC / 24 VDC con rango de 10-30 VDC
- Corriente máxima de trabajo de 10 A con tiempo de retardo, umbral de luxes y sensibilidad ajustables

- Interruptor con sensor de movimiento PIR empotrable en techo para mayor carga
- Entrada de tensión de red de 100-265 VAC, modelo de 10A
- Detección de 360 grados con tiempo de retardo, umbral de luxes y sensibilidad ajustables
- Interruptor con sensor de movimiento PIR empotrable en techo
- Entrada de tensión de red de 100-265 VAC, modelo de 5A
- Detección de 360 grados con tiempo de retardo, umbral de luxes y sensibilidad ajustables

- Kit de emisor inalámbrico y receptor para el control de iluminación de encendido/apagado en interiores
- Receptor de 100-230 V CA, 50/60 Hz con corriente nominal de 5 A
- Interruptor inalámbrico alimentado por CR2032 con comunicación de 2,4 GHz
- Presencia (encendido automático/apagado automático)
- 12–24 V CC (10–30 V CC), hasta 10 A
- Cobertura de 360°, 8–12 m de diámetro
- Tiempo de retardo de 15 s a 30 min
- Sensor de luz Desactivado/15/25/35 Lux
- Sensibilidad alta/baja
- Modo de presencia con encendido/apagado automático
- 100–265V CA, 10A (requiere neutro)
- Cobertura de 360°; diámetro de detección de 8–12 m
- Temporización: 15 s–30 min; Lux OFF/15/25/35; Sensibilidad Alta/Baja
- Modo de presencia con encendido/apagado automático
- 100–265V CA, 5A (requiere neutro)
- Cobertura de 360°; diámetro de detección de 8–12 m
- Temporización: 15 s–30 min; Lux OFF/15/25/35; Sensibilidad Alta/Baja
- Turn on the power and use the non-contact voltage tester to test each black wire in the junction box. The hot wire has power but the load wire to your light does not have power.
- Turn off the power and use the non-contact voltage tester to confirm.
- Mark the hot wire with electrical tapes if needed.
Step 3. Wire the Motion Sensor to the Light
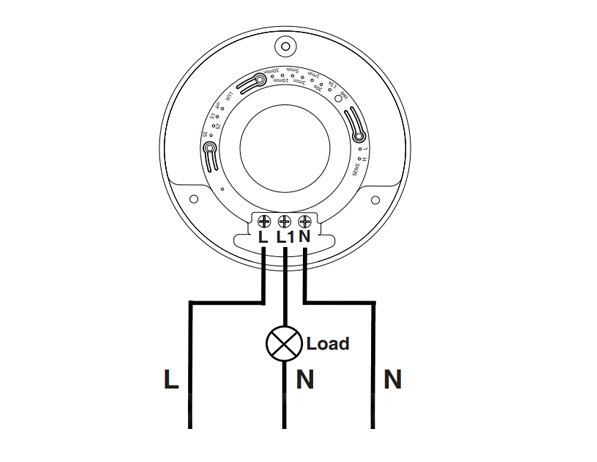
This is a standard motion sensor wiring diagram and you can apply nearly all wirings like above. The wiring is pretty straightforward, similar to installing a motion sensor light switch.
¿Busca soluciones de ahorro de energía activadas por movimiento?
Póngase en contacto con nosotros para obtener sensores de movimiento PIR completos, productos de ahorro de energía activados por movimiento, interruptores con sensor de movimiento y soluciones comerciales de presencia/vacancia.
There are only 3 wires needed. The L is for line wire or hot wire, which is the power source from your house. The L1 is for load wire which powers the lights. The N is the neutral wire, and you only need to simply wire them together.
- Connect the hot wire from your house to the hot wire on the motion sensor.
- Connect the load wire to your light to the load wire on the motion sensor.
- Connect the neutral wire from your house to the neutral wire on the motion sensor.
Step 4. Adjust the Motion Sensor
Now we partially screw the motion sensor into the junction box and turn on the power for testing the best setting.
Test a couple of times and adjust the motion sensor’s setting to the best value, such as time delay, motion detection sensitivity, light sensor LUX.
Alter the motion sensor to ensure it can detect the ideal motion detection area. Install and screw tight the motion sensor.








I’ve never heard of a “load wire”. Only HOT (black) Neutral (white) and ground (green). What is a load wire?
Hola Patrick:,
Un “cable de carga” es el cable que conecta el sensor con la carga. En este caso, la carga es la luz conectada y gestionada por el sensor de movimiento.
Suponga que desea controlar la iluminación mediante un sensor de movimiento.
El sensor de movimiento recibe alimentación a través del cable de fase y debe enviar dicha corriente a la luz mediante el cable de carga. De este modo, el sensor puede controlar cuándo mantener la luz encendida o apagada, ya que la luz recibe alimentación directamente desde el sensor de movimiento.
El cable de carga puede presentar distintos colores, habitualmente rojo o negro. Algunos sensores de movimiento cuentan con un cable de fase y un cable de carga del mismo color, siendo intercambiables. Es necesario consultar el manual del sensor para verificar este aspecto.
La mayoría de los sensores de movimiento disponen de un cable de carga y controlan la iluminación de esta manera. Si el sensor de movimiento no cuenta con un cable de carga, se trata en la mayoría de los casos de un sensor inalámbrico que debe integrarse en un sistema domótico para controlar la luz por otros medios.
Nice article very well written. It answered the questions i had. Thank you.
¿Cuánto cobraría un electricista por algo así?
Hi, I don’t understand how connecting one wire (load) to the light makes it work what about the neutral wire from the lights
Cuando ce cobra por estos trabajos