

Evlerde, ofislerde veya kapalı kamu alanlarında hareketle etkinleşen bir aydınlatma kullanmak, elektrik israfını önemli ölçüde azaltırken el değmeden otomatik bir aydınlatma deneyimi sunar. Çoğu zaman, hareket sensörlü ışık anahtarı iç mekan kullanımı için en ideal çözümdür; çünkü mevcut duvar anahtarınızı yükseltmek ve değiştirmek kolaydır, ayrıca duvara monte sensörlü anahtar kullanıcıların manuel olarak müdahale edebilmesi için daha erişilebilirdir.
İçindekiler
- Adım 1. Kurulum İçin Aletleri Hazırlayın
- Adım 2. Hareket Sensörünü Yerleştirin
- Adım 3. Hareket Sensörünü Lambaya Bağlayın
- Adım 4. Hareket Sensörünü Ayarlayın
Bazen, duvardaki sınırlı algılama alanına sahip hareket sensörlü ışık anahtarının yetersiz kaldığı durumlarda, daha geniş bir kapsama alanından hareketi algılamamız gerekir. Bu durumda, tavana monte bir hareket sensörü veya duvar üzerine yerleştirilen ve daha yüksek hassasiyet alanıyla insanları 360 dereceye kadar algılayabilen bağımsız bir hareket dedektörü sorunumuzu mükemmel bir şekilde çözebilir.
Var olan lambanıza bir hareket sensörü, yani bir varlık sensörü, eklemenin bir diğer avantajı da tamamen el değmeden çalışan, kamuya açık odalar ve ofisler için son derece uygun otomatik AÇMA/KAPAMA aydınlatmasına sahip olabilmenizdir. Ayrıca, tavan tipi varlık sensörü kurulum için yalnızca mevcut kabloları gerektirir ve yerleştirileceği konum açısından daha esnektir; duvara monte sensörlü anahtarların ise önceden var olan bir buata monte edilmesi zorunludur.
Adım 1. Kurulum İçin Aletleri Hazırlayın
Lambaya bir hareket sensörü eklemeden önce, süreci hızlandırmak adına bu aletleri hazırlayın.
- Bir hareket sensörü
- Tornavida
- İsteğe bağlı
- Kablo kesici: gerektiğinde kabloları kesmek için
- Wire connectors: most motion sensor light switches would include wire connecters by default in the accessory pack
- Voltage tester: to identify the hotwire and ensure the voltage is off
- Electrical tapes: to mark the hotwire
- Junction box: for fixing and installing the motion sensor
Adım 2. Hareket Sensörünü Yerleştirin
Turn off the power to the light which you want to add a motion sensor to. Find a place where you want to install the motion sensor between the power source from your house to the light.
Install a junction box and cut the hot wire and neutral wire for installing and fixing the motion sensor, if needed.
Now we mark the hot wire and load wire.
İlginizi Çekebilecek Diğer Ürünler

- Voltaj: 2 Adet AAA Pil
- Gündüz/Gece Modu
- Zaman gecikmesi: 15dk, 30dk, 1sa (varsayılan), 2sa

- Kuru kontak röle çıkışlı, tavan tipi PIR varlık sensörü
- 12/24VDC veya 12/24VAC düşük voltaj güç beslemesi
- EMS, HVAC ve bina kontrol girdileri için COM, NO ve NC izole röle kontakları

- Düşük voltaj DC sıva altı tavan tipi mikrodalga hareket sensörlü anahtar
- 10-30 VDC aralığına sahip 12 VDC / 24 VDC giriş
- Ayarlanabilir zaman gecikmesi, Lüks eşiği ve hassasiyet özelliklerine sahip maks. 10A çalışma akımı
- Yüksek yük kapasiteli sıva altı tavan tipi mikrodalga hareket sensörlü anahtar
- 100-265 VAC şebeke voltajı girişi, 10A model
- Ayarlanabilir zaman gecikmesi, Lüks eşiği ve hassasiyete sahip 5,8 GHz mikrodalga algılama
- Sıva altı tavana monte mikrodalga hareket sensörlü anahtar
- 100-265 VAC şebeke gerilimi girişi, 5A model
- Ayarlanabilir zaman gecikmesi, Lüks eşiği ve hassasiyete sahip 5,8 GHz mikrodalga algılama
- 220V güç için tavana monte RZ037 PIR varlık sensörlü dimmer
- 660W nominal yük ile 3A maksimum çalışma akımı
- LUX düğmesi, ışık sensörünün AÇIK/KAPALI konumunu ve kullanıcı tarafından ayarlanan dimmer parlaklığını kontrol eder
- 110V güç için tavana monte RZ037 PIR varlık sensörlü dimmer
- 330W nominal yük ile 3A maksimum çalışma akımı
- LUX düğmesi, ışık sensörünün AÇIK/KAPALI konumunu ve kullanıcı tarafından ayarlanan dimmer parlaklığını kontrol eder

- Düşük voltajlı DC tavan montajlı mikrodalga hareket sensörlü anahtar
- 10-30 VDC aralığına sahip 12 VDC / 24 VDC giriş
- Ayarlanabilir zaman gecikmesi, Lüks eşiği ve hassasiyet özelliklerine sahip maks. 10A çalışma akımı
- Yüksek yüklü tavan montajlı mikrodalga hareket sensörlü anahtar
- 100-265 VAC şebeke voltajı girişi, 10A model
- Ayarlanabilir zaman gecikmesi, Lüks eşiği ve hassasiyete sahip 5,8 GHz mikrodalga algılama
- Tavan montajlı mikrodalga hareket sensörlü anahtar
- 100-265 VAC şebeke gerilimi girişi, 5A model
- Ayarlanabilir zaman gecikmesi, Lüks eşiği ve hassasiyete sahip 5,8 GHz mikrodalga algılama

- Düşük voltajlı DC sıva altı tavan montajlı PIR hareket sensörlü anahtar
- 10-30 VDC aralığına sahip 12 VDC / 24 VDC giriş
- Ayarlanabilir zaman gecikmesi, Lüks eşiği ve hassasiyet ile maks. 10A çalışma akımı

- Yüksek yüklü sıva altı tavan montajlı PIR hareket sensörlü anahtar
- 100-265 VAC şebeke voltajı girişi, 10A model
- Ayarlanabilir zaman gecikmesi, Lüks eşiği ve hassasiyet ile 360 derece algılama
- Sıva altı tavan montajlı PIR hareket sensörlü anahtar
- 100-265 VAC şebeke gerilimi girişi, 5A model
- Ayarlanabilir zaman gecikmesi, Lüks eşiği ve hassasiyet ile 360 derece algılama

- İç mekan AÇMA/KAPAMA aydınlatma kontrolü için kablosuz anahtar ve alıcı seti
- 5A nominal akımlı 100-230VAC, 50/60Hz alıcı
- 2.4GHz haberleşmeli CR2032 pille çalışan kablosuz anahtar
- Varlık (Otomatik AÇMA/Otomatik KAPATMA)
- 12–24V DC (10–30VDC), 10A'e kadar
- 360° kapsama alanı, 8–12 m çap
- Zaman gecikmesi 15 sn–30 dk
- Işık sensörü Kapalı/15/25/35 Lux
- Yüksek/Düşük hassasiyet
- Otomatik AÇMA/Otomatik KAPATMA varlık modu
- 100–265V AC, 10A (nötr hattı gereklidir)
- 360° kapsama alanı; 8–12 m algılama çapı
- Zaman gecikmesi 15 sn–30 dk; Lux KAPALI/15/25/35; Hassasiyet Yüksek/Düşük
- Otomatik AÇMA/Otomatik KAPATMA varlık modu
- 100–265V AC, 5A (nötr hattı gereklidir)
- 360° kapsama alanı; 8–12 m algılama çapı
- Zaman gecikmesi 15 sn–30 dk; Lux KAPALI/15/25/35; Hassasiyet Yüksek/Düşük
- Turn on the power and use the non-contact voltage tester to test each black wire in the junction box. The hot wire has power but the load wire to your light does not have power.
- Turn off the power and use the non-contact voltage tester to confirm.
- Mark the hot wire with electrical tapes if needed.
Adım 3. Hareket Sensörünü Lambaya Bağlayın
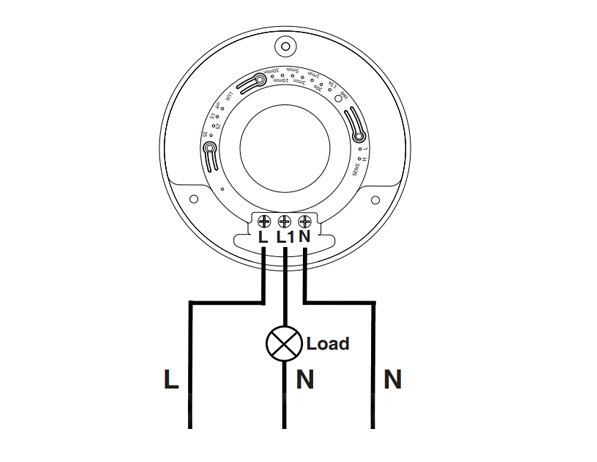
This is a standard motion sensor wiring diagram and you can apply nearly all wirings like above. The wiring is pretty straightforward, similar to installing a motion sensor light switch.
Hareket Algılamalı Enerji Tasarrufu Çözümleri Mi Arıyorsunuz?
Eksiksiz PIR hareket sensörleri, hareket algılamalı enerji tasarruflu ürünler, hareket sensörlü anahtarlar ve ticari Varlık/Yokluk (Occupancy/Vacancy) çözümleri için bizimle iletişime geçin.
There are only 3 wires needed. The L is for line wire or hot wire, which is the power source from your house. The L1 is for load wire which powers the lights. The N is the neutral wire, and you only need to simply wire them together.
- Connect the hot wire from your house to the hot wire on the motion sensor.
- Connect the load wire to your light to the load wire on the motion sensor.
- Connect the neutral wire from your house to the neutral wire on the motion sensor.
Adım 4. Hareket Sensörünü Ayarlayın
Now we partially screw the motion sensor into the junction box and turn on the power for testing the best setting.
Test a couple of times and adjust the motion sensor’s setting to the best value, such as time delay, motion detection sensitivity, light sensor LUX.
Alter the motion sensor to ensure it can detect the ideal motion detection area. Install and screw tight the motion sensor.








I’ve never heard of a “load wire”. Only HOT (black) Neutral (white) and ground (green). What is a load wire?
Hi Patrick,
A “load wire” is the wire that connects the sensor with the load. In this case, the load is the light connected and driven by the motion sensor.
Say you want to control your light with a motion sensor.
The motion sensor draws power from the hot wire and it needs to send the power to the light via the load wire. Now the sensor can control when to keep the light ON or OFF because the light is directly powered by the motion sensor.
A load wire may have different colors, usually red or black. Some motion sensors may have hot wire and load wire the same color and they are interchangeable. You need to refer to your sensor’s manual for this part.
Most motion sensors have a load wire and control the lighting in this way. If your motion sensor does not have a load wire, it is mostly a wireless sensor that needs to be integrated into a smart home system so that the light is controlled by other means.
Nice article very well written. It answered the questions i had. Thank you.
How much would an electrician charge for something like this?
Hi, I don’t understand how connecting one wire (load) to the light makes it work what about the neutral wire from the lights
Cuando ce cobra por estos trabajos