

Utilizing a motion-activated light at homes, offices, or public indoor spaces could significantly reduce electricity waste while adding a hands-free, automated lighting experience. Most of the time, a मोशन सेंसर लाइट स्विच is the optimal solution for indoor use because it’s easy to upgrade and replace your existing wall switch and the wall sensor switch is more accessible for users to have manual override control.
विषय-सूची
- Step 1. Prepare Tools for Installation
- Step 2. Place the Motion Sensor
- Step 3. Wire the Motion Sensor to the Light
- Step 4. Adjust the Motion Sensor
Sometimes we need to detect motion from a broader coverage where a motion sensor light switch is incompetent with the restricted detecting area on the wall. In this case, a ceiling mount motion sensor or a standalone motion detector located on the wall, which can detect people from up to a 360 degree with a larger sensitivity zone, can perfectly solve our problem.
Another benefit of adding a motion sensor, i.e., a occupancy sensor, to your existing light is that you can have automatic ON/OFF lighting, which is completely hands-free and suitable for public rooms and offices. Additionally, a ceiling occupancy sensor only requires available wirings for installation and is more flexible with where you place it, while the wall sensor switches must be installed into a pre-existing wallbox.
Step 1. Prepare Tools for Installation
Before we add a motion sensor to the light, prepare these tools first so we can speed up the process.
- A motion sensor
- Screwdriver
- Optional
- Wirecutter: to cut wires if necessary
- Wire connectors: most motion sensor light switches would include wire connecters by default in the accessory pack
- Voltage tester: to identify the hotwire and ensure the voltage is off
- Electrical tapes: to mark the hotwire
- Junction box: for fixing and installing the motion sensor
Step 2. Place the Motion Sensor
Turn off the power to the light which you want to add a motion sensor to. Find a place where you want to install the motion sensor between the power source from your house to the light.
Install a junction box and cut the hot wire and neutral wire for installing and fixing the motion sensor, if needed.
Now we mark the hot wire and load wire.
शायद आपकी रुचि इसमें भी हो

- वोल्टेज: 2 AAA बैटरियां
- डे/नाइट मोड
- टाइम डिले: 15 मिनट, 30 मिनट, 1 घंटा (डिफ़ॉल्ट), 2 घंटे

- ड्राय-कॉन्टैक्ट रिले आउटपुट के साथ सीलिंग-माउंटेड PIR ऑक्यूपेंसी सेंसर
- 12/24VDC या 12/24VAC कम-वोल्टेज आपूर्ति
- EMS, HVAC और भवन नियंत्रण इनपुट के लिए COM, NO और NC आइसोलेटेड रिले कॉन्टैक्ट्स

- लो-वोल्टेज DC रिसेस्ड सीलिंग-माउंटेड माइक्रोवेव मोशन सेंसर स्विच
- 10-30 VDC रेंज के साथ 12 VDC / 24 VDC इनपुट
- समायोज्य टाइम डिले, लक्स थ्रेशोल्ड और संवेदनशीलता के साथ 10A अधिकतम कार्यशील धारा
- उच्च-लोड रिसेस्ड सीलिंग-माउंटेड माइक्रोवेव मोशन सेंसर स्विच
- 100-265 VAC लाइन-वोल्टेज इनपुट, 10A मॉडल
- समायोज्य टाइम डिले, लक्स थ्रेशोल्ड और संवेदनशीलता के साथ 5.8 GHz माइक्रोवेव सेंसिंग
- रिसेस्ड सीलिंग-माउंटेड माइक्रोवेव मोशन सेंसर स्विच
- 100-265 VAC लाइन-वोल्टेज इनपुट, 5A मॉडल
- समायोज्य टाइम डिले, लक्स थ्रेशोल्ड और संवेदनशीलता के साथ 5.8 GHz माइक्रोवेव सेंसिंग
- 220V पावर के लिए सीलिंग-माउंटेड RZ037 PIR ऑक्यूपेंसी सेंसर डिमर
- 660W रेटेड लोड के साथ 3A अधिकतम कार्यशील धारा
- LUX बटन लाइट-सेंसर ON/OFF और उपयोगकर्ता-निर्धारित डिमिंग ब्राइटनेस को नियंत्रित करता है
- 110V पावर के लिए सीलिंग-माउंटेड RZ037 PIR ऑक्यूपेंसी सेंसर डिमर
- 330W रेटेड लोड के साथ 3A अधिकतम कार्यशील धारा
- LUX बटन लाइट-सेंसर ON/OFF और उपयोगकर्ता-निर्धारित डिमिंग ब्राइटनेस को नियंत्रित करता है

- कम वोल्टेज DC सीलिंग-माउंटेड माइक्रोवेव मोशन सेंसर स्विच
- 10-30 VDC रेंज के साथ 12 VDC / 24 VDC इनपुट
- समायोज्य टाइम डिले, लक्स थ्रेशोल्ड और संवेदनशीलता के साथ 10A अधिकतम कार्यशील धारा
- उच्च-लोड सीलिंग-माउंटेड माइक्रोवेव मोशन सेंसर स्विच
- 100-265 VAC लाइन-वोल्टेज इनपुट, 10A मॉडल
- समायोज्य टाइम डिले, लक्स थ्रेशोल्ड और संवेदनशीलता के साथ 5.8 GHz माइक्रोवेव सेंसिंग
- सीलिंग-माउंटेड माइक्रोवेव मोशन सेंसर स्विच
- 100-265 VAC लाइन-वोल्टेज इनपुट, 5A मॉडल
- समायोज्य टाइम डिले, लक्स थ्रेशोल्ड और संवेदनशीलता के साथ 5.8 GHz माइक्रोवेव सेंसिंग

- कम वोल्टेज DC रिसेस्ड सीलिंग माउंट PIR मोशन सेंसर स्विच
- 10-30 VDC रेंज के साथ 12 VDC / 24 VDC इनपुट
- समायोज्य टाइम डिले, लक्स थ्रेशोल्ड और संवेदनशीलता के साथ अधिकतम वर्किंग करंट 10A

- उच्च-लोड रिसेस्ड सीलिंग माउंट PIR मोशन सेंसर स्विच
- 100-265 VAC लाइन-वोल्टेज इनपुट, 10A मॉडल
- समायोज्य टाइम डिले, लक्स थ्रेशोल्ड और संवेदनशीलता के साथ 360-डिग्री डिटेक्शन
- रिसेस्ड सीलिंग माउंट PIR मोशन सेंसर स्विच
- 100-265 VAC लाइन-वोल्टेज इनपुट, 5A मॉडल
- समायोज्य टाइम डिले, लक्स थ्रेशोल्ड और संवेदनशीलता के साथ 360-डिग्री डिटेक्शन

- इंडोर ON/OFF लाइटिंग नियंत्रण के लिए वायरलेस स्विच और रिसीवर किट
- 5A रेटेड करंट के साथ 100-230VAC, 50/60Hz रिसीवर
- 2.4GHz संचार के साथ CR2032-संचालित वायरलेस स्विच
- ऑक्यूपेंसी (ऑटो-ऑन/ऑटो-ऑफ)
- 12–24V DC (10–30VDC), 10A तक
- 360° कवरेज, 8–12 मीटर व्यास
- समय की देरी 15 सेकंड–30 मिनट
- लाइट सेंसर ऑफ/15/25/35 लक्स
- उच्च/निम्न संवेदनशीलता
- ऑटो-ऑन/ऑटो-ऑफ ऑक्यूपेंसी मोड
- 100–265V AC, 10A (न्यूट्रल आवश्यक)
- 360° कवरेज; 8–12 मीटर पहचान व्यास
- समय की देरी 15 सेकंड–30 मिनट; लक्स ऑफ/15/25/35; संवेदनशीलता उच्च/निम्न
- ऑटो-ऑन/ऑटो-ऑफ ऑक्यूपेंसी मोड
- 100–265V AC, 5A (न्यूट्रल आवश्यक)
- 360° कवरेज; 8–12 मीटर पहचान व्यास
- समय की देरी 15 सेकंड–30 मिनट; लक्स ऑफ/15/25/35; संवेदनशीलता उच्च/निम्न
- Turn on the power and use the non-contact voltage tester to test each black wire in the junction box. The hot wire has power but the load wire to your light does not have power.
- Turn off the power and use the non-contact voltage tester to confirm.
- Mark the hot wire with electrical tapes if needed.
Step 3. Wire the Motion Sensor to the Light
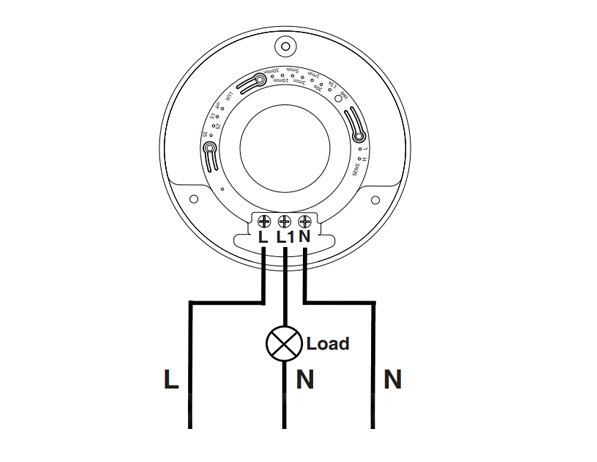
This is a standard motion sensor wiring diagram and you can apply nearly all wirings like above. The wiring is pretty straightforward, similar to installing a motion sensor light switch.
मोशन-एक्टिवेटेड ऊर्जा-बचत समाधान खोज रहे हैं?
संपूर्ण PIR मोशन सेंसर, मोशन-एक्टिवेटेड ऊर्जा-बचत उत्पाद, मोशन सेंसर स्विच, और ऑक्यूपेंसी/वेकेंसी व्यावसायिक समाधानों के लिए हमसे संपर्क करें।
There are only 3 wires needed. The L is for line wire or hot wire, which is the power source from your house. The L1 is for load wire which powers the lights. The N is the neutral wire, and you only need to simply wire them together.
- Connect the hot wire from your house to the hot wire on the motion sensor.
- Connect the load wire to your light to the load wire on the motion sensor.
- Connect the neutral wire from your house to the neutral wire on the motion sensor.
Step 4. Adjust the Motion Sensor
Now we partially screw the motion sensor into the junction box and turn on the power for testing the best setting.
Test a couple of times and adjust the motion sensor’s setting to the best value, such as time delay, motion detection sensitivity, light sensor LUX.
Alter the motion sensor to ensure it can detect the ideal motion detection area. Install and screw tight the motion sensor.








I’ve never heard of a “load wire”. Only HOT (black) Neutral (white) and ground (green). What is a load wire?
Hi Patrick,
A “load wire” is the wire that connects the sensor with the load. In this case, the load is the light connected and driven by the motion sensor.
Say you want to control your light with a motion sensor.
The motion sensor draws power from the hot wire and it needs to send the power to the light via the load wire. Now the sensor can control when to keep the light ON or OFF because the light is directly powered by the motion sensor.
A load wire may have different colors, usually red or black. Some motion sensors may have hot wire and load wire the same color and they are interchangeable. You need to refer to your sensor’s manual for this part.
Most motion sensors have a load wire and control the lighting in this way. If your motion sensor does not have a load wire, it is mostly a wireless sensor that needs to be integrated into a smart home system so that the light is controlled by other means.
Nice article very well written. It answered the questions i had. Thank you.
How much would an electrician charge for something like this?
Hi, I don’t understand how connecting one wire (load) to the light makes it work what about the neutral wire from the lights
Cuando ce cobra por estos trabajos