

O uso de uma iluminação ativada por movimento em residências, escritórios ou espaços públicos fechados pode reduzir significativamente o desperdício de energia elétrica, além de proporcionar uma experiência de iluminação automatizada e sem as mãos. Na maioria das vezes, um interruptor com sensor de movimento é a solução ideal para uso interno, pois é fácil de atualizar e substituir seu interruptor de parede existente, e o interruptor com sensor de parede oferece acesso mais prático para controle manual do usuário.
Sumário
- Etapa 1. Ferramentas Necessárias para a Instalação
- Etapa 2. Posicione o Sensor de Movimento
- Etapa 3. Conecte o Sensor de Movimento à Luminária
- Etapa 4. Ajuste o Sensor de Movimento
Às vezes, é necessário detectar movimento em uma área de cobertura mais ampla, para a qual um interruptor com sensor de movimento na parede é insuficiente devido ao seu alcance limitado. Nesses casos, um sensor de movimento de teto ou um detector de movimento independente instalado na parede, capaz de detectar pessoas em até 360 graus com uma zona de sensibilidade maior, resolve o problema perfeitamente.
Outro benefício de adicionar um sensor de movimento — isto é, um sensor de presença, — à sua iluminação existente é a automação do acendimento e desligamento das luzes, tornando o processo totalmente automático e adequado para escritórios e espaços públicos. Além disso, um sensor de presença de teto requer apenas o fiação disponível para a instalação e oferece maior flexibilidade de posicionamento, enquanto os interruptores com sensor de parede precisam ser instalados em uma caixa de passagem preexistente.
Etapa 1. Ferramentas Necessárias para a Instalação
Antes de adicionar um sensor de movimento à iluminação, prepare as seguintes ferramentas para agilizar o processo.
- Um sensor de movimento
- Chave de fenda
- Optional
- Wirecutter: to cut wires if necessary
- Wire connectors: most motion sensor light switches would include wire connecters by default in the accessory pack
- Voltage tester: to identify the hotwire and ensure the voltage is off
- Electrical tapes: to mark the hotwire
- Junction box: for fixing and installing the motion sensor
Etapa 2. Posicione o Sensor de Movimento
Turn off the power to the light which you want to add a motion sensor to. Find a place where you want to install the motion sensor between the power source from your house to the light.
Install a junction box and cut the hot wire and neutral wire for installing and fixing the motion sensor, if needed.
Now we mark the hot wire and load wire.
Você Também Pode Se Interessar Por

- Tensão: 2 Pilhas AAA
- Modo Dia/Noite
- Atraso de tempo: 15min, 30min, 1h(padrão), 2h

- Sensor de ocupação PIR para montagem no teto com saída de relé de contato seco
- Alimentação de baixa tensão de 12/24VDC ou 12/24VAC
- Contatos de relé isolados COM, NO e NC para entradas de EMS, HVAC e controle predial

- Interruptor sensor de movimento de micro-ondas embutido no teto em baixa tensão CC
- Entrada de 12 VDC / 24 VDC com faixa de 10-30 VDC
- Corrente máxima de trabalho de 10A com tempo de retardo, limite Lux e sensibilidade ajustáveis
- Interruptor sensor de movimento de micro-ondas embutido no teto para maior carga
- Entrada de tensão de rede de 100-265 VAC, modelo 10A
- Detecção de micro-ondas de 5,8 GHz com tempo de atraso, limite de Lux e sensibilidade ajustáveis
- Interruptor de sensor de movimento de micro-ondas embutido para teto
- Entrada de tensão de rede de 100-265 VAC, modelo 5A
- Detecção de micro-ondas de 5,8 GHz com tempo de atraso, limite de Lux e sensibilidade ajustáveis
- Dimmer de sensor de presença PIR para teto RZ037 para alimentação de 220V
- Corrente máxima de trabalho de 3A com carga nominal de 660W
- O botão LUX controla o Ligar/Desligar do sensor de luz e o brilho de dimerização definido pelo usuário
- Dimmer de sensor de presença PIR para teto RZ037 para alimentação de 110V
- Corrente máxima de trabalho de 3A com carga nominal de 330W
- O botão LUX controla o Ligar/Desligar do sensor de luz e o brilho de dimerização definido pelo usuário

- Interruptor de sensor de movimento de micro-ondas para teto em baixa tensão CC
- Entrada de 12 VDC / 24 VDC com faixa de 10-30 VDC
- Corrente máxima de trabalho de 10A com tempo de retardo, limite Lux e sensibilidade ajustáveis
- Interruptor de sensor de movimento de micro-ondas para teto de maior carga
- Entrada de tensão de rede de 100-265 VAC, modelo 10A
- Detecção de micro-ondas de 5,8 GHz com tempo de atraso, limite de Lux e sensibilidade ajustáveis
- Interruptor com sensor de movimento por micro-ondas para montagem no teto
- Entrada de tensão de rede de 100-265 VAC, modelo 5A
- Detecção de micro-ondas de 5,8 GHz com tempo de atraso, limite de Lux e sensibilidade ajustáveis

- Interruptor com sensor de movimento PIR de teto embutido CC de baixa tensão
- Entrada de 12 VDC / 24 VDC com faixa de 10-30 VDC
- Corrente máxima de trabalho de 10A com tempo de atraso, limite de Lux e sensibilidade ajustáveis

- Interruptor com sensor de movimento PIR de teto embutido para maior carga
- Entrada de tensão de rede de 100-265 VAC, modelo 10A
- Detecção de 360 graus com tempo de atraso, limite de Lux e sensibilidade ajustáveis
- Interruptor com sensor de movimento PIR de teto embutido
- Entrada de tensão de rede de 100-265 VAC, modelo 5A
- Detecção de 360 graus com tempo de atraso, limite de Lux e sensibilidade ajustáveis

- Kit de receptor e interruptor sem fio para controle de iluminação LIGA/DESLIGA em ambientes internos
- Receptor de 100-230VAC, 50/60Hz com corrente nominal de 5A
- Interruptor sem fio alimentado por CR2032 com comunicação de 2,4 GHz
- Ocupação (LIGA automático/DESLIGA automático)
- 12–24V CC (10–30VDC), até 10A
- Cobertura de 360°, 8–12 m de diâmetro
- Temporização: 15 s–30 min
- Sensor de luz: Desligado/15/25/35 Lux
- Sensibilidade Alta/Baixa
- Modo de ocupação Liga-Automático/Desliga-Automático
- 100–265V AC, 10A (neutro obrigatório)
- Cobertura de 360°; diâmetro de detecção de 8–12 m
- Temporização: 15 s–30 min; Lux DESLIGADO/15/25/35; Sensibilidade Alta/Baixa
- Modo de ocupação Liga-Automático/Desliga-Automático
- 100–265V AC, 5A (neutro obrigatório)
- Cobertura de 360°; diâmetro de detecção de 8–12 m
- Temporização: 15 s–30 min; Lux DESLIGADO/15/25/35; Sensibilidade Alta/Baixa
- Turn on the power and use the non-contact voltage tester to test each black wire in the junction box. The hot wire has power but the load wire to your light does not have power.
- Turn off the power and use the non-contact voltage tester to confirm.
- Mark the hot wire with electrical tapes if needed.
Etapa 3. Conecte o Sensor de Movimento à Luminária
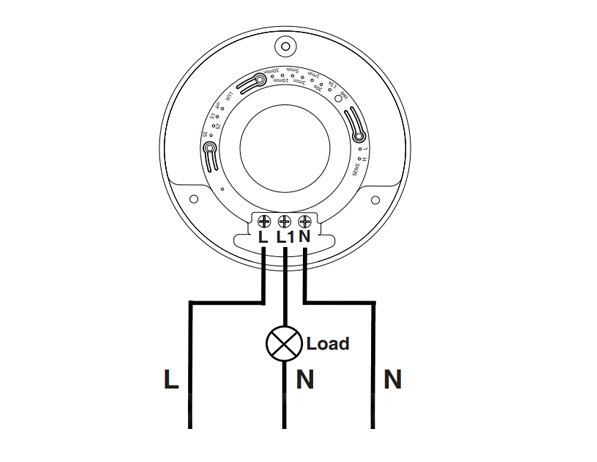
This is a standard motion sensor wiring diagram and you can apply nearly all wirings like above. The wiring is pretty straightforward, similar to installing a motion sensor light switch.
Procurando soluções de economia de energia ativadas por movimento?
Entre em contato conosco para sensores de movimento PIR completos, produtos de economia de energia ativados por movimento, interruptores com sensor de movimento e soluções comerciais de Presença/Ausência (Occupancy/Vacancy).
There are only 3 wires needed. The L is for line wire or hot wire, which is the power source from your house. The L1 is for load wire which powers the lights. The N is the neutral wire, and you only need to simply wire them together.
- Connect the hot wire from your house to the hot wire on the motion sensor.
- Connect the load wire to your light to the load wire on the motion sensor.
- Connect the neutral wire from your house to the neutral wire on the motion sensor.
Etapa 4. Ajuste o Sensor de Movimento
Now we partially screw the motion sensor into the junction box and turn on the power for testing the best setting.
Test a couple of times and adjust the motion sensor’s setting to the best value, such as time delay, motion detection sensitivity, light sensor LUX.
Alter the motion sensor to ensure it can detect the ideal motion detection area. Install and screw tight the motion sensor.








I’ve never heard of a “load wire”. Only HOT (black) Neutral (white) and ground (green). What is a load wire?
Hi Patrick,
A “load wire” is the wire that connects the sensor with the load. In this case, the load is the light connected and driven by the motion sensor.
Say you want to control your light with a motion sensor.
The motion sensor draws power from the hot wire and it needs to send the power to the light via the load wire. Now the sensor can control when to keep the light ON or OFF because the light is directly powered by the motion sensor.
A load wire may have different colors, usually red or black. Some motion sensors may have hot wire and load wire the same color and they are interchangeable. You need to refer to your sensor’s manual for this part.
Most motion sensors have a load wire and control the lighting in this way. If your motion sensor does not have a load wire, it is mostly a wireless sensor that needs to be integrated into a smart home system so that the light is controlled by other means.
Nice article very well written. It answered the questions i had. Thank you.
How much would an electrician charge for something like this?
Hi, I don’t understand how connecting one wire (load) to the light makes it work what about the neutral wire from the lights
Cuando ce cobra por estos trabajos