

Utilizing a motion-activated light at homes, offices, or public indoor spaces could significantly reduce electricity waste while adding a hands-free, automated lighting experience. Most of the time, a interrupteur à détecteur de mouvement is the optimal solution for indoor use because it’s easy to upgrade and replace your existing wall switch and the wall sensor switch is more accessible for users to have manual override control.
Sommaire
- Step 1. Prepare Tools for Installation
- Step 2. Place the Motion Sensor
- Step 3. Wire the Motion Sensor to the Light
- Step 4. Adjust the Motion Sensor
Sometimes we need to detect motion from a broader coverage where a motion sensor light switch is incompetent with the restricted detecting area on the wall. In this case, a ceiling mount motion sensor or a standalone motion detector located on the wall, which can detect people from up to a 360 degree with a larger sensitivity zone, can perfectly solve our problem.
Another benefit of adding a motion sensor, i.e., a détecteur de présence, to your existing light is that you can have automatic ON/OFF lighting, which is completely hands-free and suitable for public rooms and offices. Additionally, a ceiling occupancy sensor only requires available wirings for installation and is more flexible with where you place it, while the wall sensor switches must be installed into a pre-existing wallbox.
Step 1. Prepare Tools for Installation
Before we add a motion sensor to the light, prepare these tools first so we can speed up the process.
- A motion sensor
- Tournevis
- En option
- Pince coupante : pour couper les fils si nécessaire
- Wire connectors: most motion sensor light switches would include wire connecters by default in the accessory pack
- Voltage tester: to identify the hotwire and ensure the voltage is off
- Electrical tapes: to mark the hotwire
- Junction box: for fixing and installing the motion sensor
Step 2. Place the Motion Sensor
Turn off the power to the light which you want to add a motion sensor to. Find a place where you want to install the motion sensor between the power source from your house to the light.
Install a junction box and cut the hot wire and neutral wire for installing and fixing the motion sensor, if needed.
Now we mark the hot wire and load wire.
Ces produits pourraient vous intéresser

- Tension : 2 piles AAA
- Mode Jour/Nuit
- Temporisation : 15 min, 30 min, 1 h (par défaut), 2 h

- Détecteur de présence PIR pour montage au plafond avec sortie relais à contact sec
- Alimentation basse tension 12/24VDC ou 12/24VAC
- Contacts relais isolés COM, NO et NC pour les entrées de régulation CVC, GTC et de gestion de l'énergie

- Interrupteur détecteur de mouvement hyperfréquence encastré pour plafond basse tension continue
- Entrée 12 VDC / 24 VDC avec plage de 10-30 VDC
- Courant de fonctionnement maximal de 10A avec temporisation, seuil Lux et sensibilité réglables
- Interrupteur détecteur de mouvement à micro-ondes encastré au plafond pour charges plus élevées
- Entrée de tension secteur 100-265 VAC, modèle 10A
- Détection hyperfréquence (micro-ondes) 5,8 GHz avec temporisation, seuil Lux et sensibilité réglables
- Interrupteur détecteur de mouvement à micro-ondes encastré au plafond
- Entrée de tension secteur 100-265 VAC, modèle 5A
- Détection hyperfréquence (micro-ondes) 5,8 GHz avec temporisation, seuil Lux et sensibilité réglables
- Variateur détecteur de présence PIR RZ037 pour montage au plafond pour alimentation 220V
- Courant de fonctionnement maximal de 3A avec une charge nominale de 660W
- Le bouton LUX contrôle la marche/arrêt du capteur de lumière et la luminosité de variation réglée par l'utilisateur
- Variateur détecteur de présence PIR RZ037 pour montage au plafond pour alimentation 110V
- Courant de fonctionnement maximal de 3A avec une charge nominale de 330W
- Le bouton LUX contrôle la marche/arrêt du capteur de lumière et la luminosité de variation réglée par l'utilisateur

- Interrupteur détecteur de mouvement à micro-ondes basse tension CC pour montage au plafond
- Entrée 12 VDC / 24 VDC avec plage de 10-30 VDC
- Courant de fonctionnement maximal de 10A avec temporisation, seuil Lux et sensibilité réglables
- Interrupteur détecteur de mouvement à micro-ondes pour montage au plafond pour charges plus élevées
- Entrée de tension secteur 100-265 VAC, modèle 10A
- Détection hyperfréquence (micro-ondes) 5,8 GHz avec temporisation, seuil Lux et sensibilité réglables
- Interrupteur à détecteur de mouvement hyperfréquence pour montage au plafond
- Entrée de tension secteur 100-265 VAC, modèle 5A
- Détection hyperfréquence (micro-ondes) 5,8 GHz avec temporisation, seuil Lux et sensibilité réglables

- Interrupteur à détecteur de mouvement PIR encastré pour plafond à basse tension CC
- Entrée 12 VDC / 24 VDC avec plage de 10-30 VDC
- Courant de fonctionnement maximal de 10A avec temporisation, seuil Lux et sensibilité réglables

- Interrupteur à détecteur de mouvement PIR encastré pour plafond pour charges plus élevées
- Entrée de tension secteur 100-265 VAC, modèle 10A
- Détection à 360 degrés avec temporisation, seuil Lux et sensibilité réglables
- Interrupteur à détecteur de mouvement PIR encastré pour plafond
- Entrée de tension secteur 100-265 VAC, modèle 5A
- Détection à 360 degrés avec temporisation, seuil Lux et sensibilité réglables

- Kit d’interrupteur sans fil et récepteur pour le contrôle de l’éclairage intérieur MARCHE/ARRÊT
- Récepteur 100-230VAC, 50/60Hz avec courant nominal de 5A
- Interrupteur sans fil alimenté par pile CR2032 avec communication 2.4GHz
- Détection d'occupation (Auto-ON/Auto-OFF)
- 12–24V DC (10–30VDC), jusqu'à 10A
- Couverture 360°, diamètre de 8–12 m
- Temporisation 15 s–30 min
- Capteur de luminosité Désactivé/15/25/35 Lux
- Sensibilité Haute/Basse
- Mode d'occupation Auto-ON/Auto-OFF
- 100–265V AC, 10A (neutre requis)
- Couverture 360° ; diamètre de détection 8–12 m
- Temporisation 15 s–30 min ; Lux Désactivé/15/25/35 ; Sensibilité Haute/Basse
- Mode d'occupation Auto-ON/Auto-OFF
- 100–265V AC, 5A (neutre requis)
- Couverture 360° ; diamètre de détection 8–12 m
- Temporisation 15 s–30 min ; Lux Désactivé/15/25/35 ; Sensibilité Haute/Basse
- Turn on the power and use the non-contact voltage tester to test each black wire in the junction box. The hot wire has power but the load wire to your light does not have power.
- Turn off the power and use the non-contact voltage tester to confirm.
- Mark the hot wire with electrical tapes if needed.
Step 3. Wire the Motion Sensor to the Light
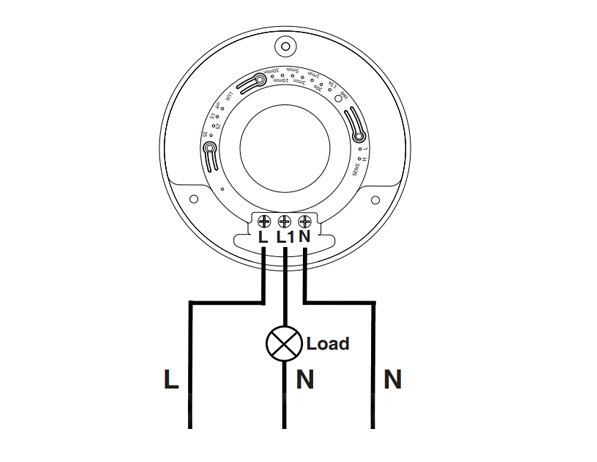
This is a standard motion sensor wiring diagram and you can apply nearly all wirings like above. The wiring is pretty straightforward, similar to installing a motion sensor light switch.
Vous recherchez des solutions d’économie d’énergie activées par le mouvement ?
Contactez-nous pour obtenir une gamme complète de détecteurs de mouvement PIR, de produits d’économie d’énergie activés par le mouvement, d’interrupteurs à détecteur de mouvement et de solutions commerciales de présence/vacance.
There are only 3 wires needed. The L is for line wire or hot wire, which is the power source from your house. The L1 is for load wire which powers the lights. The N is the neutral wire, and you only need to simply wire them together.
- Connect the hot wire from your house to the hot wire on the motion sensor.
- Connect the load wire to your light to the load wire on the motion sensor.
- Connect the neutral wire from your house to the neutral wire on the motion sensor.
Step 4. Adjust the Motion Sensor
Now we partially screw the motion sensor into the junction box and turn on the power for testing the best setting.
Test a couple of times and adjust the motion sensor’s setting to the best value, such as time delay, motion detection sensitivity, light sensor LUX.
Alter the motion sensor to ensure it can detect the ideal motion detection area. Install and screw tight the motion sensor.








I’ve never heard of a “load wire”. Only HOT (black) Neutral (white) and ground (green). What is a load wire?
Bonjour Patrick,
Un “ câble de charge ” est le câble qui relie le détecteur à la charge. Dans ce cas, la charge correspond au luminaire raccordé et piloté par le détecteur de mouvement.
Imaginons que vous souhaitiez contrôler votre éclairage à l'aide d'un détecteur de mouvement.
Le détecteur de mouvement est alimenté par la phase (fil sous tension) et doit transmettre cette alimentation au luminaire via le câble de charge. Le détecteur peut ainsi contrôler l'allumage ou l'extinction du luminaire, car ce dernier est directement alimenté par le détecteur de mouvement.
Un câble de charge peut être de différentes couleurs, généralement rouge ou noir. Sur certains détecteurs de mouvement, le câble de phase et le câble de charge sont de la même couleur et sont intervertibles. Veuillez vous référer au manuel de votre détecteur pour ce point spécifique.
La plupart des détecteurs de mouvement disposent d'un câble de charge et contrôlent l'éclairage de cette manière. Si votre détecteur de mouvement ne comporte pas de câble de charge, il s'agit généralement d'un détecteur sans fil devant être intégré à un système domotique afin que l'éclairage soit contrôlé par d'autres moyens.
Excellent article, très bien rédigé. Il a répondu à mes questions. Merci.
How much would an electrician charge for something like this?
Hi, I don’t understand how connecting one wire (load) to the light makes it work what about the neutral wire from the lights
Cuando ce cobra por estos trabajos