

Menggunakan lampu sensor gerak di rumah, kantor, atau ruang dalam ruangan umum dapat mengurangi pemborosan listrik secara signifikan sekaligus memberikan pengalaman pencahayaan otomatis bebas genggam. Sebagian besar waktu, sebuah sakelar lampu sensor gerak merupakan solusi optimal untuk penggunaan dalam ruangan karena mudah untuk meningkatkan dan mengganti sakelar dinding yang ada, serta sakelar sensor dinding lebih mudah diakses oleh pengguna untuk memiliki kontrol alih manual.
Daftar Isi
- Langkah 1. Siapkan Alat untuk Instalasi
- Langkah 2. Tempatkan Sensor Gerak
- Langkah 3. Hubungkan Kabel Sensor Gerak ke Lampu
- Langkah 4. Sesuaikan Sensor Gerak
Terkadang kita perlu mendeteksi gerakan dari cakupan yang lebih luas di mana sakelar lampu sensor gerak tidak memadai akibat area pendeteksian yang terbatas pada dinding. Dalam hal ini, sensor gerak langit-langit atau sebuah detektor gerak mandiri yang terletak di dinding, yang dapat mendeteksi orang hingga 360 derajat dengan zona sensitivitas yang lebih besar, dapat menyelesaikan masalah kita dengan sempurna.
Manfaat lain dari menambahkan sensor gerak, yaitu sebuah sensor okupansi, ke lampu yang ada adalah Anda dapat memiliki pencahayaan otomatis NYALA/MATI, yang sepenuhnya bebas genggam dan cocok untuk ruang umum serta kantor. Selain itu, sensor okupansi langit-langit hanya memerlukan pengabelan yang tersedia untuk instalasi dan lebih fleksibel mengenai lokasi penempatannya, sedangkan sakelar sensor dinding harus diinstal ke dalam kotak dinding (wallbox) yang sudah ada sebelumnya.
Langkah 1. Siapkan Alat untuk Instalasi
Sebelum kita menambahkan sensor gerak ke lampu, siapkan alat-alat ini terlebih dahulu agar kita dapat mempercepat prosesnya.
- Sebuah sensor gerak
- Obeng
- Opsional
- Pemotong kabel: untuk memotong kabel jika diperlukan
- Konektor kabel: sebagian besar sakelar lampu sensor gerak akan menyertakan konektor kabel secara default dalam paket aksesori
- Penguji tegangan (tespen): untuk mengidentifikasi kabel berarus listrik dan memastikan tegangan mati
- Electrical tapes: to mark the hotwire
- Junction box: for fixing and installing the motion sensor
Langkah 2. Tempatkan Sensor Gerak
Turn off the power to the light which you want to add a motion sensor to. Find a place where you want to install the motion sensor between the power source from your house to the light.
Install a junction box and cut the hot wire and neutral wire for installing and fixing the motion sensor, if needed.
Now we mark the hot wire and load wire.
Mungkin Anda Tertarik Dengan

- Tegangan: 2 Baterai AAA
- Mode Siang/Malam
- Penundaan waktu: 15 menit, 30 menit, 1 jam (default), 2 jam

- Sensor keterhunian PIR pemasangan di langit-langit dengan output relai kontak kering
- Suplai tegangan rendah 12/24VDC atau 12/24VAC
- Kontak relai terisolasi COM, NO, dan NC untuk input EMS, HVAC, dan kontrol bangunan

- Sakelar sensor gerak gelombang mikro pemasangan tanam di langit-langit bertegangan rendah DC
- Input 12 VDC / 24 VDC dengan rentang 10-30 VDC
- Arus kerja maksimum 10A dengan penundaan waktu, ambang batas Lux, dan sensitivitas yang dapat disesuaikan
- Sakelar sensor gerak gelombang mikro pemasangan tanam di langit-langit untuk beban lebih tinggi
- Input tegangan saluran 100-265 VAC, model 10A
- Deteksi gelombang mikro 5,8 GHz dengan penundaan waktu, ambang batas Lux, dan sensitivitas yang dapat disesuaikan
- Sakelar sensor gerak gelombang mikro terpasang rata (recessed) pada langit-langit
- Input tegangan saluran 100-265 VAC, model 5A
- Deteksi gelombang mikro 5,8 GHz dengan penundaan waktu, ambang batas Lux, dan sensitivitas yang dapat disesuaikan
- Dimmer sensor keberadaan PIR RZ037 pasang langit-langit untuk daya 220V
- Arus kerja maksimum 3A dengan beban terukur 660W
- Tombol LUX mengontrol ON/OFF sensor cahaya dan kecerahan redup yang diatur pengguna
- Dimmer sensor keberadaan PIR RZ037 pasang langit-langit untuk daya 110V
- Arus kerja maksimum 3A dengan beban terukur 330W
- Tombol LUX mengontrol ON/OFF sensor cahaya dan kecerahan redup yang diatur pengguna

- Sakelar sensor gerak gelombang mikro pasang langit-langit DC tegangan rendah
- Input 12 VDC / 24 VDC dengan rentang 10-30 VDC
- Arus kerja maksimum 10A dengan penundaan waktu, ambang batas Lux, dan sensitivitas yang dapat disesuaikan
- Sakelar sensor gerak gelombang mikro pasang langit-langit untuk beban lebih tinggi
- Input tegangan saluran 100-265 VAC, model 10A
- Deteksi gelombang mikro 5,8 GHz dengan penundaan waktu, ambang batas Lux, dan sensitivitas yang dapat disesuaikan
- Sakelar sensor gerak gelombang mikro pasang langit-langit
- Input tegangan saluran 100-265 VAC, model 5A
- Deteksi gelombang mikro 5,8 GHz dengan penundaan waktu, ambang batas Lux, dan sensitivitas yang dapat disesuaikan

- Sakelar sensor gerak PIR terpasang rata (recessed) pada langit-langit DC tegangan rendah
- Input 12 VDC / 24 VDC dengan rentang 10-30 VDC
- Arus kerja maks 10A dengan penundaan waktu, ambang batas Lux, dan sensitivitas yang dapat disesuaikan

- Sakelar sensor gerak PIR pemasangan plafon tanam beban lebih tinggi
- Input tegangan saluran 100-265 VAC, model 10A
- Deteksi 360 derajat dengan penundaan waktu, ambang batas Lux, dan sensitivitas yang dapat disesuaikan
- Sakelar sensor gerak PIR pemasangan plafon tanam
- Input tegangan saluran 100-265 VAC, model 5A
- Deteksi 360 derajat dengan penundaan waktu, ambang batas Lux, dan sensitivitas yang dapat disesuaikan

- Kit sakelar dan penerima nirkabel untuk kontrol pencahayaan ON/OFF dalam ruangan
- Penerima 100-230VAC, 50/60Hz dengan arus pengenal 5A
- Sakelar nirkabel berdaya baterai CR2032 dengan komunikasi 2,4GHz
- Okupansi (Auto-ON/Auto-OFF)
- 12–24V DC (10–30VDC), hingga 10A
- Cakupan 360°, diameter 8–12 m
- Penundaan waktu 15 dtk–30 mnt
- Sensor cahaya Mati/15/25/35 Lux
- Sensitivitas Tinggi/Rendah
- Mode okupansi Auto-ON/Auto-OFF
- 100–265V AC, 10A (memerlukan netral)
- Cakupan 360°; diameter deteksi 8–12 m
- Penundaan waktu 15 dtk–30 mnt; Lux NONAKTIF/15/25/35; Sensitivitas Tinggi/Rendah
- Mode okupansi Auto-ON/Auto-OFF
- 100–265V AC, 5A (memerlukan netral)
- Cakupan 360°; diameter deteksi 8–12 m
- Penundaan waktu 15 dtk–30 mnt; Lux NONAKTIF/15/25/35; Sensitivitas Tinggi/Rendah
- Turn on the power and use the non-contact voltage tester to test each black wire in the junction box. The hot wire has power but the load wire to your light does not have power.
- Turn off the power and use the non-contact voltage tester to confirm.
- Mark the hot wire with electrical tapes if needed.
Langkah 3. Hubungkan Kabel Sensor Gerak ke Lampu
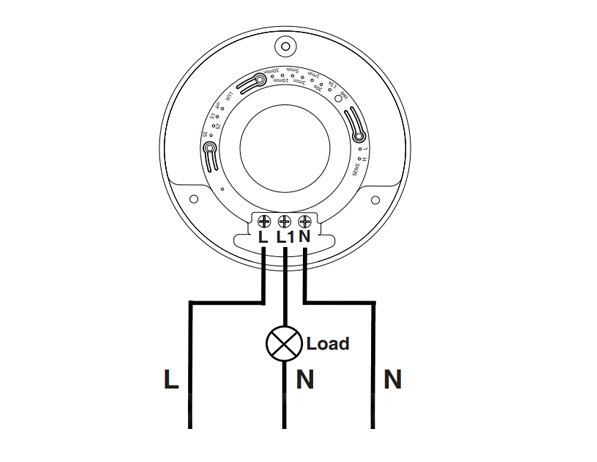
This is a standard motion sensor wiring diagram and you can apply nearly all wirings like above. The wiring is pretty straightforward, similar to installing a motion sensor light switch.
Mencari Solusi Hemat Energi Berbasis Gerakan?
Hubungi kami untuk sensor gerak PIR lengkap, produk hemat energi yang diaktifkan oleh gerakan, sakelar sensor gerak, serta solusi komersial Okupansi/Vakansi.
There are only 3 wires needed. The L is for line wire or hot wire, which is the power source from your house. The L1 is for load wire which powers the lights. The N is the neutral wire, and you only need to simply wire them together.
- Connect the hot wire from your house to the hot wire on the motion sensor.
- Connect the load wire to your light to the load wire on the motion sensor.
- Connect the neutral wire from your house to the neutral wire on the motion sensor.
Langkah 4. Sesuaikan Sensor Gerak
Now we partially screw the motion sensor into the junction box and turn on the power for testing the best setting.
Test a couple of times and adjust the motion sensor’s setting to the best value, such as time delay, motion detection sensitivity, light sensor LUX.
Alter the motion sensor to ensure it can detect the ideal motion detection area. Install and screw tight the motion sensor.








I’ve never heard of a “load wire”. Only HOT (black) Neutral (white) and ground (green). What is a load wire?
Hi Patrick,
A “load wire” is the wire that connects the sensor with the load. In this case, the load is the light connected and driven by the motion sensor.
Say you want to control your light with a motion sensor.
The motion sensor draws power from the hot wire and it needs to send the power to the light via the load wire. Now the sensor can control when to keep the light ON or OFF because the light is directly powered by the motion sensor.
A load wire may have different colors, usually red or black. Some motion sensors may have hot wire and load wire the same color and they are interchangeable. You need to refer to your sensor’s manual for this part.
Most motion sensors have a load wire and control the lighting in this way. If your motion sensor does not have a load wire, it is mostly a wireless sensor that needs to be integrated into a smart home system so that the light is controlled by other means.
Artikel yang sangat bagus dan ditulis dengan amat baik. Artikel ini menjawab pertanyaan-pertanyaan yang saya miliki. Terima kasih.
Berapa biaya yang dikenakan oleh teknisi listrik untuk pekerjaan seperti ini?
Hi, I don’t understand how connecting one wire (load) to the light makes it work what about the neutral wire from the lights
Cuando ce cobra por estos trabajos