

การใช้ไฟเปิด-ปิดอัตโนมัติตามการเคลื่อนไหวในบ้าน สำนักงาน หรือพื้นที่ภายในอาคารสาธารณะ สามารถช่วยลดการสิ้นเปลืองพลังงานไฟฟ้าได้อย่างมาก พร้อมทั้งมอบประสบการณ์การส่องสว่างแบบอัตโนมัติโดยไม่ต้องใช้มือเปิด-ปิด โดยส่วนใหญ่แล้ว สวิตช์ไฟเซนเซอร์ตรวจจับการเคลื่อนไหว คือทางเลือกที่เหมาะสมที่สุดสำหรับการใช้งานภายในอาคาร เนื่องจากสามารถอัปเกรดและแทนที่สวิตช์ผนังเดิมได้ง่าย อีกทั้งสวิตช์เซนเซอร์แบบติดผนังยังช่วยให้ผู้ใช้เข้าถึงการควบคุมแบบแมนนวลเพื่อเปิด-ปิดเองได้สะดวกยิ่งขึ้น.
สารบัญ
- ขั้นตอนที่ 1 เตรียมเครื่องมือสำหรับติดตั้ง
- ขั้นตอนที่ 2 จัดวางตำแหน่งเซนเซอร์ตรวจจับการเคลื่อนไหว
- ขั้นตอนที่ 3 ต่อสายไฟจากเซนเซอร์ตรวจจับการเคลื่อนไหวเข้ากับโคมไฟ
- ขั้นตอนที่ 8 ปรับแต่งค่าเซนเซอร์ตรวจจับการเคลื่อนไหว
ในบางครั้ง เราจำเป็นต้องตรวจจับการเคลื่อนไหวในพื้นที่ครอบคลุมที่กว้างขึ้น ซึ่งสวิตช์ไฟเซนเซอร์ตรวจจับการเคลื่อนไหวแบบติดผนังอาจไม่สามารถทำงานได้ครอบคลุมเนื่องจากมีพื้นที่ตรวจจับที่จำกัด ในกรณีนี้ เซนเซอร์ตรวจจับการเคลื่อนไหวแบบติดเพดานหรือ อุปกรณ์ตรวจจับการเคลื่อนไหว แบบแยกส่วนที่ติดตั้งบนผนัง ซึ่งสามารถตรวจจับบุคคลได้สูงสุดถึง 360 องศาพร้อมรัศมีตรวจจับที่กว้างขึ้น จะสามารถแก้ปัญหานี้ได้อย่างสมบูรณ์แบบ.
ข้อดีอีกประการของการติดตั้งเซนเซอร์ตรวจจับการเคลื่อนไหว หรือ เซนเซอร์ตรวจจับการเข้าใช้พื้นที่, เพิ่มเติมเข้ากับโคมไฟเดิมของคุณ คือคุณจะได้ระบบส่องสว่างที่เปิด-ปิดอัตโนมัติ ซึ่งไม่ต้องใช้มือสัมผัสเลยแม้แต่น้อย และเหมาะอย่างยิ่งสำหรับห้องสาธารณะและสำนักงาน นอกจากนี้, เซนเซอร์ตรวจจับการเข้าใช้พื้นที่แบบติดเพดาน ต้องการเพียงสายไฟที่สามารถเชื่อมต่อได้สำหรับการติดตั้ง และมีความยืดหยุ่นสูงกว่าในการเลือกตำแหน่งติดตั้ง ในขณะที่สวิตช์เซนเซอร์แบบติดผนังจำเป็นต้องติดตั้งเข้ากับกล่องสวิตช์บนผนังที่มีอยู่เดิมเท่านั้น.
ขั้นตอนที่ 1 เตรียมเครื่องมือสำหรับติดตั้ง
ก่อนที่เราจะต่อเซนเซอร์ตรวจจับการเคลื่อนไหวเข้ากับโคมไฟ โปรดเตรียมเครื่องมือเหล่านี้ให้พร้อมเพื่อช่วยให้ขั้นตอนการทำงานรวดเร็วยิ่งขึ้น.
- เซนเซอร์ตรวจจับการเคลื่อนไหว
- ไขควง
- อุปกรณ์เสริม
- Wirecutter: to cut wires if necessary
- Wire connectors: most motion sensor light switches would include wire connecters by default in the accessory pack
- Voltage tester: to identify the hotwire and ensure the voltage is off
- Electrical tapes: to mark the hotwire
- Junction box: for fixing and installing the motion sensor
ขั้นตอนที่ 2 จัดวางตำแหน่งเซนเซอร์ตรวจจับการเคลื่อนไหว
Turn off the power to the light which you want to add a motion sensor to. Find a place where you want to install the motion sensor between the power source from your house to the light.
Install a junction box and cut the hot wire and neutral wire for installing and fixing the motion sensor, if needed.
Now we mark the hot wire and load wire.
คุณอาจสนใจ

- แรงดันไฟฟ้า: ถ่าน AAA 2 ก้อน
- โหมดกลางวัน/กลางคืน
- การหน่วงเวลา: 15 นาที, 30 นาที, 1 ชั่วโมง (ค่าเริ่มต้น), 2 ชั่วโมง

- เซนเซอร์ตรวจจับการถือครองห้อง PIR ติดตั้งบนเพดาน พร้อมเอาต์พุตรีเลย์หน้าสัมผัสแห้ง
- ระบบจ่ายไฟแรงดันต่ำ 12/24VDC หรือ 12/24VAC
- หน้าสัมผัสรีเลย์แบบแยก COM, NO และ NC สำหรับสัญญาณอินพุตของระบบ EMS, HVAC และระบบควบคุมอาคาร

- สวิตช์เซนเซอร์ตรวจจับการเคลื่อนไหวด้วยไมโครเวฟแบบติดเพดานฝังฝ้า ไฟฟ้ากระแสตรงแรงดันต่ำ
- อินพุต 12 VDC / 24 VDC พร้อมช่วงรองรับ 10-30 VDC
- กระแสไฟฟ้าทำงานสูงสุด 10A พร้อมการปรับตั้งค่าเวลาหน่วง เกณฑ์ค่า Lux และความไวในการตรวจจับ
- สวิตช์เซนเซอร์ตรวจจับการเคลื่อนไหวด้วยไมโครเวฟแบบติดเพดานฝังฝ้า สำหรับโหลดสูง
- อินพุตแรงดันสาย 100-265 VAC รุ่น 10A
- ระบบตรวจจับด้วยไมโครเวฟความถี่ 5.8 GHz พร้อมการปรับตั้งค่าเวลาหน่วง เกณฑ์ค่า Lux และความไวในการตรวจจับ
- สวิตช์เซนเซอร์ตรวจจับการเคลื่อนไหวด้วยไมโครเวฟแบบติดเพดานฝังฝ้า
- อินพุตแรงดันสาย 100-265 VAC รุ่น 5A
- ระบบตรวจจับด้วยไมโครเวฟความถี่ 5.8 GHz พร้อมการปรับตั้งค่าเวลาหน่วง เกณฑ์ค่า Lux และความไวในการตรวจจับ
- สวิตช์หรี่ไฟเซนเซอร์ตรวจจับการเข้าใช้พื้นที่ระบบ PIR รุ่น RZ037 แบบติดเพดาน สำหรับระบบไฟฟ้า 220V
- กระแสไฟฟ้าทำงานสูงสุด 3A พร้อมโหลดพิกัด 660W
- ปุ่ม LUX ควบคุมการเปิด/ปิดเซนเซอร์แสง และความสว่างในการหรี่ไฟที่ผู้ใช้กำหนด
- สวิตช์หรี่ไฟเซนเซอร์ตรวจจับการเข้าใช้พื้นที่ระบบ PIR รุ่น RZ037 แบบติดเพดาน สำหรับระบบไฟฟ้า 110V
- กระแสไฟฟ้าทำงานสูงสุด 3A พร้อมโหลดพิกัด 330W
- ปุ่ม LUX ควบคุมการเปิด/ปิดเซนเซอร์แสง และความสว่างในการหรี่ไฟที่ผู้ใช้กำหนด

- สวิตช์เซนเซอร์ตรวจจับการเคลื่อนไหวด้วยไมโครเวฟแบบติดเพดาน ไฟฟ้ากระแสตรงแรงดันต่ำ
- อินพุต 12 VDC / 24 VDC พร้อมช่วงรองรับ 10-30 VDC
- กระแสไฟฟ้าทำงานสูงสุด 10A พร้อมการปรับตั้งค่าเวลาหน่วง เกณฑ์ค่า Lux และความไวในการตรวจจับ
- สวิตช์เซนเซอร์ตรวจจับความเคลื่อนไหวคลื่นไมโครเวฟแบบติดเพดาน รองรับโหลดสูง
- อินพุตแรงดันสาย 100-265 VAC รุ่น 10A
- ระบบตรวจจับด้วยไมโครเวฟความถี่ 5.8 GHz พร้อมการปรับตั้งค่าเวลาหน่วง เกณฑ์ค่า Lux และความไวในการตรวจจับ
- สวิตช์เซนเซอร์ตรวจจับความเคลื่อนไหวคลื่นไมโครเวฟแบบติดเพดาน
- อินพุตแรงดันสาย 100-265 VAC รุ่น 5A
- ระบบตรวจจับด้วยไมโครเวฟความถี่ 5.8 GHz พร้อมการปรับตั้งค่าเวลาหน่วง เกณฑ์ค่า Lux และความไวในการตรวจจับ

- สวิตช์เซนเซอร์ตรวจจับความเคลื่อนไหว PIR แบบฝังฝ้าเพดาน แรงดันไฟฟ้าต่ำ DC
- อินพุต 12 VDC / 24 VDC พร้อมช่วงรองรับ 10-30 VDC
- กระแสไฟฟ้าทำงานสูงสุด 10A พร้อมระบบปรับตั้งเวลาหน่วง ค่าความสว่าง Lux และความไวในการตรวจจับได้

- สวิตช์เซนเซอร์ตรวจจับความเคลื่อนไหว PIR แบบฝังฝ้าเพดาน รองรับโหลดสูง
- อินพุตแรงดันสาย 100-265 VAC รุ่น 10A
- ระบบตรวจจับ 360 องศา พร้อมระบบปรับตั้งเวลาหน่วง ค่าความสว่าง Lux และความไวในการตรวจจับได้
- สวิตช์เซนเซอร์ตรวจจับความเคลื่อนไหว PIR แบบฝังฝ้าเพดาน
- อินพุตแรงดันสาย 100-265 VAC รุ่น 5A
- ระบบตรวจจับ 360 องศา พร้อมระบบปรับตั้งเวลาหน่วง ค่าความสว่าง Lux และความไวในการตรวจจับได้

- ชุดสวิตช์ไร้สายและตัวรับสัญญาณสำหรับควบคุมการเปิด/ปิดไฟภายในอาคาร
- ตัวรับสัญญาณ 100-230VAC, 50/60Hz พิกัดกระแสไฟฟ้า 5A
- สวิตช์ไร้สายใช้พลังงานจากแบตเตอรี่ CR2032 พร้อมการสื่อสารผ่านความถี่ 2.4GHz
- ตรวจจับการใช้งาน (เปิดอัตโนมัติ/ปิดอัตโนมัติ)
- 12–24V DC (10–30VDC), สูงสุด 10A
- ครอบคลุม 360° เส้นผ่านศูนย์กลาง 8–12 ม.
- หน่วงเวลา 15 วินาที–30 นาที
- เซนเซอร์วัดแสง ปิด/15/25/35 Lux
- ความไวสูง/ต่ำ
- โหมดตรวจจับการใช้งาน เปิดอัตโนมัติ/ปิดอัตโนมัติ
- 100–265V AC, 10A (จำเป็นต้องมีสายสายนิวทรัล)
- ครอบคลุม 360°; เส้นผ่านศูนย์กลางการตรวจจับ 8–12 ม.
- หน่วงเวลา 15 วินาที–30 นาที; Lux ปิด/15/25/35; ความไวสูง/ต่ำ
- โหมดตรวจจับการใช้งาน เปิดอัตโนมัติ/ปิดอัตโนมัติ
- 100–265V AC, 5A (จำเป็นต้องมีสายสายนิวทรัล)
- ครอบคลุม 360°; เส้นผ่านศูนย์กลางการตรวจจับ 8–12 ม.
- หน่วงเวลา 15 วินาที–30 นาที; Lux ปิด/15/25/35; ความไวสูง/ต่ำ
- Turn on the power and use the non-contact voltage tester to test each black wire in the junction box. The hot wire has power but the load wire to your light does not have power.
- Turn off the power and use the non-contact voltage tester to confirm.
- Mark the hot wire with electrical tapes if needed.
ขั้นตอนที่ 3 ต่อสายไฟจากเซนเซอร์ตรวจจับการเคลื่อนไหวเข้ากับโคมไฟ
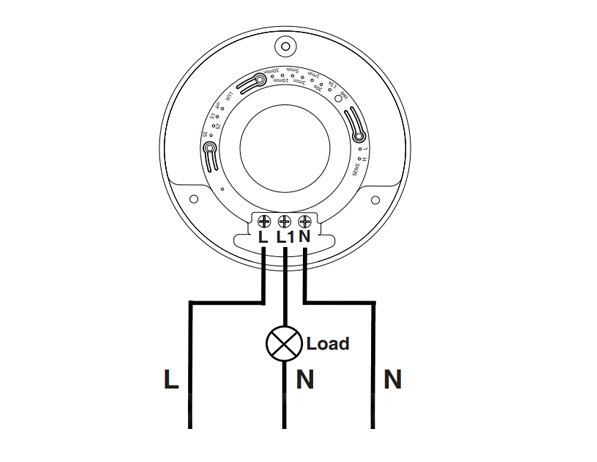
This is a standard motion sensor wiring diagram and you can apply nearly all wirings like above. The wiring is pretty straightforward, similar to installing a motion sensor light switch.
กำลังมองหาโซลูชันประหยัดพลังงานทำงานตามการเคลื่อนไหวอยู่ใช่หรือไม่
ติดต่อเราเพื่อรับโซลูชันครบวงจรสำหรับ PIR motion sensor, ผลิตภัณฑ์ประหยัดพลังงานทำงานตามการเคลื่อนไหว, สวิตช์เซนเซอร์ตรวจจับการเคลื่อนไหว และโซลูชัน Occupancy/Vacancy สำหรับเชิงพาณิชย์.
There are only 3 wires needed. The L is for line wire or hot wire, which is the power source from your house. The L1 is for load wire which powers the lights. The N is the neutral wire, and you only need to simply wire them together.
- Connect the hot wire from your house to the hot wire on the motion sensor.
- Connect the load wire to your light to the load wire on the motion sensor.
- Connect the neutral wire from your house to the neutral wire on the motion sensor.
ขั้นตอนที่ 8 ปรับแต่งค่าเซนเซอร์ตรวจจับการเคลื่อนไหว
Now we partially screw the motion sensor into the junction box and turn on the power for testing the best setting.
Test a couple of times and adjust the motion sensor’s setting to the best value, such as time delay, motion detection sensitivity, light sensor LUX.
Alter the motion sensor to ensure it can detect the ideal motion detection area. Install and screw tight the motion sensor.








I’ve never heard of a “load wire”. Only HOT (black) Neutral (white) and ground (green). What is a load wire?
Hi Patrick,
A “load wire” is the wire that connects the sensor with the load. In this case, the load is the light connected and driven by the motion sensor.
Say you want to control your light with a motion sensor.
The motion sensor draws power from the hot wire and it needs to send the power to the light via the load wire. Now the sensor can control when to keep the light ON or OFF because the light is directly powered by the motion sensor.
A load wire may have different colors, usually red or black. Some motion sensors may have hot wire and load wire the same color and they are interchangeable. You need to refer to your sensor’s manual for this part.
Most motion sensors have a load wire and control the lighting in this way. If your motion sensor does not have a load wire, it is mostly a wireless sensor that needs to be integrated into a smart home system so that the light is controlled by other means.
Nice article very well written. It answered the questions i had. Thank you.
How much would an electrician charge for something like this?
Hi, I don’t understand how connecting one wire (load) to the light makes it work what about the neutral wire from the lights
Cuando ce cobra por estos trabajos