

Brug af en bevægelsesaktiveret lampe i hjemmet, på kontoret eller i offentlige indendørsområder kan reducere strømspild betydeligt og samtidig give en håndfri, automatiseret belysningsoplevelse. Som regel er en lyskontakt med bevægelsessensor den optimale løsning til indendørs brug, fordi det er nemt at opgradere og udskifte din eksisterende vægkontakt, og fordi en vægsensor er mere tilgængelig for brugerne, hvis der er brug for manuel overstyring.
Indhold
- Trin 1. Klargør værktøj til installationen
- Trin 2. Placer bevægelsessensoren
- Trin 3. Forbind bevægelsessensoren til lampen
- Trin 4. Juster bevægelsessensoren
Nogle gange er der brug for at registrere bevægelse over et bredere område, hvor en lyskontakt med bevægelsessensor ikke slår til på grund af det begrænsede registreringsfelt på væggen. I dette tilfælde kan en loftmonteret bevægelsessensor eller en fritstående bevægelsesdetektor placeret på væggen, som kan registrere personer i op til 360 grader med en større følsomhedszone, løse problemet perfekt.
En anden fordel ved at tilføje en bevægelsessensor, dvs. en tilstedeværelsessensor, til din eksisterende belysning er, at du får automatisk tænd/sluk-lys, som er helt håndfrit og velegnet til fællesrum og kontorer. Derudover kræver, en tilstedeværelsessensor til loftet kun tilgængelige ledninger til installationen og giver større fleksibilitet i forhold til placeringen, hvorimod vægsensorer skal installeres i en eksisterende indmuringsdåse.
Trin 1. Klargør værktøj til installationen
Før vi tilføjer en bevægelsessensor til lampen, skal disse værktøjer findes frem, så processen kan fremskyndes.
- En bevægelsessensor
- Skruetrækker
- Valgfrit
- Bidetang: til at afkorte ledninger om nødvendigt
- Samlemuffer: De fleste lyskontakter med bevægelsessensor indeholder som standard samlemuffer i tilbehørspakken
- Spændingstester: Til at identificere den strømførende ledning og sikre, at spændingen er afbrudt
- Isoleringstape: Til at mærke den strømførende ledning
- Samledåse: Til montering og installation af bevægelsessensoren
Trin 2. Placer bevægelsessensoren
Afbryd strømmen til den lampe, som du vil tilføje en bevægelsessensor til. Find et sted, hvor du vil installere bevægelsessensoren mellem strømkilden fra din bolig og lampen.
Install a junction box and cut the hot wire and neutral wire for installing and fixing the motion sensor, if needed.
Now we mark the hot wire and load wire.
Måske er du også interesseret i

- Spænding: 2 AAA-batterier
- Dag/nat-tilstand
- Tidsforsinkelse: 15 min, 30 min, 1 t (standard), 2 t

- Loftmonteret PIR-tilstedeværelsessensor med tørkontaktrelæudgang
- 12/24VDC eller 12/24VAC lavspændingsforsyning
- Isolerede relækontakter (COM, NO og NC) til EMS-, HVAC- og bygningsstyringsindgange

- Lavspændings DC indbygget loftmonteret mikrobølge-bevægelsessensor-afbryder
- 12 VDC / 24 VDC-indgang med 10-30 VDC-område
- Maks. 10A arbejdsstrøm med justerbar tidsforsinkelse, Lux-tærskel og følsomhed
- Indbygget loftmonteret mikrobølge-bevægelsessensor-afbryder til højere belastning
- 100-265 VAC netspændingsindgang, 10A-model
- 5,8 GHz mikrobølgeregistrering med justerbar tidsforsinkelse, Lux-tærskel og følsomhed
- Indbygget loftmonteret mikrobølge-bevægelsessensorkontakt
- 100-265 VAC netspændingsindgang, 5A-model
- 5,8 GHz mikrobølgeregistrering med justerbar tidsforsinkelse, Lux-tærskel og følsomhed
- Loftmonteret RZ037 PIR-tilstedeværelsessensor-dæmper til 220V-strømforsyning
- Maksimal arbejdsstrøm på 3A med 660W nominel belastning
- LUX-knap styrer lyssensor TIL/FRA samt brugerdefineret lysdæmpning
- Loftmonteret RZ037 PIR-tilstedeværelsessensor-dæmper til 110V-strømforsyning
- Maksimal arbejdsstrøm på 3A med 330W nominel belastning
- LUX-knap styrer lyssensor TIL/FRA samt brugerdefineret lysdæmpning

- Lavspændings DC loftmonteret mikrobølge-bevægelsessensorkontakt
- 12 VDC / 24 VDC-indgang med 10-30 VDC-område
- Maks. 10A arbejdsstrøm med justerbar tidsforsinkelse, Lux-tærskel og følsomhed
- Loftmonteret mikrobølge-bevægelsessensorkontakt til højere belastning
- 100-265 VAC netspændingsindgang, 10A-model
- 5,8 GHz mikrobølgeregistrering med justerbar tidsforsinkelse, Lux-tærskel og følsomhed
- Loftmonteret mikrobølge-bevægelsessensorkontakt
- 100-265 VAC netspændingsindgang, 5A-model
- 5,8 GHz mikrobølgeregistrering med justerbar tidsforsinkelse, Lux-tærskel og følsomhed

- Lavspændings DC PIR-bevægelsessensorkontakt til indbygning i loft
- 12 VDC / 24 VDC-indgang med 10-30 VDC-område
- Maks. arbejdsstrøm 10A med justerbar tidsforsinkelse, Lux-tærskel og følsomhed

- PIR-bevægelsessensorkontakt til indbygning i loft til højere belastning
- 100-265 VAC netspændingsindgang, 10A-model
- 360-graders registrering med justerbar tidsforsinkelse, Lux-tærskel og følsomhed
- PIR-bevægelsessensorkontakt til indbygning i loft
- 100-265 VAC netspændingsindgang, 5A-model
- 360-graders registrering med justerbar tidsforsinkelse, Lux-tærskel og følsomhed

- Trådløst kontakt- og modtagersæt til indendørs TÆND/SLUK-belysningsstyring
- 100-230VAC, 50/60Hz modtager med 5A mærkestrøm
- CR2032-drevet trådløs kontakt med 2,4GHz-kommunikation
- Tilstedeværelse (Auto-TÆND/Auto-SLUK)
- 12–24V DC (10–30VDC), op til 10A
- 360° dækning, 8–12 m diameter
- Tidsforsinkelse 15 s–30 min
- Lyssensor Fra/15/25/35 Lux
- Høj/Lav følsomhed
- Auto-ON/Auto-OFF tilstedeværelsestilstand
- 100–265V AC, 10A (nulleder påkrævet)
- 360° dækning; 8–12 m detekteringsdiameter
- Tidsforsinkelse 15 s–30 min; Lux OFF/15/25/35; Følsomhed Høj/Lav
- Auto-ON/Auto-OFF tilstedeværelsestilstand
- 100–265V AC, 5A (nulleder påkrævet)
- 360° dækning; 8–12 m detekteringsdiameter
- Tidsforsinkelse 15 s–30 min; Lux OFF/15/25/35; Følsomhed Høj/Lav
- Turn on the power and use the non-contact voltage tester to test each black wire in the junction box. The hot wire has power but the load wire to your light does not have power.
- Turn off the power and use the non-contact voltage tester to confirm.
- Mark the hot wire with electrical tapes if needed.
Trin 3. Forbind bevægelsessensoren til lampen
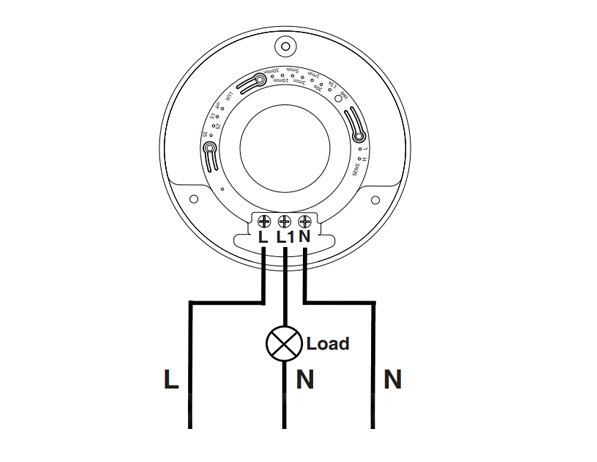
This is a standard motion sensor wiring diagram and you can apply nearly all wirings like above. The wiring is pretty straightforward, similar to installing a motion sensor light switch.
Søger du bevægelsesaktiverede energibesparende løsninger?
Kontakt os for komplette PIR-bevægelsessensorer, bevægelsesaktiverede energibesparende produkter, bevægelsessensorafbrydere og kommercielle tilstedeværelses-/fraværsløsninger.
There are only 3 wires needed. The L is for line wire or hot wire, which is the power source from your house. The L1 is for load wire which powers the lights. The N is the neutral wire, and you only need to simply wire them together.
- Connect the hot wire from your house to the hot wire on the motion sensor.
- Connect the load wire to your light to the load wire on the motion sensor.
- Connect the neutral wire from your house to the neutral wire on the motion sensor.
Trin 4. Juster bevægelsessensoren
Now we partially screw the motion sensor into the junction box and turn on the power for testing the best setting.
Test a couple of times and adjust the motion sensor’s setting to the best value, such as time delay, motion detection sensitivity, light sensor LUX.
Alter the motion sensor to ensure it can detect the ideal motion detection area. Install and screw tight the motion sensor.








I’ve never heard of a “load wire”. Only HOT (black) Neutral (white) and ground (green). What is a load wire?
Hi Patrick,
A “load wire” is the wire that connects the sensor with the load. In this case, the load is the light connected and driven by the motion sensor.
Say you want to control your light with a motion sensor.
The motion sensor draws power from the hot wire and it needs to send the power to the light via the load wire. Now the sensor can control when to keep the light ON or OFF because the light is directly powered by the motion sensor.
A load wire may have different colors, usually red or black. Some motion sensors may have hot wire and load wire the same color and they are interchangeable. You need to refer to your sensor’s manual for this part.
Most motion sensors have a load wire and control the lighting in this way. If your motion sensor does not have a load wire, it is mostly a wireless sensor that needs to be integrated into a smart home system so that the light is controlled by other means.
Nice article very well written. It answered the questions i had. Thank you.
How much would an electrician charge for something like this?
Hi, I don’t understand how connecting one wire (load) to the light makes it work what about the neutral wire from the lights
Cuando ce cobra por estos trabajos