

A utilização de uma iluminação ativada por movimento em residências, escritórios ou espaços públicos interiores pode reduzir significativamente o desperdício de eletricidade, adicionando uma experiência de iluminação automatizada e sem mãos. Na maioria das vezes, um interruptor com sensor de movimento é a solução ideal para utilização no interior, pois é fácil de atualizar e substituir o interruptor de parede existente, e o interruptor de parede com sensor é mais acessível para os utilizadores disporem de controlo manual.
Índice
- Passo 1. Preparar as ferramentas para a instalação
- Passo 2. Posicionar o sensor de movimento
- Passo 3. Ligar o sensor de movimento à luz
- Passo 4. Ajustar o sensor de movimento
Por vezes, é necessário detetar movimento numa cobertura mais ampla onde um interruptor com sensor de movimento não é suficiente, devido à área de deteção restrita na parede. Neste caso, um sensor de movimento de teto ou um detetor de movimento autónomo localizado na parede, que pode detetar pessoas num ângulo de até 360 graus com uma zona de sensibilidade maior, pode resolver o problema na perfeição.
Outra vantagem de adicionar um sensor de movimento, ou seja, um sensor de presença, à sua iluminação existente é a possibilidade de ter uma iluminação automática LIGADA/DESLIGADA, totalmente sem mãos e adequada para espaços públicos e escritórios. Adicionalmente, um sensor de presença de teto apenas requer a cablagem disponível para a instalação e oferece maior flexibilidade quanto ao local de colocação, ao passo que os interruptores de parede com sensor têm de ser instalados numa caixa de aparelhagem pré-existente.
Passo 1. Preparar as ferramentas para a instalação
Antes de adicionar um sensor de movimento à luz, prepare primeiro estas ferramentas para acelerar o processo.
- Um sensor de movimento
- Chave de fendas
- Opcional
- Alicate corta-cabos: para cortar fios, se necessário
- Conectores de cabos: a maioria dos interruptores de luz com sensor de movimento inclui conectores de cabos por predefinição no pacote de acessórios
- Testador de tensão: para identificar o fio de fase e garantir que a alimentação está desligada
- Fita isoladora: para marcar o fio de fase
- Caixa de derivação: para fixar e instalar o sensor de movimento
Passo 2. Posicionar o sensor de movimento
Desligue a alimentação da luz à qual pretende adicionar um sensor de movimento. Encontre o local onde pretende instalar o sensor de movimento entre a fonte de alimentação da sua casa e a luz.
Instale uma caixa de derivação e corte o fio de fase e o fio neutro para instalar e fixar o sensor de movimento, se necessário.
Agora marcamos o fio de fase e o fio de carga.
Poderá Também Estar Interessado Em

- Tensão: 2 pilhas AAA
- Modo Dia/Noite
- Temporização: 15min, 30min, 1h(padrão), 2h

- Sensor de presença PIR para montagem no teto com saída de relé de contacto seco
- Alimentação de baixa tensão de 12/24VDC ou 12/24VAC
- Contactos de relé isolados COM, NO e NC para entradas de controlo de edifícios, HVAC e EMS

- Interruptor com sensor de movimento por micro-ondas encastrável no teto de baixa tensão DC
- Entrada de 12 VDC / 24 VDC com intervalo de 10-30 VDC
- Corrente máxima de trabalho de 10A com temporizador, limiar Lux e sensibilidade ajustáveis
- Interruptor com sensor de movimento de micro-ondas encastrável no teto para cargas mais elevadas
- Entrada de tensão de linha de 100-265 VAC, modelo de 10A
- Deteção por micro-ondas a 5,8 GHz com temporizador, limiar Lux e sensibilidade ajustáveis
- Interruptor com sensor de movimento de micro-ondas encastrável no teto
- Entrada de tensão de linha de 100-265 VAC, modelo de 5A
- Deteção por micro-ondas a 5,8 GHz com temporizador, limiar Lux e sensibilidade ajustáveis
- Dimmer com sensor de presença PIR RZ037 de montagem no teto para alimentação de 220V
- Corrente máxima de funcionamento de 3A com carga nominal de 660W
- O botão LUX controla o sensor de luz ON/OFF e o brilho de regulação definido pelo utilizador
- Dimmer com sensor de presença PIR RZ037 de montagem no teto para alimentação de 110V
- Corrente máxima de funcionamento de 3A com carga nominal de 330W
- O botão LUX controla o sensor de luz ON/OFF e o brilho de regulação definido pelo utilizador

- Interruptor com sensor de movimento por micro-ondas de montagem no teto em DC de baixa tensão
- Entrada de 12 VDC / 24 VDC com intervalo de 10-30 VDC
- Corrente máxima de trabalho de 10A com temporizador, limiar Lux e sensibilidade ajustáveis
- Interruptor de sensor de movimento por micro-ondas para montagem no teto para cargas mais elevadas
- Entrada de tensão de linha de 100-265 VAC, modelo de 10A
- Deteção por micro-ondas a 5,8 GHz com temporizador, limiar Lux e sensibilidade ajustáveis
- Interruptor de sensor de movimento por micro-ondas para montagem no teto
- Entrada de tensão de linha de 100-265 VAC, modelo de 5A
- Deteção por micro-ondas a 5,8 GHz com temporizador, limiar Lux e sensibilidade ajustáveis

- Interruptor de sensor de movimento PIR para montagem de embutir no teto em CC de baixa tensão
- Entrada de 12 VDC / 24 VDC com intervalo de 10-30 VDC
- Corrente máxima de trabalho de 10A com temporizador, limiar Lux e sensibilidade ajustáveis

- Interruptor de sensor de movimento PIR para montagem de embutir no teto para cargas mais elevadas
- Entrada de tensão de linha de 100-265 VAC, modelo de 10A
- Deteção de 360 graus com temporizador, limiar Lux e sensibilidade ajustáveis
- Interruptor de sensor de movimento PIR para montagem de embutir no teto
- Entrada de tensão de linha de 100-265 VAC, modelo de 5A
- Deteção de 360 graus com temporizador, limiar Lux e sensibilidade ajustáveis

- Kit de interruptor sem fios e recetor para controlo de iluminação interior ON/OFF
- Recetor de 100-230VAC, 50/60Hz com corrente nominal de 5A
- Interruptor sem fios alimentado a pilha CR2032 com comunicação a 2.4GHz
- Ocupação (Ligado automático/Desligado automático)
- 12–24V DC (10–30VDC), até 10A
- Cobertura de 360°, diâmetro de 8–12 m
- Temporização de 15 s–30 min
- Sensor de luz Desligado/15/25/35 Lux
- Sensibilidade Alta/Baixa
- Modo de presença Ligado Automático/Desligado Automático
- 100–265V AC, 10A (neutro necessário)
- Cobertura de 360°; diâmetro de deteção de 8–12 m
- Temporização de 15 s–30 min; Lux Desligado/15/25/35; Sensibilidade Alta/Baixa
- Modo de presença Ligado Automático/Desligado Automático
- 100–265V AC, 5A (neutro necessário)
- Cobertura de 360°; diâmetro de deteção de 8–12 m
- Temporização de 15 s–30 min; Lux Desligado/15/25/35; Sensibilidade Alta/Baixa
- Ligue a alimentação e utilize o testador de tensão sem contacto para testar cada fio preto na caixa de derivação. O fio de fase tem corrente, mas o fio de carga para a sua luz não tem.
- Desligue a alimentação e utilize o testador de tensão sem contacto para confirmar.
- Marque o fio de fase com fita isoladora, se necessário.
Passo 3. Ligar o sensor de movimento à luz
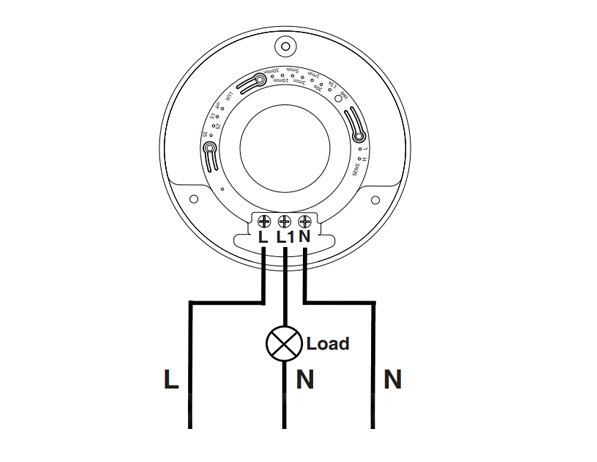
Este é um esquema de ligação padrão para sensores de movimento e pode aplicar quase todas as ligações como indicado acima. A instalação elétrica é bastante simples, semelhante a instalar um interruptor de luz com sensor de movimento.
Procura Soluções de Poupança de Energia Ativadas por Movimento?
Contacte-nos para soluções completas de sensores de movimento PIR, produtos de poupança de energia ativados por movimento, interruptores com sensor de movimento e soluções comerciais de ocupação/vacância.
São necessários apenas 3 fios. O L destina-se ao fio de linha ou fio de fase, que é a fonte de alimentação da sua casa. O L1 destina-se ao fio de carga, que alimenta as luzes. O N é o fio neutro, bastando ligá-los entre si.
- Ligue o fio de fase da sua casa ao fio de fase do sensor de movimento.
- Ligue o fio de carga da sua luz ao fio de carga do sensor de movimento.
- Ligue o fio neutro da sua casa ao fio neutro do sensor de movimento.
Passo 4. Ajustar o sensor de movimento
Agora, aparafuse parcialmente o sensor de movimento na caixa de derivação e ligue a alimentação para testar a melhor configuração.
Test a couple of times and adjust the motion sensor’s setting to the best value, such as time delay, motion detection sensitivity, light sensor LUX.
Alter the motion sensor to ensure it can detect the ideal motion detection area. Install and screw tight the motion sensor.








I’ve never heard of a “load wire”. Only HOT (black) Neutral (white) and ground (green). What is a load wire?
Hi Patrick,
A “load wire” is the wire that connects the sensor with the load. In this case, the load is the light connected and driven by the motion sensor.
Say you want to control your light with a motion sensor.
The motion sensor draws power from the hot wire and it needs to send the power to the light via the load wire. Now the sensor can control when to keep the light ON or OFF because the light is directly powered by the motion sensor.
A load wire may have different colors, usually red or black. Some motion sensors may have hot wire and load wire the same color and they are interchangeable. You need to refer to your sensor’s manual for this part.
Most motion sensors have a load wire and control the lighting in this way. If your motion sensor does not have a load wire, it is mostly a wireless sensor that needs to be integrated into a smart home system so that the light is controlled by other means.
Nice article very well written. It answered the questions i had. Thank you.
Quanto cobra um eletricista por um serviço deste tipo?
Hi, I don’t understand how connecting one wire (load) to the light makes it work what about the neutral wire from the lights
Cuando ce cobra por estos trabajos