

Zastosowanie oświetlenia aktywowanego ruchem w domach, biurach czy publicznych przestrzeniach zamkniętych może znacząco zmniejszyć zużycie energii elektrycznej, zapewniając jednocześnie bezdotykową, automatyczną obsługę oświetlenia. W większości przypadków włącznika światła z czujnikiem ruchu jest optymalnym rozwiązaniem do użytku wewnętrznego, ponieważ umożliwia łatwą modernizację i wymianę istniejącego włącznika ściennego, a ścienny czujnik ruchu zapewnia użytkownikom łatwiejszy dostęp do ręcznego sterowania.
Spis treści
- Krok 1. Przygotuj narzędzia do montażu
- Krok 2. Umieść czujnik ruchu
- Krok 3. Podłącz czujnik ruchu do oświetlenia
- Krok 6. Dostosuj ustawienia czujnika ruchu
Czasami wymagane jest wykrywanie ruchu na większym obszarze, gdzie ścienny włącznik z czujnikiem ruchu jest niewystarczający ze względu na ograniczony pole detekcji na ścianie. W takim przypadku sufitowy czujnik ruchu lub autonomiczny czujnik ruchu umieszczony na ścianie, który potrafi wykrywać obecność osób w promieniu do 360 stopni przy większej strefie czułości, stanowi doskonałe rozwiązanie problemu.
Kolejną zaletą dodania czujnika ruchu, tj. czujnika obecności, do istniejącego punktu świetlnego jest możliwość uzyskania automatycznego włączania i wyłączania światła. Jest to rozwiązanie w pełni bezdotykowe, idealnie nadające się do pomieszczeń ogólnodostępnych oraz biur. Ponadto, sufitowy czujnik obecności wymaga do instalacji jedynie dostępnego okablowania i zapewnia większą elastyczność w doborze miejsca montażu, podczas gdy ścienne czujniki ruchu muszą być montowane w istniejących puszkach podtynkowych.
Krok 1. Przygotuj narzędzia do montażu
Przed podłączeniem czujnika ruchu do oświetlenia należy przygotować następujące narzędzia, aby usprawnić przebieg prac.
- Czujnik ruchu
- Śrubokręt
- Opcjonalnie
- Szczypce do ściągania izolacji / obcinaki do kabli: do przycinania przewodów w razie potrzeby
- Złączki kablowe: większość włączników światła z czujnikiem ruchu zawiera złączki instalacyjne w standardowym zestawie akcesoriów
- Próbnik napięcia: do identyfikacji przewodu fazowego i upewnienia się, że zasilanie jest odłączone
- Electrical tapes: to mark the hotwire
- Junction box: for fixing and installing the motion sensor
Krok 2. Umieść czujnik ruchu
Turn off the power to the light which you want to add a motion sensor to. Find a place where you want to install the motion sensor between the power source from your house to the light.
Install a junction box and cut the hot wire and neutral wire for installing and fixing the motion sensor, if needed.
Now we mark the hot wire and load wire.
Może Cię również zainteresować

- Napięcie: 2 baterie AAA
- Tryb Dzień/Noc
- Opóźnienie czasowe: 15min, 30min, 1h (domyślnie), 2h

- Sufitowy czujnik obecności PIR z wyjściem przekaźnikowym bezpotencjałowym
- Zasilanie niskonapięciowe 12/24 VDC lub 12/24 VAC
- Izolowane styki przekaźnika COM, NO i NC dla wejść systemów EMS, HVAC i sterowania budynkiem

- Niskonapięciowy, podtynkowy sufitowy mikrofalowy czujnik ruchu DC
- Wejście 12 VDC / 24 VDC w zakresie 10–30 VDC
- Maksymalny prąd roboczy 10 A z regulowanym opóźnieniem czasowym, progiem Lux i czułością
- Mikrofalowy czujnik ruchu do montażu podtynkowego w suficie o podwyższonej obciążalności
- Zasilanie sieciowe 100-265 VAC, model 10A
- Detekcja mikrofalowa 5,8 GHz z regulowanym opóźnieniem czasowym, progiem Lux i czułością
- Mikrofalowy czujnik ruchu do montażu podtynkowego w suficie
- Zasilanie sieciowe 100-265 VAC, model 5A
- Detekcja mikrofalowa 5,8 GHz z regulowanym opóźnieniem czasowym, progiem Lux i czułością
- Sufitowy czujnik obecności PIR ze ściemniaczem RZ037 do zasilania 220V
- Maksymalny prąd roboczy 3A przy obciążeniu znamionowym 660W
- Przycisk LUX steruje włączeniem/wyłączeniem czujnika światła oraz ustawionym przez użytkownika poziomem jasności
- Sufitowy czujnik obecności PIR ze ściemniaczem RZ037 do zasilania 110V
- Maksymalny prąd roboczy 3A przy obciążeniu znamionowym 330W
- Przycisk LUX steruje włączeniem/wyłączeniem czujnika światła oraz ustawionym przez użytkownika poziomem jasności

- Niskonapięciowy DC sufitowy mikrofalowy czujnik ruchu
- Wejście 12 VDC / 24 VDC w zakresie 10–30 VDC
- Maksymalny prąd roboczy 10 A z regulowanym opóźnieniem czasowym, progiem Lux i czułością
- Sufitowy mikrofalowy czujnik ruchu o podwyższonej obciążalności
- Zasilanie sieciowe 100-265 VAC, model 10A
- Detekcja mikrofalowa 5,8 GHz z regulowanym opóźnieniem czasowym, progiem Lux i czułością
- Sufitowy mikrofaliowy czujnik ruchu z przełącznikiem
- Zasilanie sieciowe 100-265 VAC, model 5A
- Detekcja mikrofalowa 5,8 GHz z regulowanym opóźnieniem czasowym, progiem Lux i czułością

- Niskonapięciowy prądu stałego (DC) przełącznik z czujnikiem ruchu PIR do montażu podtynkowego w suficie
- Wejście 12 VDC / 24 VDC w zakresie 10–30 VDC
- Maksymalny prąd roboczy 10A z regulacją opóźnienia czasowego, progu natężenia światła (Lux) oraz czułości

- Przełącznik z czujnikiem ruchu PIR o wyższym obciążeniu, do montażu podtynkowego w suficie
- Zasilanie sieciowe 100-265 VAC, model 10A
- Detekcja w promieniu 360 stopni z regulacją opóźnienia czasowego, progu natężenia światła (Lux) oraz czułości
- Przełącznik z czujnikiem ruchu PIR do montażu podtynkowego w suficie
- Zasilanie sieciowe 100-265 VAC, model 5A
- Detekcja w promieniu 360 stopni z regulacją opóźnienia czasowego, progu natężenia światła (Lux) oraz czułości

- Zestaw bezprzewodowego przełącznika i odbiornika do wewnętrznego sterowania oświetleniem WŁ./WYŁ.
- Odbiornik 100-230VAC, 50/60Hz o prądzie znamionowym 5A
- Przełącznik bezprzewodowy zasilany baterią CR2032 z komunikacją 2.4GHz
- Tryb obecności (Auto-ON/Auto-OFF)
- 12–24V DC (10–30VDC), do 10A
- Zasięg 360°, średnica wykrywania 8–12 m
- Opóźnienie czasowe 15 s–30 min
- Czujnik światła Wył./15/25/35 Lux
- Wysoka/Niska czułość
- Automatyczny tryb obecności (Auto-ON/Auto-OFF)
- 100–265V AC, 10A (wymagany przewód neutralny)
- Zasięg 360°; średnica wykrywania 8–12 m
- Opóźnienie czasowe 15 s–30 min; Lux WYŁ./15/25/35; Czułość Wysoka/Niska
- Automatyczny tryb obecności (Auto-ON/Auto-OFF)
- 100–265V AC, 5A (wymagany przewód neutralny)
- Zasięg 360°; średnica wykrywania 8–12 m
- Opóźnienie czasowe 15 s–30 min; Lux WYŁ./15/25/35; Czułość Wysoka/Niska
- Turn on the power and use the non-contact voltage tester to test each black wire in the junction box. The hot wire has power but the load wire to your light does not have power.
- Turn off the power and use the non-contact voltage tester to confirm.
- Mark the hot wire with electrical tapes if needed.
Krok 3. Podłącz czujnik ruchu do oświetlenia
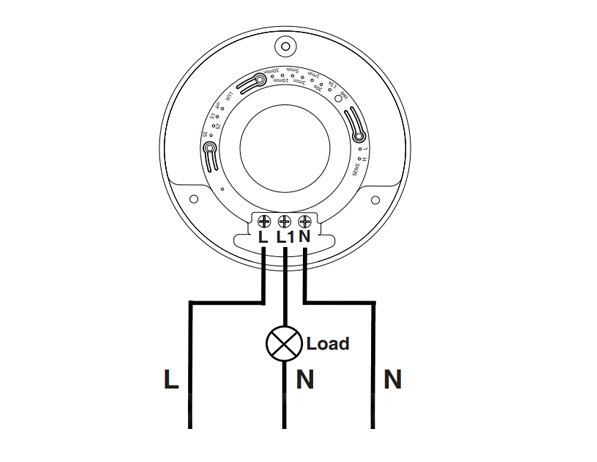
This is a standard motion sensor wiring diagram and you can apply nearly all wirings like above. The wiring is pretty straightforward, similar to installing a motion sensor light switch.
Szukasz energooszczędnych rozwiązań aktywowanych ruchem?
Skontaktuj się z nami w sprawie czujników ruchu PIR, energooszczędnych produktów aktywowanych ruchem, przełączników z czujnikiem ruchu oraz komercyjnych rozwiązań typu Occupancy/Vacancy.
There are only 3 wires needed. The L is for line wire or hot wire, which is the power source from your house. The L1 is for load wire which powers the lights. The N is the neutral wire, and you only need to simply wire them together.
- Connect the hot wire from your house to the hot wire on the motion sensor.
- Connect the load wire to your light to the load wire on the motion sensor.
- Connect the neutral wire from your house to the neutral wire on the motion sensor.
Krok 6. Dostosuj ustawienia czujnika ruchu
Now we partially screw the motion sensor into the junction box and turn on the power for testing the best setting.
Test a couple of times and adjust the motion sensor’s setting to the best value, such as time delay, motion detection sensitivity, light sensor LUX.
Alter the motion sensor to ensure it can detect the ideal motion detection area. Install and screw tight the motion sensor.








I’ve never heard of a “load wire”. Only HOT (black) Neutral (white) and ground (green). What is a load wire?
Hi Patrick,
A “load wire” is the wire that connects the sensor with the load. In this case, the load is the light connected and driven by the motion sensor.
Say you want to control your light with a motion sensor.
The motion sensor draws power from the hot wire and it needs to send the power to the light via the load wire. Now the sensor can control when to keep the light ON or OFF because the light is directly powered by the motion sensor.
A load wire may have different colors, usually red or black. Some motion sensors may have hot wire and load wire the same color and they are interchangeable. You need to refer to your sensor’s manual for this part.
Most motion sensors have a load wire and control the lighting in this way. If your motion sensor does not have a load wire, it is mostly a wireless sensor that needs to be integrated into a smart home system so that the light is controlled by other means.
Nice article very well written. It answered the questions i had. Thank you.
How much would an electrician charge for something like this?
Hi, I don’t understand how connecting one wire (load) to the light makes it work what about the neutral wire from the lights
Cuando ce cobra por estos trabajos