

Использование светильника с датчиком движения дома, в офисе или в общественных помещениях позволяет значительно снизить расход электроэнергии и обеспечивает удобное автоматическое освещение. В большинстве случаев выключатель с датчиком движения является оптимальным решением для внутренних помещений, поскольку позволяет легко модернизировать или заменить существующий настенный выключатель, а настенный выключатель с датчиком предоставляет пользователям удобный доступ к ручному управлению.
Содержание
- Шаг 1. Подготовьте инструменты для установки
- Шаг 2. Разместите датчик движения
- Шаг 3. Подключите датчик движения к светильнику
- Шаг 5. Настройте датчик движения
Иногда требуется обнаружение движения на более широкой площади, где настенный выключатель с датчиком движения не справляется из-за ограниченной зоны охвата на стене. В таких случаях потолочный датчик движения или отдельный детектор движения , размещенный на стене и способный обнаруживать людей в радиусе до 360 градусов с более высокой чувствительностью, идеально решает эту задачу.
Еще одно преимущество добавления датчика движения, то есть датчика присутствия, к существующему светильнику заключается в том, что вы получаете полностью автоматическое включение и выключение освещения без необходимости ручного управления, что отлично подходит для общественных помещений и офисов. Кроме того, потолочный датчик присутствия требует только наличия электропроводки для монтажа и обеспечивает гибкость при выборе места установки, в то время как настенные выключатели с датчиком должны монтироваться в заранее установленную подрозетную коробку.
Шаг 1. Подготовьте инструменты для установки
Перед тем как подсоединить датчик движения к светильнику, подготовьте следующие инструменты для ускорения процесса.
- Датчик движения
- Отвертка
- Дополнительно
- Стриппер или кусачки: для зачистки и обрезки проводов при необходимости
- Соединительные клеммы для проводов: большинство выключателей с датчиком движения поставляются с клеммами в комплекте
- Voltage tester: to identify the hotwire and ensure the voltage is off
- Electrical tapes: to mark the hotwire
- Junction box: for fixing and installing the motion sensor
Шаг 2. Разместите датчик движения
Turn off the power to the light which you want to add a motion sensor to. Find a place where you want to install the motion sensor between the power source from your house to the light.
Install a junction box and cut the hot wire and neutral wire for installing and fixing the motion sensor, if needed.
Now we mark the hot wire and load wire.
Возможно, вас заинтересует

- Напряжение: 2 батарейки типа AAA
- Режим День/Ночь
- Задержка времени: 15 мин, 30 мин, 1 ч (по умолчанию), 2 ч

- Потолочный PIR-датчик присутствия с выходом реле с сухими контактами
- Низковольтное питание 12/24VDC или 12/24VAC
- Изолированные контакты реле COM, NO и NC для систем управления зданием (EMS), ОВК (HVAC) и автоматизации

- Низковольтный встраиваемый потолочный микроволновый выключатель с датчиком движения постоянного тока
- Вход 12 VDC / 24 VDC с диапазоном 10-30 VDC
- Максимальный рабочий ток 10A с регулируемой задержкой времени, порогом освещенности (Lux) и чувствительностью
- Встраиваемый в потолок микроволновый датчик движения (выключатель) для повышенной нагрузки
- Входное сетевое напряжение 100-265 VAC, модель на 10A
- Микроволновое обнаружение на частоте 5.8 GHz с регулировкой задержки времени, порога освещенности (Lux) и чувствительности
- Встраиваемый в потолок микроволновый датчик движения (выключатель)
- Входное сетевое напряжение 100-265 VAC, модель на 5A
- Микроволновое обнаружение на частоте 5.8 GHz с регулировкой задержки времени, порога освещенности (Lux) и чувствительности
- Потолочный PIR-датчик присутствия с функцией диммера RZ037 для сетей 220V
- Максимальный рабочий ток 3A с номинальной нагрузкой 660W
- Кнопка LUX управляет включением/выключением датчика освещенности и установленной пользователем яркостью диммирования
- Потолочный PIR-датчик присутствия с функцией диммера RZ037 для сетей 110V
- Максимальный рабочий ток 3A с номинальной нагрузкой 330W
- Кнопка LUX управляет включением/выключением датчика освещенности и установленной пользователем яркостью диммирования

- Низковольтный потолочный микроволновый датчик движения (выключатель) постоянного тока (DC)
- Вход 12 VDC / 24 VDC с диапазоном 10-30 VDC
- Максимальный рабочий ток 10A с регулируемой задержкой времени, порогом освещенности (Lux) и чувствительностью
- Потолочный микроволновый датчик движения (выключатель) для повышенной нагрузки
- Входное сетевое напряжение 100-265 VAC, модель на 10A
- Микроволновое обнаружение на частоте 5.8 GHz с регулировкой задержки времени, порога освещенности (Lux) и чувствительности
- Потолочный микроволновый датчик движения (выключатель)
- Входное сетевое напряжение 100-265 VAC, модель на 5A
- Микроволновое обнаружение на частоте 5.8 GHz с регулировкой задержки времени, порога освещенности (Lux) и чувствительности

- Низковольтный встраиваемый потолочный датчик-выключатель движения PIR постоянного тока
- Вход 12 VDC / 24 VDC с диапазоном 10-30 VDC
- Максимальный рабочий ток 10 А с регулировкой задержки времени, порога освещенности (Lux) и чувствительности

- Встраиваемый потолочный датчик-выключатель движения PIR для повышенной нагрузки
- Входное сетевое напряжение 100-265 VAC, модель на 10A
- Обнаружение на 360 градусов с регулировкой задержки времени, порога освещенности (Lux) и чувствительности
- Встраиваемый потолочный датчик-выключатель движения PIR
- Входное сетевое напряжение 100-265 VAC, модель на 5A
- Обнаружение на 360 градусов с регулировкой задержки времени, порога освещенности (Lux) и чувствительности

- Комплект из беспроводного выключателя и приемника для управления внутренним освещением (вкл/выкл)
- Приемник 100–230 В переменного тока, 50/60 Гц с номинальным током 5 А
- Беспроводной выключатель на базе батарейки CR2032 с частотой связи 2.4 ГГц
- Контроль присутствия (автоматическое включение и выключение)
- 12–24 В постоянного тока (10–30 В постоянного тока), до 10 А
- Зона покрытия 360°, диаметр обнаружения 8–12 м
- Задержка времени от 15 с до 30 мин
- Датчик освещенности: Выкл / 15 / 25 / 35 Люкс
- Высокая/низкая чувствительность
- Режим присутствия: авто-включение / авто-выключение
- 100–265V AC, 10A (требуется нейтраль)
- Зона покрытия 360°; диаметр обнаружения 8–12 м
- Задержка времени 15 с–30 мин; Lux ВЫКЛ/15/25/35; Чувствительность Высокая/Низкая
- Режим присутствия: авто-включение / авто-выключение
- 100–265V AC, 5A (требуется нейтраль)
- Зона покрытия 360°; диаметр обнаружения 8–12 м
- Задержка времени 15 с–30 мин; Lux ВЫКЛ/15/25/35; Чувствительность Высокая/Низкая
- Turn on the power and use the non-contact voltage tester to test each black wire in the junction box. The hot wire has power but the load wire to your light does not have power.
- Turn off the power and use the non-contact voltage tester to confirm.
- Mark the hot wire with electrical tapes if needed.
Шаг 3. Подключите датчик движения к светильнику
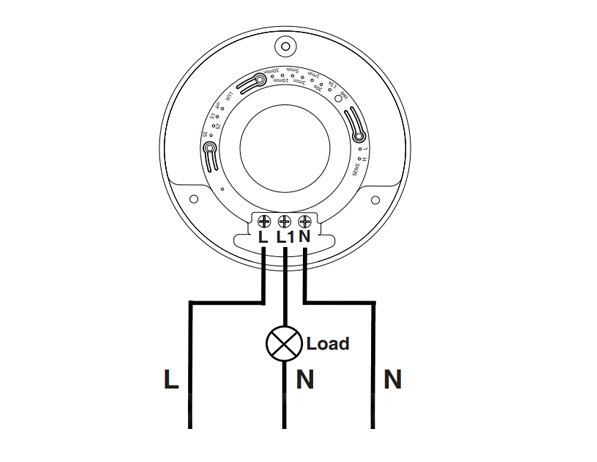
This is a standard motion sensor wiring diagram and you can apply nearly all wirings like above. The wiring is pretty straightforward, similar to installing a motion sensor light switch.
Ищете энергосберегающие решения с датчиками движения?
Свяжитесь с нами, чтобы заказать готовые PIR-датчики движения, энергосберегающие устройства с активацией по движению, выключатели с датчиками движения, а также коммерческие решения контроля присутствия (Occupancy/Vacancy).
There are only 3 wires needed. The L is for line wire or hot wire, which is the power source from your house. The L1 is for load wire which powers the lights. The N is the neutral wire, and you only need to simply wire them together.
- Connect the hot wire from your house to the hot wire on the motion sensor.
- Connect the load wire to your light to the load wire on the motion sensor.
- Connect the neutral wire from your house to the neutral wire on the motion sensor.
Шаг 5. Настройте датчик движения
Now we partially screw the motion sensor into the junction box and turn on the power for testing the best setting.
Test a couple of times and adjust the motion sensor’s setting to the best value, such as time delay, motion detection sensitivity, light sensor LUX.
Alter the motion sensor to ensure it can detect the ideal motion detection area. Install and screw tight the motion sensor.








I’ve never heard of a “load wire”. Only HOT (black) Neutral (white) and ground (green). What is a load wire?
Hi Patrick,
A “load wire” is the wire that connects the sensor with the load. In this case, the load is the light connected and driven by the motion sensor.
Say you want to control your light with a motion sensor.
The motion sensor draws power from the hot wire and it needs to send the power to the light via the load wire. Now the sensor can control when to keep the light ON or OFF because the light is directly powered by the motion sensor.
A load wire may have different colors, usually red or black. Some motion sensors may have hot wire and load wire the same color and they are interchangeable. You need to refer to your sensor’s manual for this part.
Most motion sensors have a load wire and control the lighting in this way. If your motion sensor does not have a load wire, it is mostly a wireless sensor that needs to be integrated into a smart home system so that the light is controlled by other means.
Nice article very well written. It answered the questions i had. Thank you.
How much would an electrician charge for something like this?
Hi, I don’t understand how connecting one wire (load) to the light makes it work what about the neutral wire from the lights
Cuando ce cobra por estos trabajos