

Motion sensors are great at saving energy and bringing convenience. They can automatically turn on the light for us when detecting motion from a person and turn off the light for us when no motion is detected. Whether it’s outdoor or indoor usage, a motion sensor light switch is better than a mechanical light switch in most cases.
Obsah
- Step 1. Prepare tools for the installation
- Step 2. Remove the Old Switch
- Step 3. Wire the Motion Sensor Light Switch
- Step 4. Fix the Switch Into the Wallbox
Motion sensor light switches are great at saving energy and bringing convenience to our home. The motion sensor detector can automatically turn on the light for us when we enter the room and turn off the light after we leave. A motion sensor light switch is more preferred than a motion sensor light for home use because we need to manually take control of the light most of the time. And it’s easier to simply upgrade the traditional wall switch with a motion sensor light switch than to replace the light fixture.
It’s never too late to replace your manual mechanical light switch with a smart, motion-activated one, and wiring and installing a motion sensor light switch can be fast and easy.
You don’t need to call an electrician for the job. All you need is some common tools like a screwdriver that every home has (you don’t own a screwdriver?) and within 30 minutes, you can get the job done even for beginners with no electrical knowledge.
Check the video version of installing a motion sensor light switch.
If you want a step by step instruction to follow, keep reading.
Step 1. Prepare tools for the installation
Before we install a motion sensor light switch, prepare these tools first so we can speed up the process.
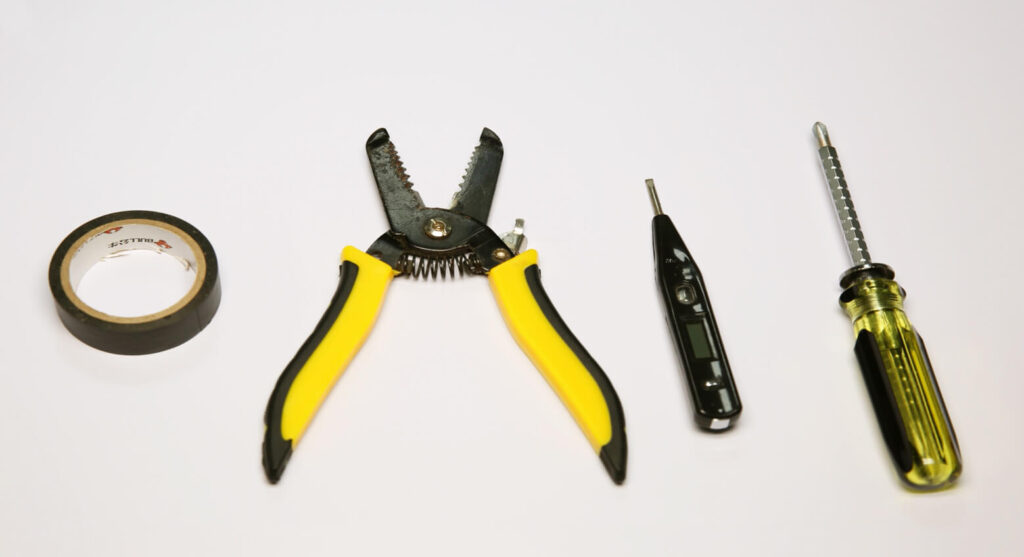
- A motion sensor light switch
- Screwdriver
- Optional
- Wirecutter: to cut wires if necessary
- Wire connectors: most motion sensor light switches would include wire connecters by default in the accessory pack
- Voltage tester: to identity the hotwire and ensure the voltage is off
- Electrical tapes: to mark the hotwire
Step 2. Remove the Old Switch
Turn off the breaker to the light you want to replace the switch of and turn on/off the existing switch several times to ensure there is no power.
Now we can safely remove the old switch. Suppose you have absolutely no electrical knowledge and worry about the wiring. In that case, you can take a picture of the existing wiring to apply similar wirings to the motion sensor light switch or even restore the old wiring and the switch.
Hledáte úsporná řešení aktivovaná pohybem?
Kontaktujte nás pro kompletní PIR snímače pohybu, úsporné produkty aktivované pohybem, spínače s pohybovým senzorem a komerční řešení pro detekci přítomnosti či nepřítomnosti osob.
Mark the hot wire(the black wire) with electrical tapes if necessary.
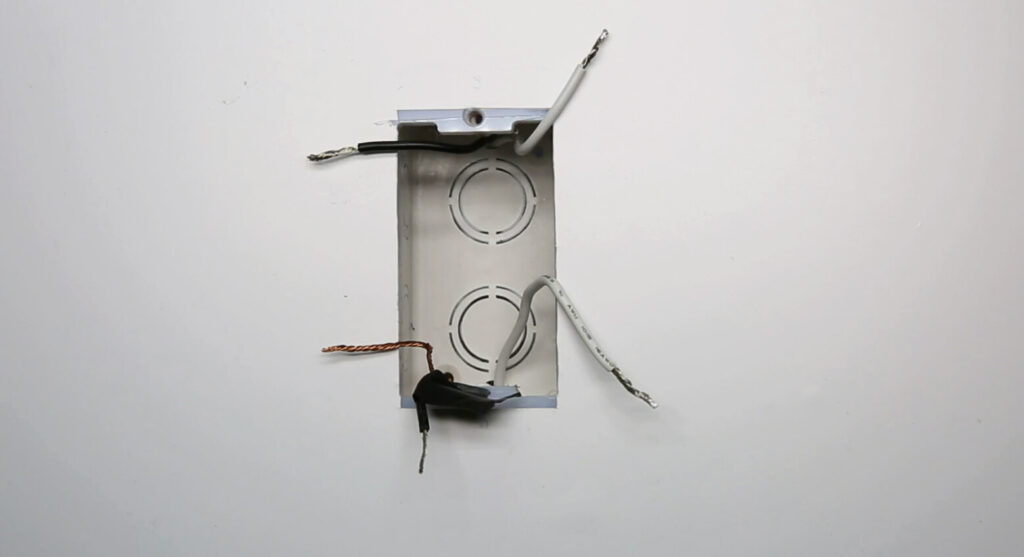
If you do not know which is load wire or hot wire, use the voltage tester to confirm with the following process:
- Turn on the breaker
- Move the voltage tester near each black wire
- The hotwire has power and the load wire does not have power
- Turn off the breaker
- Use the voltage near the hot wire to ensure the power is off
- Mark the hotwire with electrical tapes
Step 3. Wire the Motion Sensor Light Switch
First, make sure the breaker is turned off and there is no power with a voltage tester.
Inspirujte se portfoliem snímačů pohybu Rayzeek.
Nenašli jste, co hledáte? Nemějte obavy. K vyřešení vašich požadavků existují vždy alternativní cesty. Možná vám pomůže některé z našich portfolií.
Now we start wiring the motion sensor light switch to the light by connecting the wires with the same color.
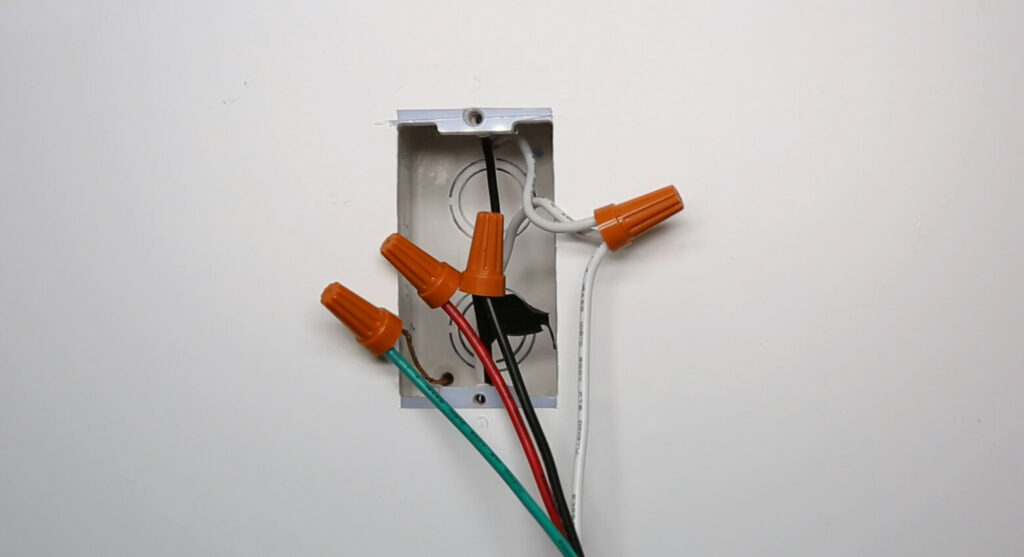
- Hotwire(black) to the light switch’s hotwire(black)
- Load wire(black or red) to the light switch’s load wire(red)
- Connect all neutral wires together (white)
- Connect all ground wires together(green or bare copper)
Now we partially screw the motion sensor switch into the wall box and test the wiring.
Turn on the breaker and the motion sensor light switch needs some time to warm up and will automatically turn on the light if the wiring is correct.
Mohlo by vás také zajímat

- Napětí: 2 baterie AAA
- Režim Den/Noc
- Časové zpoždění: 15 min, 30 min, 1 h (výchozí), 2 h

- Stropní PIR snímač přítomnosti s výstupem relé s beznapěťovým kontaktem
- Nízkonapěťové napájení 12/24VDC nebo 12/24VAC
- Isolované kontakty relé COM, NO a NC pro vstupy systémů EMS, HVAC a řízení budov

- Nízkonapěťový stejnosměrný vestavný stropní mikrovlnný spínač snímače pohybu
- Vstup 12 VDC / 24 VDC s rozsahem 10–30 VDC
- Maximální pracovní proud 10 A s nastavitelným časovým zpožděním, prahem Lux a citlivostí
- Vestavný stropní mikrovlnný spínač snímače pohybu pro vyšší zátěž
- Síťové vstupní napětí 100–265 VAC, model 10A
- Mikrovlnné snímání 5.8 GHz s nastavitelnou časovou prodlevou, prahem Lux a citlivostí
- Vestavný stropní mikrovlnný spínač senzoru pohybu
- Síťové vstupní napětí 100–265 VAC, model 5A
- Mikrovlnné snímání 5.8 GHz s nastavitelnou časovou prodlevou, prahem Lux a citlivostí
- Stropní RZ037 PIR senzor přítomnosti se stmívačem pro napájení 220V
- Maximální pracovní proud 3A s jmenovitým zatížením 660W
- Tlačítko LUX ovládá zapnutí/vypnutí světelného senzoru a uživatelsky nastavený jas stmívání
- Stropní RZ037 PIR senzor přítomnosti se stmívačem pro napájení 110V
- Maximální pracovní proud 3A s jmenovitým zatížením 330W
- Tlačítko LUX ovládá zapnutí/vypnutí světelného senzoru a uživatelsky nastavený jas stmívání

- Nízkonapěťový stejnosměrný stropní mikrovlnný spínač senzoru pohybu
- Vstup 12 VDC / 24 VDC s rozsahem 10–30 VDC
- Maximální pracovní proud 10 A s nastavitelným časovým zpožděním, prahem Lux a citlivostí
- Stropní mikrovlnný spínač senzoru pohybu pro vyšší zatížení
- Síťové vstupní napětí 100–265 VAC, model 10A
- Mikrovlnné snímání 5.8 GHz s nastavitelnou časovou prodlevou, prahem Lux a citlivostí
- Stropní mikrovlnný spínač s pohybovým senzorem
- Síťové vstupní napětí 100–265 VAC, model 5A
- Mikrovlnné snímání 5.8 GHz s nastavitelnou časovou prodlevou, prahem Lux a citlivostí

- Nízkonapěťový stejnosměrný vestavný stropní spínač s PIR pohybovým senzorem
- Vstup 12 VDC / 24 VDC s rozsahem 10–30 VDC
- Maximální pracovní proud 10A s nastavitelným časovým zpožděním, prahem Lux a citlivostí

- Vestavný stropní spínač s PIR pohybovým senzorem pro vyšší zátěž
- Síťové vstupní napětí 100–265 VAC, model 10A
- 360stupňová detekce s nastavitelným časovým zpožděním, prahem Lux a citlivostí
- Vestavný stropní spínač s PIR pohybovým senzorem
- Síťové vstupní napětí 100–265 VAC, model 5A
- 360stupňová detekce s nastavitelným časovým zpožděním, prahem Lux a citlivostí

- Sada bezdrátového spínače a přijímače pro vnitřní řízení osvětlení ZAP/VYP
- Přijímač 100-230VAC, 50/60Hz s jmenovitým proudem 5A
- Bezdrátový spínač napájený baterií CR2032 s komunikací 2,4GHz
- Detekce přítomnosti (Automatické ZAP/Automatické VYP)
- 12–24V DC (10–30VDC), až 10A
- Pokrytí 360°, průměr 8–12 m
- Časové zpoždění 15 s–30 min
- Snímač jasu Vypnuto / 15 / 25 / 35 Lux
- Vysoká/nízká citlivost
- Režim detekce přítomnosti s automatickým zapnutím/vypnutím
- 100–265V AC, 10A (vyžaduje nulový vodič)
- 360° pokrytí; průměr detekce 8–12 m
- Časové zpoždění 15 s – 30 min; Lux VYPNUTO / 15 / 25 / 35; citlivost vysoká/nízká
- Režim detekce přítomnosti s automatickým zapnutím/vypnutím
- 100–265V AC, 5A (vyžaduje nulový vodič)
- 360° pokrytí; průměr detekce 8–12 m
- Časové zpoždění 15 s – 30 min; Lux VYPNUTO / 15 / 25 / 35; citlivost vysoká/nízká
Press the buttons on the light switch to see if you can successfully control the ON and OFF of the light.
Step 4. Fix the Switch Into the Wallbox
Strengthen the screws, install the cover plates, and adjust the switch to a straight position.
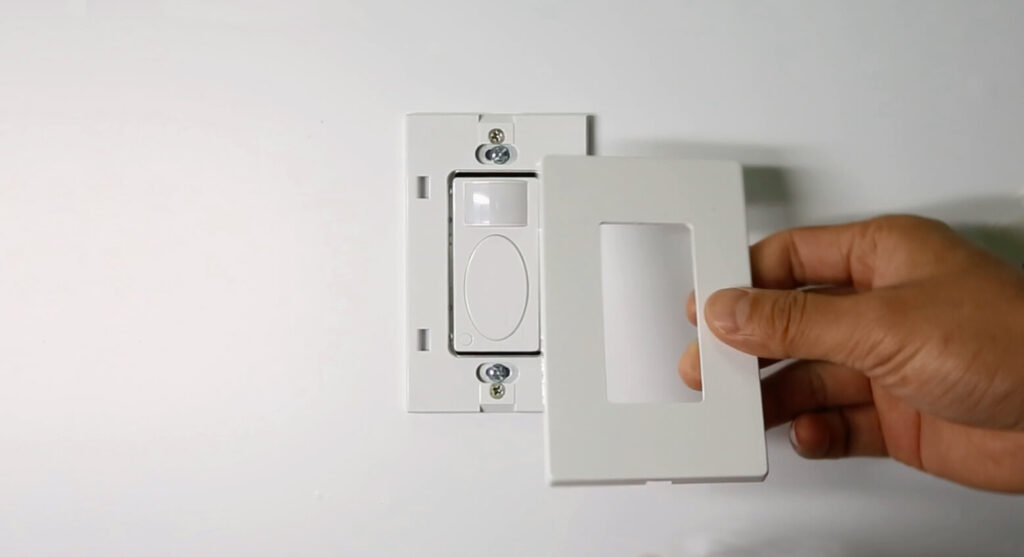
Now you can adjust the functions of the motion sensor light switch to a proper setting according to the user manual, such as occupancy sensor and vacancy sensor motion detection mode, time delay, and ambient light sensing.







