

Motion sensors are great at saving energy and bringing convenience. They can automatically turn on the light for us when detecting motion from a person and turn off the light for us when no motion is detected. Whether it’s outdoor or indoor usage, a สวิตช์ไฟเซนเซอร์ตรวจจับการเคลื่อนไหว is better than a mechanical light switch in most cases.
สารบัญ
- Step 1. Prepare tools for the installation
- Step 2. Remove the Old Switch
- Step 3. Wire the Motion Sensor Light Switch
- Step 4. Fix the Switch Into the Wallbox
Motion sensor light switches are great at saving energy and bringing convenience to our home. The motion sensor detector can automatically turn on the light for us when we enter the room and turn off the light after we leave. A motion sensor light switch is more preferred than a motion sensor light for home use because we need to manually take control of the light most of the time. And it’s easier to simply upgrade the traditional wall switch with a motion sensor light switch than to replace the light fixture.
It’s never too late to replace your manual mechanical light switch with a smart, motion-activated one, and wiring and installing a motion sensor light switch can be fast and easy.
You don’t need to call an electrician for the job. All you need is some common tools like a screwdriver that every home has (you don’t own a screwdriver?) and within 30 minutes, you can get the job done even for beginners with no electrical knowledge.
Check the video version of installing a motion sensor light switch.
If you want a step by step instruction to follow, keep reading.
Step 1. Prepare tools for the installation
Before we install a motion sensor light switch, prepare these tools first so we can speed up the process.

- A motion sensor light switch
- ไขควง
- อุปกรณ์เสริม
- Wirecutter: to cut wires if necessary
- Wire connectors: most motion sensor light switches would include wire connecters by default in the accessory pack
- Voltage tester: to identity the hotwire and ensure the voltage is off
- Electrical tapes: to mark the hotwire
Step 2. Remove the Old Switch
Turn off the breaker to the light you want to replace the switch of and turn on/off the existing switch several times to ensure there is no power.
Now we can safely remove the old switch. Suppose you have absolutely no electrical knowledge and worry about the wiring. In that case, you can take a picture of the existing wiring to apply similar wirings to the motion sensor light switch or even restore the old wiring and the switch.
กำลังมองหาโซลูชันประหยัดพลังงานทำงานตามการเคลื่อนไหวอยู่ใช่หรือไม่
ติดต่อเราเพื่อรับโซลูชันครบวงจรสำหรับ PIR motion sensor, ผลิตภัณฑ์ประหยัดพลังงานทำงานตามการเคลื่อนไหว, สวิตช์เซนเซอร์ตรวจจับการเคลื่อนไหว และโซลูชัน Occupancy/Vacancy สำหรับเชิงพาณิชย์.
Mark the hot wire(the black wire) with electrical tapes if necessary.
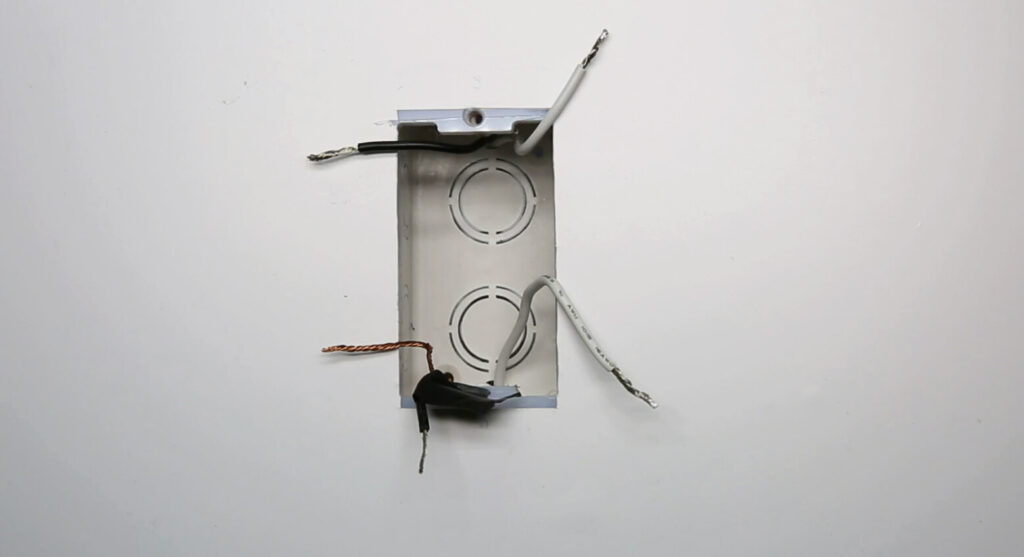
If you do not know which is load wire or hot wire, use the voltage tester to confirm with the following process:
- Turn on the breaker
- Move the voltage tester near each black wire
- The hotwire has power and the load wire does not have power
- Turn off the breaker
- Use the voltage near the hot wire to ensure the power is off
- Mark the hotwire with electrical tapes
Step 3. Wire the Motion Sensor Light Switch
First, make sure the breaker is turned off and there is no power with a voltage tester.
รับแรงบันดาลใจจากกลุ่มผลิตภัณฑ์เซนเซอร์ตรวจจับความเคลื่อนไหว Rayzeek.
ยังไม่พบสิ่งที่ต้องการใช่หรือไม่? ไม่ต้องกังวล เพราะยังมีแนวทางอื่นในการแก้ปัญหาของคุณเสมอ บางทีหนึ่งในกลุ่มผลิตภัณฑ์ของเราอาจช่วยคุณได้.
Now we start wiring the motion sensor light switch to the light by connecting the wires with the same color.
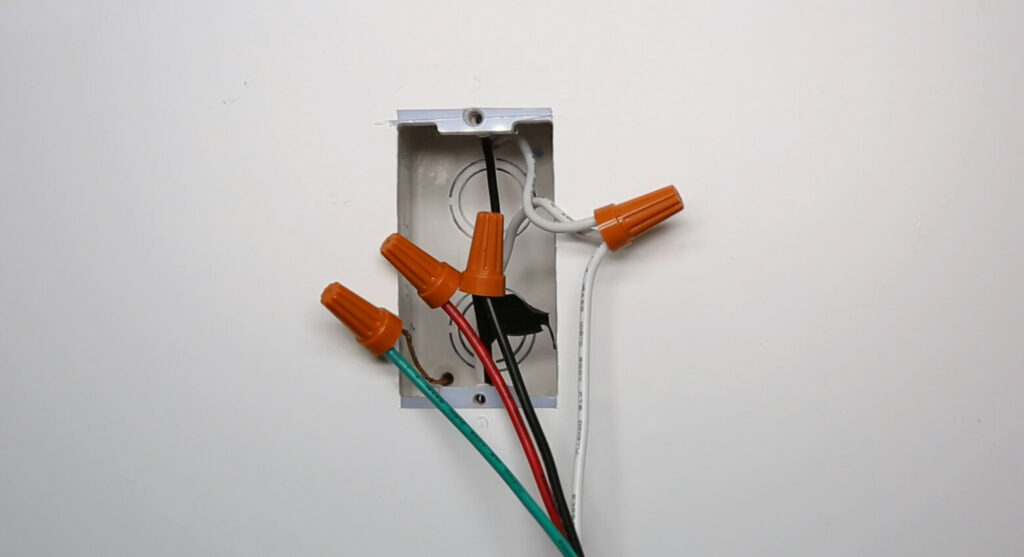
- Hotwire(black) to the light switch’s hotwire(black)
- Load wire(black or red) to the light switch’s load wire(red)
- Connect all neutral wires together (white)
- Connect all ground wires together(green or bare copper)
Now we partially screw the motion sensor switch into the wall box and test the wiring.
Turn on the breaker and the motion sensor light switch needs some time to warm up and will automatically turn on the light if the wiring is correct.
คุณอาจสนใจ

- แรงดันไฟฟ้า: ถ่าน AAA 2 ก้อน
- โหมดกลางวัน/กลางคืน
- การหน่วงเวลา: 15 นาที, 30 นาที, 1 ชั่วโมง (ค่าเริ่มต้น), 2 ชั่วโมง

- เซนเซอร์ตรวจจับการถือครองห้อง PIR ติดตั้งบนเพดาน พร้อมเอาต์พุตรีเลย์หน้าสัมผัสแห้ง
- ระบบจ่ายไฟแรงดันต่ำ 12/24VDC หรือ 12/24VAC
- หน้าสัมผัสรีเลย์แบบแยก COM, NO และ NC สำหรับสัญญาณอินพุตของระบบ EMS, HVAC และระบบควบคุมอาคาร

- สวิตช์เซนเซอร์ตรวจจับการเคลื่อนไหวด้วยไมโครเวฟแบบติดเพดานฝังฝ้า ไฟฟ้ากระแสตรงแรงดันต่ำ
- อินพุต 12 VDC / 24 VDC พร้อมช่วงรองรับ 10-30 VDC
- กระแสไฟฟ้าทำงานสูงสุด 10A พร้อมการปรับตั้งค่าเวลาหน่วง เกณฑ์ค่า Lux และความไวในการตรวจจับ
- สวิตช์เซนเซอร์ตรวจจับการเคลื่อนไหวด้วยไมโครเวฟแบบติดเพดานฝังฝ้า สำหรับโหลดสูง
- อินพุตแรงดันสาย 100-265 VAC รุ่น 10A
- ระบบตรวจจับด้วยไมโครเวฟความถี่ 5.8 GHz พร้อมการปรับตั้งค่าเวลาหน่วง เกณฑ์ค่า Lux และความไวในการตรวจจับ
- สวิตช์เซนเซอร์ตรวจจับการเคลื่อนไหวด้วยไมโครเวฟแบบติดเพดานฝังฝ้า
- อินพุตแรงดันสาย 100-265 VAC รุ่น 5A
- ระบบตรวจจับด้วยไมโครเวฟความถี่ 5.8 GHz พร้อมการปรับตั้งค่าเวลาหน่วง เกณฑ์ค่า Lux และความไวในการตรวจจับ
- สวิตช์หรี่ไฟเซนเซอร์ตรวจจับการเข้าใช้พื้นที่ระบบ PIR รุ่น RZ037 แบบติดเพดาน สำหรับระบบไฟฟ้า 220V
- กระแสไฟฟ้าทำงานสูงสุด 3A พร้อมโหลดพิกัด 660W
- ปุ่ม LUX ควบคุมการเปิด/ปิดเซนเซอร์แสง และความสว่างในการหรี่ไฟที่ผู้ใช้กำหนด
- สวิตช์หรี่ไฟเซนเซอร์ตรวจจับการเข้าใช้พื้นที่ระบบ PIR รุ่น RZ037 แบบติดเพดาน สำหรับระบบไฟฟ้า 110V
- กระแสไฟฟ้าทำงานสูงสุด 3A พร้อมโหลดพิกัด 330W
- ปุ่ม LUX ควบคุมการเปิด/ปิดเซนเซอร์แสง และความสว่างในการหรี่ไฟที่ผู้ใช้กำหนด

- สวิตช์เซนเซอร์ตรวจจับการเคลื่อนไหวด้วยไมโครเวฟแบบติดเพดาน ไฟฟ้ากระแสตรงแรงดันต่ำ
- อินพุต 12 VDC / 24 VDC พร้อมช่วงรองรับ 10-30 VDC
- กระแสไฟฟ้าทำงานสูงสุด 10A พร้อมการปรับตั้งค่าเวลาหน่วง เกณฑ์ค่า Lux และความไวในการตรวจจับ
- สวิตช์เซนเซอร์ตรวจจับความเคลื่อนไหวคลื่นไมโครเวฟแบบติดเพดาน รองรับโหลดสูง
- อินพุตแรงดันสาย 100-265 VAC รุ่น 10A
- ระบบตรวจจับด้วยไมโครเวฟความถี่ 5.8 GHz พร้อมการปรับตั้งค่าเวลาหน่วง เกณฑ์ค่า Lux และความไวในการตรวจจับ
- สวิตช์เซนเซอร์ตรวจจับความเคลื่อนไหวคลื่นไมโครเวฟแบบติดเพดาน
- อินพุตแรงดันสาย 100-265 VAC รุ่น 5A
- ระบบตรวจจับด้วยไมโครเวฟความถี่ 5.8 GHz พร้อมการปรับตั้งค่าเวลาหน่วง เกณฑ์ค่า Lux และความไวในการตรวจจับ

- สวิตช์เซนเซอร์ตรวจจับความเคลื่อนไหว PIR แบบฝังฝ้าเพดาน แรงดันไฟฟ้าต่ำ DC
- อินพุต 12 VDC / 24 VDC พร้อมช่วงรองรับ 10-30 VDC
- กระแสไฟฟ้าทำงานสูงสุด 10A พร้อมระบบปรับตั้งเวลาหน่วง ค่าความสว่าง Lux และความไวในการตรวจจับได้

- สวิตช์เซนเซอร์ตรวจจับความเคลื่อนไหว PIR แบบฝังฝ้าเพดาน รองรับโหลดสูง
- อินพุตแรงดันสาย 100-265 VAC รุ่น 10A
- ระบบตรวจจับ 360 องศา พร้อมระบบปรับตั้งเวลาหน่วง ค่าความสว่าง Lux และความไวในการตรวจจับได้
- สวิตช์เซนเซอร์ตรวจจับความเคลื่อนไหว PIR แบบฝังฝ้าเพดาน
- อินพุตแรงดันสาย 100-265 VAC รุ่น 5A
- ระบบตรวจจับ 360 องศา พร้อมระบบปรับตั้งเวลาหน่วง ค่าความสว่าง Lux และความไวในการตรวจจับได้

- ชุดสวิตช์ไร้สายและตัวรับสัญญาณสำหรับควบคุมการเปิด/ปิดไฟภายในอาคาร
- ตัวรับสัญญาณ 100-230VAC, 50/60Hz พิกัดกระแสไฟฟ้า 5A
- สวิตช์ไร้สายใช้พลังงานจากแบตเตอรี่ CR2032 พร้อมการสื่อสารผ่านความถี่ 2.4GHz
- ตรวจจับการใช้งาน (เปิดอัตโนมัติ/ปิดอัตโนมัติ)
- 12–24V DC (10–30VDC), สูงสุด 10A
- ครอบคลุม 360° เส้นผ่านศูนย์กลาง 8–12 ม.
- หน่วงเวลา 15 วินาที–30 นาที
- เซนเซอร์วัดแสง ปิด/15/25/35 Lux
- ความไวสูง/ต่ำ
- โหมดตรวจจับการใช้งาน เปิดอัตโนมัติ/ปิดอัตโนมัติ
- 100–265V AC, 10A (จำเป็นต้องมีสายสายนิวทรัล)
- ครอบคลุม 360°; เส้นผ่านศูนย์กลางการตรวจจับ 8–12 ม.
- หน่วงเวลา 15 วินาที–30 นาที; Lux ปิด/15/25/35; ความไวสูง/ต่ำ
- โหมดตรวจจับการใช้งาน เปิดอัตโนมัติ/ปิดอัตโนมัติ
- 100–265V AC, 5A (จำเป็นต้องมีสายสายนิวทรัล)
- ครอบคลุม 360°; เส้นผ่านศูนย์กลางการตรวจจับ 8–12 ม.
- หน่วงเวลา 15 วินาที–30 นาที; Lux ปิด/15/25/35; ความไวสูง/ต่ำ
Press the buttons on the light switch to see if you can successfully control the ON and OFF of the light.
Step 4. Fix the Switch Into the Wallbox
Strengthen the screws, install the cover plates, and adjust the switch to a straight position.
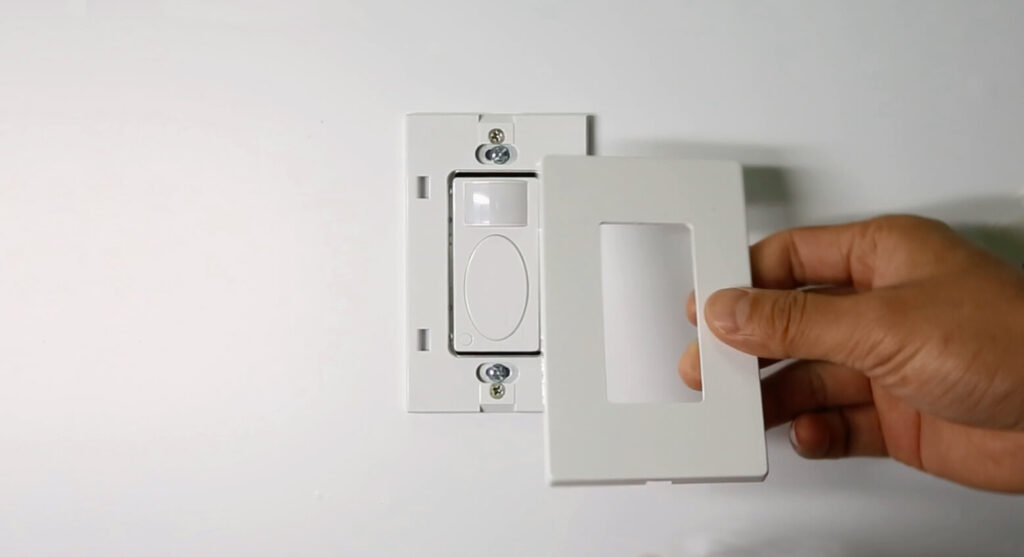
Now you can adjust the functions of the motion sensor light switch to a proper setting according to the user manual, such as occupancy sensor and vacancy sensor motion detection mode, time delay, and ambient light sensing.







