

Los sensores de movimiento son excelentes para ahorrar energía y aportar comodidad. Pueden encender automáticamente la luz al detectar el movimiento de una persona y apagarla cuando no se detecta movimiento. Ya sea para uso en interiores o exteriores, un interruptor de luz con sensor de movimiento es mejor que un interruptor mecánico en la mayoría de los casos.
Contenido
- Paso 1. Preparar las herramientas para la instalación
- Paso 2. Retirar el interruptor antiguo
- Paso 3. Cablear el interruptor de luz con sensor de movimiento
- Paso 4. Fijar el interruptor en la caja de empotrar
Los interruptores de luz con sensor de movimiento son excelentes para ahorrar energía y aportar comodidad al hogar. El detector de sensor de movimiento puede encender la luz automáticamente al entrar en la habitación y apagarla después de salir. Se prefiere un interruptor de luz con sensor de movimiento antes que una luminaria con sensor de movimiento para uso doméstico porque, la mayoría de las veces, es necesario controlar la luz de forma manual. Además, resulta más sencillo actualizar el interruptor de pared tradicional con un interruptor con sensor de movimiento que reemplazar la luminaria.
Nunca es tarde para sustituir el interruptor mecánico manual por uno inteligente activado por movimiento; además, el cableado y la instalación de un interruptor de luz con sensor de movimiento pueden realizarse de forma rápida y sencilla.
No es necesario llamar a un electricista para este trabajo. Solo se necesitan algunas herramientas habituales, como un destornillador, disponible en cualquier hogar, y en menos de 30 minutos se puede completar la tarea, incluso para principiantes sin conocimientos de electricidad.
Consulte la versión en vídeo sobre cómo instalar un interruptor de luz con sensor de movimiento.
Si prefiere seguir instrucciones paso a paso, continúe leyendo.
Paso 1. Preparar las herramientas para la instalación
Antes de instalar el interruptor de luz con sensor de movimiento, prepare primero estas herramientas para agilizar el proceso.
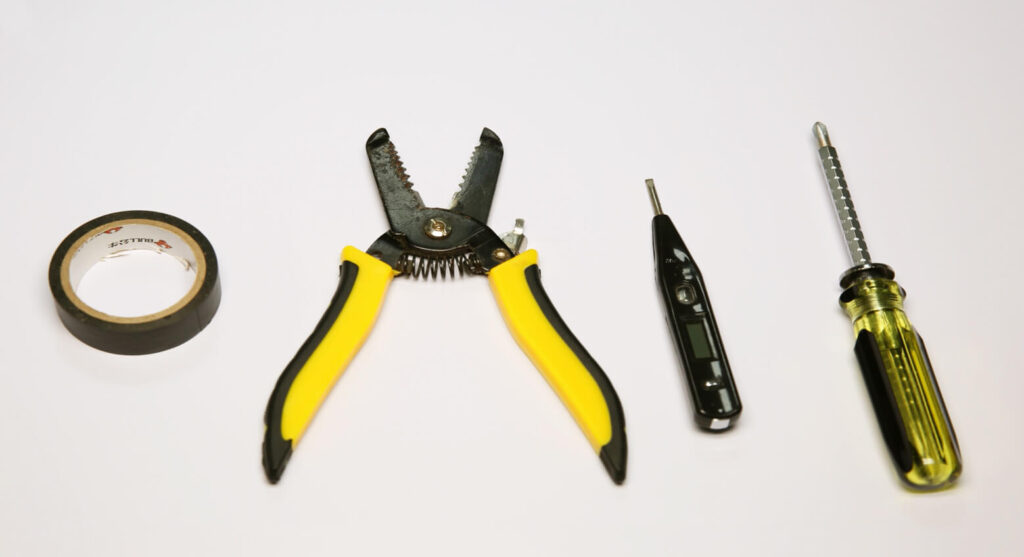
- Un interruptor de luz con sensor de movimiento
- Destornillador
- Opcional
- Alicates de corte: para cortar cables si es necesario
- Conectores de cables: la mayoría de los interruptores de luz con sensor de movimiento los incluyen de forma predeterminada en el paquete de accesorios
- Comprobador de tensión: para identificar el cable de fase y verificar que la corriente está desconectada
- Cinta aislante: para marcar el cable de fase
Paso 2. Retirar el interruptor antiguo
Desconecte el interruptor magnetotérmico del circuito de la luz cuyo interruptor desea sustituir y accione el interruptor existente varias veces para asegurarse de que no hay corriente.
Ahora es seguro retirar el interruptor antiguo. Si carece de conocimientos eléctricos y le preocupa el cableado, puede hacer una fotografía de la instalación existente para reproducirla en el interruptor con sensor de movimiento o bien para restaurar el interruptor y la instalación anteriores.
¿Busca soluciones de ahorro de energía activadas por movimiento?
Póngase en contacto con nosotros para obtener sensores de movimiento PIR completos, productos de ahorro de energía activados por movimiento, interruptores con sensor de movimiento y soluciones comerciales de presencia/vacancia.
Marque el cable de fase (el cable negro) con cinta aislante si es necesario.
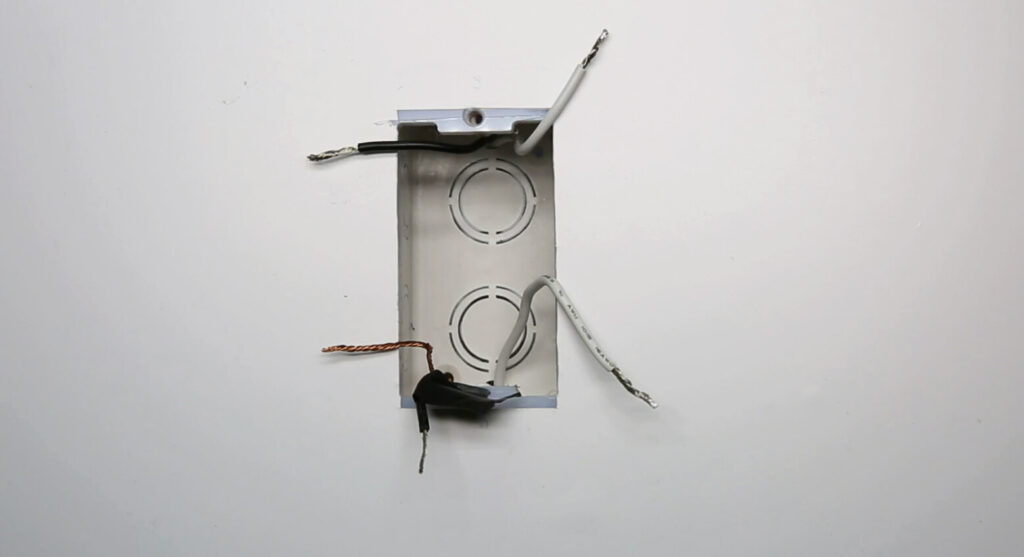
Si no sabe cuál es el cable de carga y cuál el de fase, utilice el comprobador de tensión para confirmarlo mediante el siguiente procedimiento:
- Conecte el interruptor magnetotérmico
- Aproxime el comprobador de tensión a cada cable negro
- El cable de fase tiene corriente y el cable de carga no tiene corriente
- Desconecte el interruptor magnetotérmico
- Utilice el comprobador de tensión cerca del cable de fase para comprobar que la corriente está desconectada
- Marque el cable de fase con cinta aislante
Paso 3. Cablear el interruptor de luz con sensor de movimiento
En primer lugar, asegúrese de que el interruptor magnetotérmico está desconectado y de que no hay corriente utilizando un comprobador de tensión.
Inspírese con los portafolios de sensores de movimiento Rayzeek.
¿No encuentra lo que busca? No se preocupe. Siempre existen formas alternativas de resolver sus problemas. Quizá alguno de nuestros portafolios pueda ayudarle.
A continuación, comience a cablear el interruptor de luz con sensor de movimiento a la luz conectando los cables del mismo color.
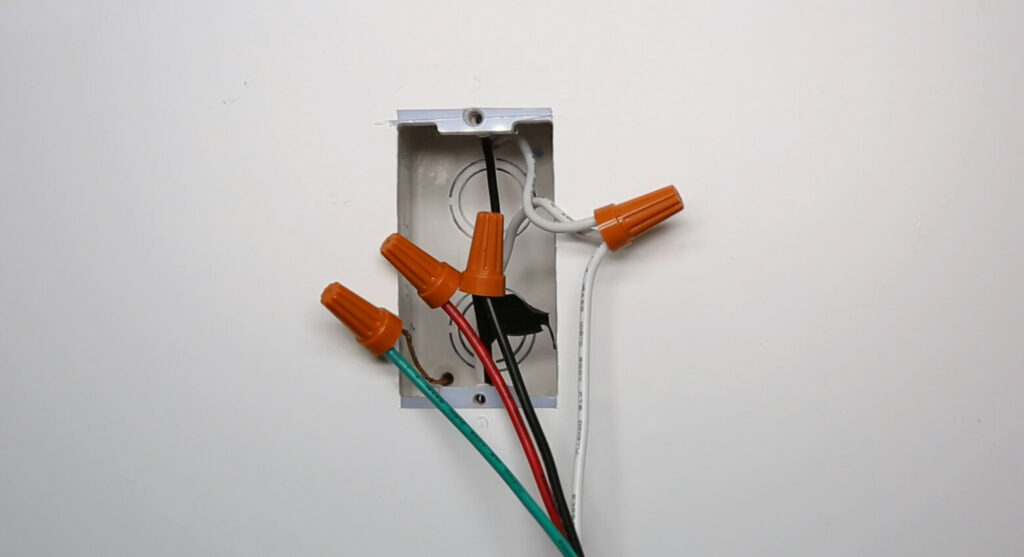
- Cable de fase (negro) al cable de fase del interruptor de luz (negro)
- Cable de carga (negro o rojo) al cable de carga del interruptor de luz (rojo)
- Conecte todos los cables neutros entre sí (blancos)
- Conecte todos los cables de toma de tierra entre sí (verdes o de cobre al descubierto)
Now we partially screw the motion sensor switch into the wall box and test the wiring.
Turn on the breaker and the motion sensor light switch needs some time to warm up and will automatically turn on the light if the wiring is correct.
Quizás le interese

- Tensión: 2 pilas AAA
- Modo Día/Noche
- Temporización: 15 min, 30 min, 1 h (por defecto), 2 h

- Sensor de presencia PIR para montaje en techo con salida de relé de contacto seco
- Alimentación de baja tensión de 12/24VDC o 12/24VAC
- Contactos de relé aislados COM, NO y NC para entradas de EMS, HVAC y control de edificios

- Interruptor con sensor de movimiento por microondas empotrable en techo de baja tensión DC
- Entrada de 12 VDC / 24 VDC con rango de 10-30 VDC
- Corriente de funcionamiento máxima de 10A con retardo de tiempo, umbral de Lux y sensibilidad ajustables
- Interruptor con sensor de movimiento por microondas empotrable en techo para cargas más elevadas
- Entrada de tensión de red de 100-265 VAC, modelo de 10A
- Detección por microondas de 5,8 GHz con temporizador, umbral Lux y sensibilidad ajustables
- Interruptor con sensor de movimiento por microondas empotrable para techo
- Entrada de tensión de red de 100-265 VAC, modelo de 5A
- Detección por microondas de 5,8 GHz con temporizador, umbral Lux y sensibilidad ajustables
- Regulador con sensor de presencia PIR RZ037 de techo para alimentación de 220V
- Corriente de funcionamiento máxima de 3A con carga nominal de 660W
- El botón LUX controla el encendido/apagado del sensor de luz y la regulación de brillo ajustada por el usuario
- Regulador con sensor de presencia PIR RZ037 de techo para alimentación de 110V
- Corriente de funcionamiento máxima de 3A con carga nominal de 330W
- El botón LUX controla el encendido/apagado del sensor de luz y la regulación de brillo ajustada por el usuario

- Interruptor con sensor de movimiento por microondas de techo para CC de bajo voltaje
- Entrada de 12 VDC / 24 VDC con rango de 10-30 VDC
- Corriente de funcionamiento máxima de 10A con retardo de tiempo, umbral de Lux y sensibilidad ajustables
- Interruptor con sensor de movimiento por microondas de techo para mayor carga
- Entrada de tensión de red de 100-265 VAC, modelo de 10A
- Detección por microondas de 5,8 GHz con temporizador, umbral Lux y sensibilidad ajustables
- Interruptor con sensor de movimiento por microondas de techo
- Entrada de tensión de red de 100-265 VAC, modelo de 5A
- Detección por microondas de 5,8 GHz con temporizador, umbral Lux y sensibilidad ajustables

- Interruptor con sensor de movimiento PIR para montaje empotrable en techo de CC de bajo voltaje
- Entrada de 12 VDC / 24 VDC con rango de 10-30 VDC
- Corriente máxima de trabajo de 10 A con tiempo de retardo, umbral de luxes y sensibilidad ajustables

- Interruptor con sensor de movimiento PIR empotrable en techo para mayor carga
- Entrada de tensión de red de 100-265 VAC, modelo de 10A
- Detección de 360 grados con tiempo de retardo, umbral de luxes y sensibilidad ajustables
- Interruptor con sensor de movimiento PIR empotrable en techo
- Entrada de tensión de red de 100-265 VAC, modelo de 5A
- Detección de 360 grados con tiempo de retardo, umbral de luxes y sensibilidad ajustables

- Kit de emisor inalámbrico y receptor para el control de iluminación de encendido/apagado en interiores
- Receptor de 100-230 V CA, 50/60 Hz con corriente nominal de 5 A
- Interruptor inalámbrico alimentado por CR2032 con comunicación de 2,4 GHz
- Presencia (encendido automático/apagado automático)
- 12–24 V CC (10–30 V CC), hasta 10 A
- Cobertura de 360°, 8–12 m de diámetro
- Tiempo de retardo de 15 s a 30 min
- Sensor de luz Desactivado/15/25/35 Lux
- Sensibilidad alta/baja
- Modo de presencia con encendido/apagado automático
- 100–265V CA, 10A (requiere neutro)
- Cobertura de 360°; diámetro de detección de 8–12 m
- Temporización: 15 s–30 min; Lux OFF/15/25/35; Sensibilidad Alta/Baja
- Modo de presencia con encendido/apagado automático
- 100–265V CA, 5A (requiere neutro)
- Cobertura de 360°; diámetro de detección de 8–12 m
- Temporización: 15 s–30 min; Lux OFF/15/25/35; Sensibilidad Alta/Baja
Press the buttons on the light switch to see if you can successfully control the ON and OFF of the light.
Paso 4. Fijar el interruptor en la caja de empotrar
Strengthen the screws, install the cover plates, and adjust the switch to a straight position.
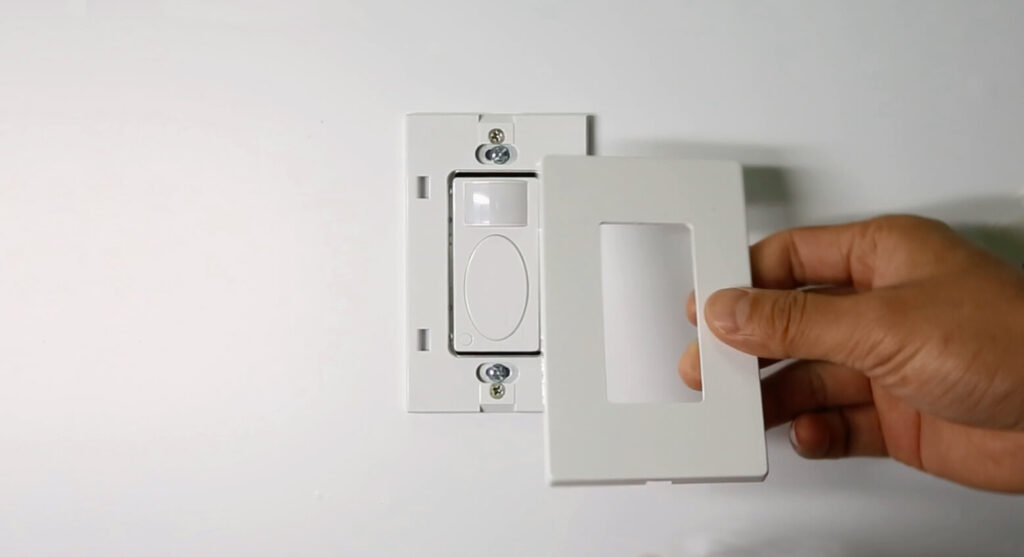
Now you can adjust the functions of the motion sensor light switch to a proper setting according to the user manual, such as occupancy sensor and vacancy sensor motion detection mode, time delay, and ambient light sensing.







