
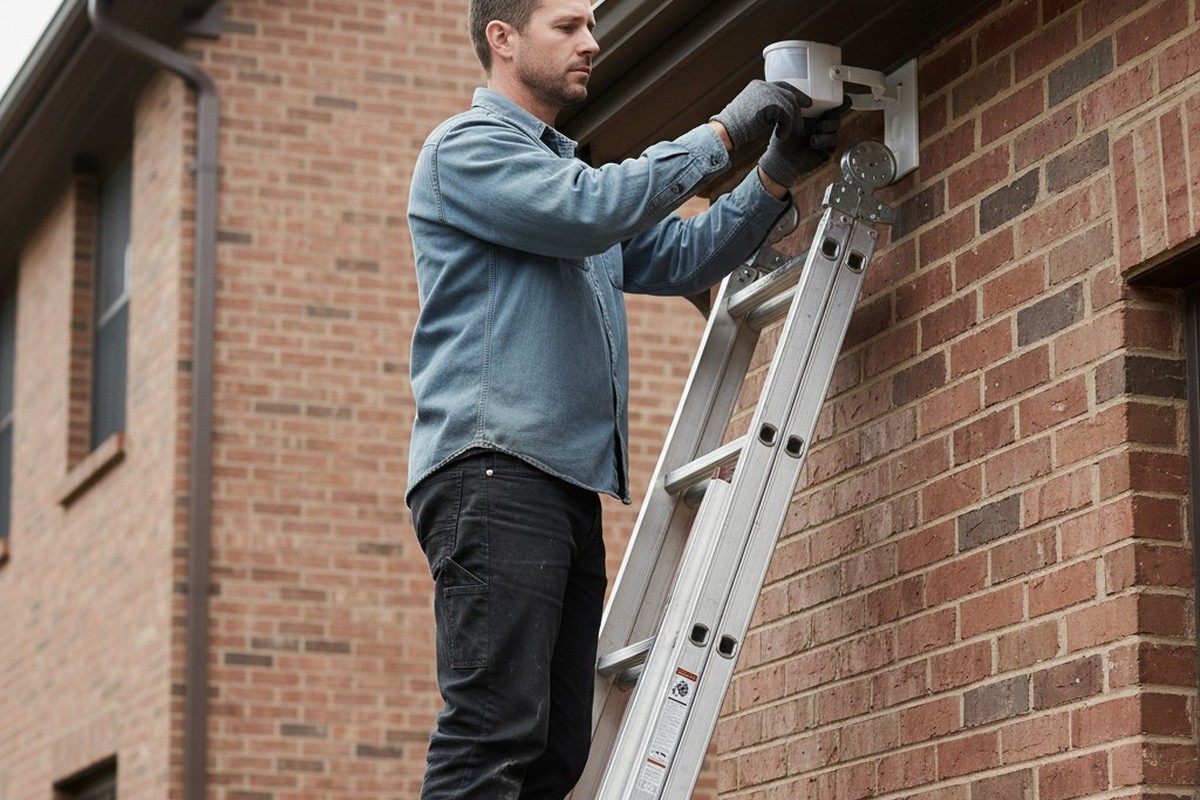
The outdoor motion light that trips every time a neighbor walks to their car, a vehicle passes on the shared driveway, or someone approaches an adjacent door isn’t malfunctioning. It’s performing exactly as designed. The constant false triggers, the pointless illumination of empty pavement, and the light spilling into windows are symptoms of a fundamental mismatch between sensor technology and property layout. In townhomes, row homes, and urban infill with tight setbacks, the motion sensors marketed for typical residential use are simply the wrong tool for the job.
The conventional fix is to layer on smart scheduling or complex automation to suppress unwanted activation. This treats the symptom. The real solution is structural: choosing motion sensors with detection patterns that fit the constraints of tight urban lots, mounting them at heights that narrow the coverage zone, and aiming them to isolate your property instead of surveilling the entire shared space. This guide explains how to select and install the right hardware to prevent neighbor-triggered nuisance while maintaining effective security lighting—no connected devices, hubs, or apps required.
Why Shared Driveways Breed False Triggers
Most outdoor motion lights are chosen based on aesthetics, brightness, or price. The detection pattern—the three-dimensional zone where the sensor responds to movement—is often treated as an afterthought. Manufacturers contribute to this by marketing “wide coverage” as a universal benefit. A 180-degree detection spread sounds comprehensive, and for a detached home with 30 feet of lawn separating it from the neighbors, it may be harmless. The sensor can cover the driveway, walkway, and side yard without issue.
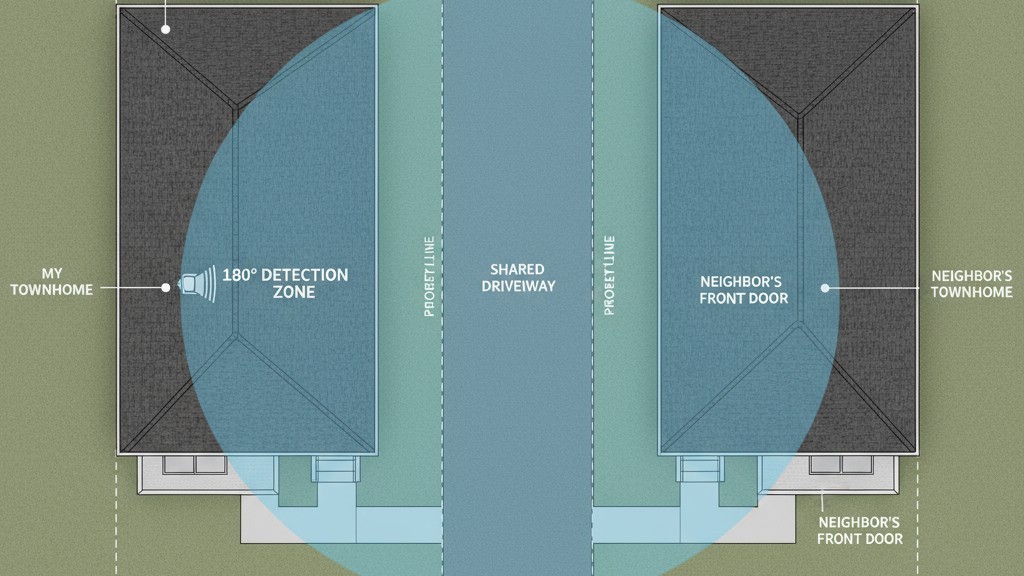
That same wide pattern becomes a liability in shared-driveway townhomes, where property lines are measured in feet and a neighbor’s front door may be only 15 feet from yours. A sensor with a 120- or 180-degree spread doesn’t just see your door; it sees your neighbor’s door, cars arriving and departing on the shared pavement, and pedestrians on the common walkway. The result is a light that flashes on dozens of times a day for events entirely unrelated to your property.
This isn’t a flaw in the sensor. It is a failure of application. The device is doing its job by detecting infrared changes across a broad field of view. The problem is that this field of view, shaped by the lens inside the fixture, is far too wide for the physical context.
How PIR Sensors Create Detection Zones
Passive infrared (PIR) sensors work by detecting changes in heat. A human body, a warm car engine, or an animal creates a shift in the infrared signature of the monitored space. The sensor doesn’t emit a beam; it passively observes. When the thermal change exceeds a threshold, it trips the light. This mechanism is mature, reliable, and efficient, which is why it dominates outdoor lighting. The challenge isn’t the detection principle; it’s the shape of the zone the sensor monitors.
That shape is not a uniform sphere. It is a directional, three-dimensional pattern sculpted by the multi-faceted Fresnel lens in front of the infrared sensor. Each facet focuses heat from a specific direction onto the sensor, and their combined effect defines the zone’s geometry: its horizontal spread, its vertical reach, and its forward range.
こちらの商品もおすすめです

- 電圧: 単4形乾電池 2本
- 昼/夜モード
- タイマー設定時間: 15分、30分、1時間(デフォルト)、2時間

- 無電圧接点リレー出力付き天井取り付け型PIR人感センサー
- 12/24VDCまたは12/24VAC低電圧電源
- EMS、HVAC、および建物制御入力用COM、NO、NC絶縁リレー接点

- 低電圧DC天井埋め込み型マイクロ波人感センサースイッチ
- 10~30 VDC範囲の12 VDC / 24 VDC入力
- 調整可能なタイムラグ、照度(Lux)閾値、感度を備えた最大動作電流10A仕様
- 高負荷対応型 埋込型天井取付けマイクロ波人感センサースイッチ
- 100-265 VAC 商用電源入力、10Aモデル
- 調整可能なタイムラグ、照度(Lux)閾値、感度を備えた5.8 GHzマイクロ波検知
- 埋込型天井取付けマイクロ波人感センサースイッチ
- 100-265 VAC商用電圧入力、5Aモデル
- 調整可能なタイムラグ、照度(Lux)閾値、感度を備えた5.8 GHzマイクロ波検知
- 220V電源対応 天井取付けRZ037 PIR(赤外線)人感センサー調光器
- 定格負荷660W、最大動作電流3A
- LUXボタンによる照度センサーのON/OFFおよびユーザー設定の調光明るさ制御
- 110V電源対応 天井取付けRZ037 PIR(赤外線)人感センサー調光器
- 定格負荷330W、最大動作電流3A
- LUXボタンによる照度センサーのON/OFFおよびユーザー設定の調光明るさ制御

- 低電圧DC対応 天井取付けマイクロ波人感センサースイッチ
- 10~30 VDC範囲の12 VDC / 24 VDC入力
- 調整可能なタイムラグ、照度(Lux)閾値、感度を備えた最大動作電流10A仕様
- 高負荷対応 天井取付型マイクロ波人感センサースイッチ
- 100-265 VAC 商用電源入力、10Aモデル
- 調整可能なタイムラグ、照度(Lux)閾値、感度を備えた5.8 GHzマイクロ波検知
- 天井取り付け型マイクロ波人感センサースイッチ
- 100-265 VAC商用電圧入力、5Aモデル
- 調整可能なタイムラグ、照度(Lux)閾値、感度を備えた5.8 GHzマイクロ波検知

- 低電圧DC埋込型天井PIR人感センサースイッチ
- 10~30 VDC範囲の12 VDC / 24 VDC入力
- 最大動作電流10A(調整可能なタイムラグ、照度閾値、感度設定付き)

- 高負荷対応 埋込型天井PIR人感センサースイッチ
- 100-265 VAC 商用電源入力、10Aモデル
- 360度検知(調整可能なタイムラグ、照度閾値、感度設定付き)
- 埋込型天井PIR人感センサースイッチ
- 100-265 VAC商用電圧入力、5Aモデル
- 360度検知(調整可能なタイムラグ、照度閾値、感度設定付き)

- 屋内用照明ON/OFF制御ワイヤレススイッチ&受信機キット
- 100-230VAC、50/60Hz、定格電流5A受信機
- 2.4GHz通信対応 CR2032電池駆動ワイヤレススイッチ
- Occupancy(自動点灯/自動消灯)
- 12–24V DC (10–30VDC)、最大10A
- 360°検知エリア、直径8–12m
- タイムラグ 15秒–30分
- 照度センサー オフ/15/25/35 Lux
- 高/低感度
- 自動点灯/自動消灯人感モード
- 100–265V AC, 10A(中性線必須)
- 360°検知範囲、検知直径8–12 m
- タイムデレイ15秒–30分、Lux OFF/15/25/35、感度 高/低
- 自動点灯/自動消灯人感モード
- 100–265V AC, 5A(中性線必須)
- 360°検知範囲、検知直径8–12 m
- タイムデレイ15秒–30分、Lux OFF/15/25/35、感度 高/低
For shared driveways, the horizontal spread is the most critical dimension. A sensor with a 180-degree spread monitors a full semicircle, inevitably capturing the neighbor’s property and any traffic in the shared space. A sensor with a 60- or 90-degree spread monitors a much narrower slice, concentrating on the area directly in front of the fixture. This isn’t a reduction in sensitivity; it’s a deliberate focus that trades useless breadth for necessary precision.
Detection Zone Geometry: Spread, Reach, and Range
Horizontal spread is an angle, typically from a narrow 30 degrees to a panoramic 240 degrees. A 30-degree sensor creates a tight cone of detection, perfect for a single doorway. A 120-degree sensor creates a wide arc that, in a townhome layout, will almost certainly extend across the driveway and into the neighbor’s approach path. A 60-degree sensor, mounted in the same spot, can monitor your door and walkway without ever seeing the neighbor’s side.
Vertical reach describes the zone’s height. Some sensors have a strong downward bias, focusing on ground-level movement. Others extend their field upward, causing false triggers from swaying tree branches. For driveways and entries, a sensor with limited upward reach and a strong downward focus is superior.
Range is the forward distance of detection, usually between 20 and 40 feet for residential sensors. Excessive range compounds the problem of excessive spread. While you can reduce range by lowering the sensitivity, this is an imprecise fix. It’s far more effective to choose a sensor with a narrow horizontal pattern in the first place, making the range less of an issue because the entire zone is already focused.
Choosing the Right Lens Pattern: Narrow-Beam vs. Wide-Angle
The single most important decision is selecting a sensor based on its lens pattern. Narrow-beam sensors, often found in spotlight or directional fixtures, use lenses that create a horizontal spread between 30 and 90 degrees. Wide-angle sensors, typically sold as floodlights, spread detection across 120 to 180 degrees. Marketing language positions wide-angle sensors as superior because they “cover more space,” a logic that holds true for large properties but is deeply flawed for shared ones.
A narrow-beam sensor solves the false-trigger problem by design. A 60-degree spread aimed at your front door creates a detection zone that stays on your property. Your neighbor’s door, offset by even a few feet, falls outside the cone. Passing cars, unless they pull directly into your spot, never enter the zone. The sensor’s field of view is aligned with your home’s functional boundaries, not the maximum possible area it could surveil.
Wide-angle sensors, in contrast, are almost impossible to constrain in tight spaces. Even with careful aiming, a 120-degree spread will bleed across property lines. Attempts to fix this with software or secondary adjustments—like reducing sensitivity or shortening the timer—are merely managing the consequences of choosing the wrong hardware.
人感センサーを活用した省エネソリューションをお探しですか?
PIR人感センサー、人感センサー搭載省エネ製品、人感センサースイッチ、商業施設向けOccupancy/Vacancy(在室/不在)ソリューションについては、お気軽にお問い合わせください。
The difficulty is that the retail market is dominated by wide-angle products. You may need to look beyond generic “security floodlights” and search for terms like “directional motion sensor” or “spotlight PIR sensor.” These are more common in commercial and architectural lighting lines, where precision is valued over raw coverage.
Reinforcing the Pattern with Shrouds and Hoods
Beyond the lens, the fixture’s housing can provide another layer of control. Some sensors include physical shrouds or hoods that block detection from peripheral angles. A functional shroud is opaque and prevents infrared radiation from reaching the sensor except through a limited opening, effectively narrowing the field of view.
This is especially useful when your only options have patterns that are still too broad. A fixture with a 90-degree lens and adjustable side baffles can be tuned on-site to create a much narrower effective zone. These are distinct from decorative covers; a useful shroud blocks the sensor’s view, not just the visible light from the bulb.
Strategic Mounting for Tighter Zones
Mounting height shapes the detection zone’s footprint on the ground. A sensor mounted at eye level (five to six feet) projects its zone outward at a shallow angle, creating a long, wide footprint. The same sensor mounted at 10 feet, near the eave line, projects its zone downward at a steeper angle. This creates a much tighter footprint, concentrated closer to the fixture.
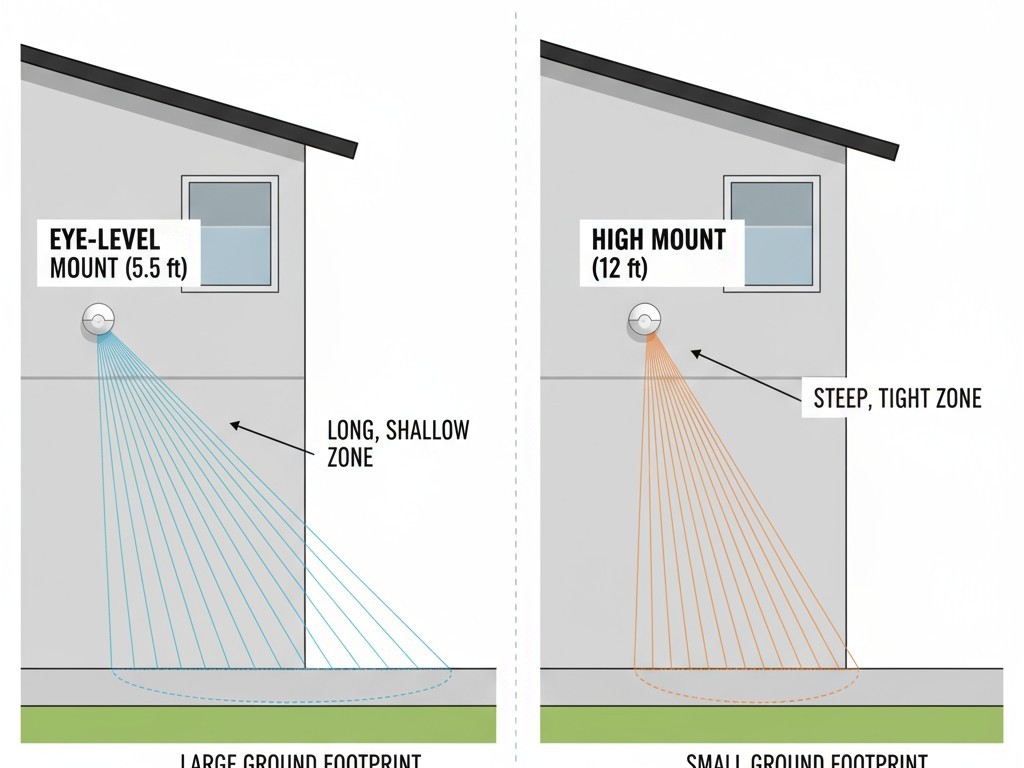
In townhome layouts, mounting higher is a powerful strategy. It dramatically reduces the chance that the detection zone will spill across property lines or deep into the shared driveway. The zone becomes a spotlight on the immediate approach to your door, not a floodlight on the whole area. This works best when combined with a narrow-beam lens; a 60-degree sensor at 10 feet might monitor only a 6-foot-wide path extending 15 feet out—a zone entirely within your control.
Soffit vs. Pillar Mounting in Shared Spaces
Where you mount the fixture also matters. Soffit mounting, under an eave or overhang, offers an inherent downward focus. This naturally limits the detection zone to a tight footprint around the door, making it ideal for simple layouts where your walkway is directly in front. The main limitation is that it’s difficult to cover areas off to the side, like a parking spot.
Pillar mounting, on a vertical wall or column, provides maximum flexibility. The sensor can be aimed in almost any direction to thread the detection zone between exclusion areas, covering your path while avoiding the shared driveway or a neighbor’s window. The risk, however, is over-aiming. A pillar-mounted sensor aimed too broadly reintroduces the very problem you’re trying to solve. This flexibility demands discipline.
Aiming: The Final Step to Precision
Even the perfect sensor, mounted at the right height, will fail if aimed incorrectly. The goal is to orient the sensor so its detection pattern covers your target zone (path, door, parking spot) and its edges stop short of exclusion zones (the neighbor’s door, the shared walkway).
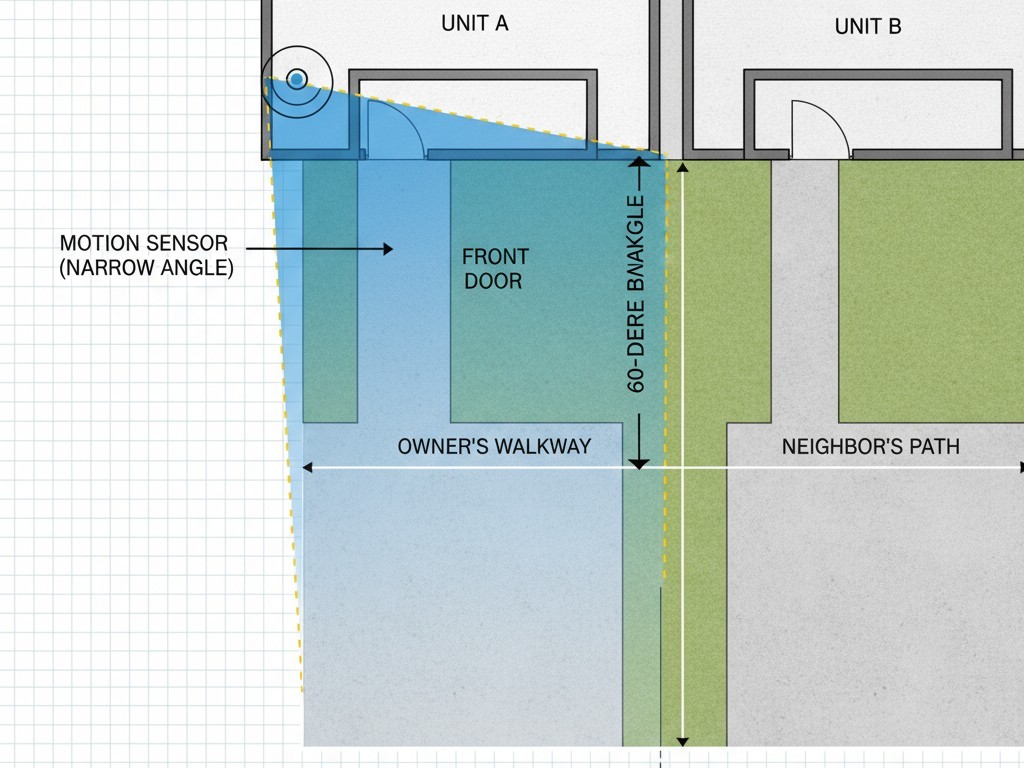
For a sensor with a 60-degree spread, this means aligning its centerline with your target and ensuring the 30-degree arcs to the left and right remain on your property. Many fixtures have adjustable heads on ball joints, which are invaluable for this fine-tuning. Use the fixture’s “walk-test” mode to physically trace the boundaries of the detection zone, confirming it triggers where you want and stays off everywhere else.
Rayzeek人感センサーのポートフォリオを見る.
お探しの製品が見つかりませんか?ご安心ください。課題を解決する手段は常に複数存在します。当社の製品ポートフォリオのいずれかがお役に立つかもしれません。
Once the physical aiming is correct, you can use sensitivity and timer controls for final refinement. Lowering the sensitivity can help filter out marginal detections at the very edge of the zone, while a shorter timer minimizes the annoyance of any remaining false triggers. These are fine-tuning steps, not substitutes for proper aiming.
Avoiding the Marketing Trap
The lighting aisle is full of wide-angle flood sensors. They feature prominent dual lamps, boast high lumen counts, and are marketed with language emphasizing maximum coverage and security. For the average buyer, “covers 180 degrees” sounds better than “covers 60 degrees.” This is the marketing trap.
This market bias exists because wide-angle sensors are easy to install without much thought. In a typical suburban lot, imprecise coverage is harmless. The false triggers that plague dense urban layouts are treated as a minor nuisance, not a design failure.
To solve the problem, you must deliberately seek out the right hardware. Look for directional spotlights, wall sconces with integrated sensors, or even modular PIR sensors that can be paired with a separate light fixture. You have to bypass the default choices to select hardware that actually fits your home’s context. The solution isn’t smarter software; it’s smarter hardware selection.







