

The Apartment Energy Savings Dilemma
Air conditioning is one of the biggest expenses for apartment dwellers, especially in climates that demand constant cooling. The promise of automated savings from an occupancy sensor is simple: Why pay to cool an empty room? But renters and apartment owners face constraints that most smart home gadgets ignore. Lease agreements forbid permanent modifications. HVAC warranties can be voided by a single wrong move. Internet service is unreliable, changing with every new tenant. These are not minor details; they demand an entirely different approach to automation—one built for reversibility, reliability, and warranty protection.
The Rayzeek AC motion controller was engineered for this reality. It’s compatible with the split AC systems found in most apartments and, unlike smart thermostats, operates without an internet connection, sidestepping a major point of failure in rental units. Its two installation methods, low-voltage and line-level, allow you to match the approach to your property’s rules and your own skill level. Understanding these methods is the key to a drama-free installation. This guide is a decision framework, not a universal tutorial. It will equip you to make safe, informed choices that preserve your warranty and to recognize when it’s time to call a professional.
Low-Voltage vs. Line-Level: The Foundational Choice
Every AC motion controller installation falls into one of two categories. This isn’t a matter of preference; it’s a critical choice that dictates safety, complexity, and whether you keep your warranty.
How Low-Voltage Installation Works
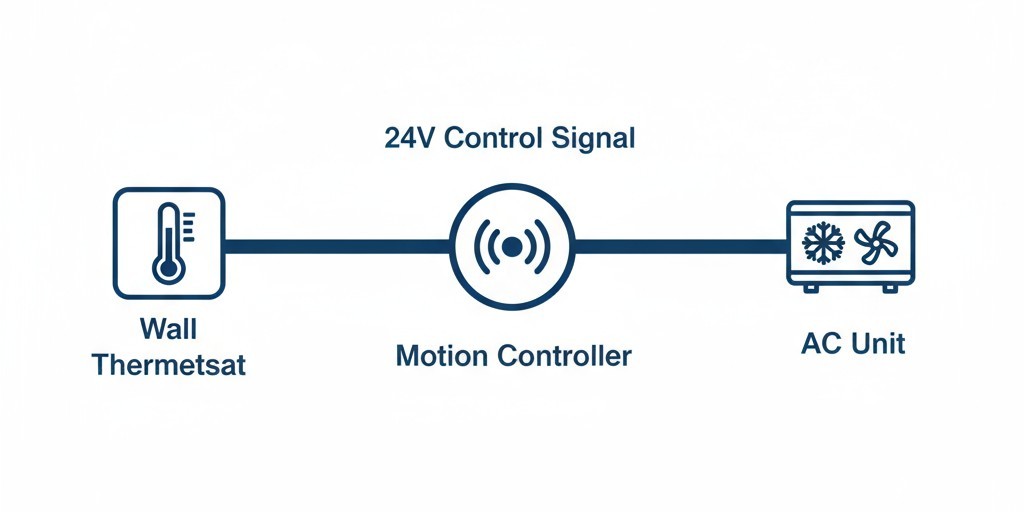
In a low-voltage setup, the Rayzeek controller sits between the thermostat and the air conditioner. Most thermostats run on 24-volt AC power from a transformer in the HVAC system. They send a low-voltage signal to the AC unit to call for cooling. The controller simply intercepts this signal. When its sensor detects no motion for a set time, it opens the circuit, stopping the thermostat’s call from reaching the AC. When motion returns, the circuit closes, and the thermostat operates as usual.
This method is far lower risk. The voltage is too low to pose a serious shock hazard, and the wiring is usually accessible right at the thermostat. Crucially, the controller never touches the AC unit itself or its high-voltage power supply. For renters, this is the ideal approach. The installation is external, completely reversible, and no different functionally than swapping in a new programmable thermostat—an action that rarely causes warranty issues. The only requirement is a standard low-voltage thermostat, which the vast majority of split AC systems use.
How Line-Level Installation Works
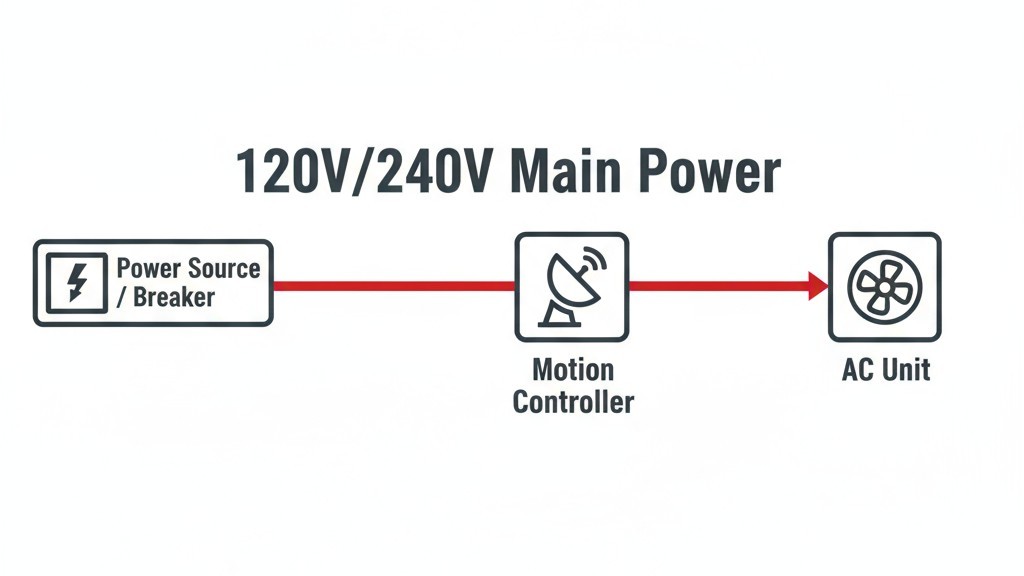
A line-level installation puts the controller directly in the high-voltage power supply to the air conditioner, typically 120V or 240V. The controller acts as a heavy-duty, motion-sensing switch. When the room is empty, it cuts all power to the AC unit. When motion is detected, it restores power, and the AC runs based on its own internal settings.
Rayzeek人感センサーのポートフォリオを見る.
お探しの製品が見つかりませんか?ご安心ください。課題を解決する手段は常に複数存在します。当社の製品ポートフォリオのいずれかがお役に立つかもしれません。
This approach is more complex and carries greater electrical risk. Working with line voltage demands strict safety practices and often requires a licensed electrician to comply with local building codes. You’ll need access to an electrical panel or junction box, which may be off-limits in a rental. From a warranty standpoint, cutting main power to an AC unit repeatedly can be contentious. While the controller is still an external device, some manufacturers may use it to deny a warranty claim if the unit develops electrical problems.
The Clear Choice for Renters and DIYers
For nearly all apartment and DIY installations, the low-voltage method is the correct choice. It respects the reversibility that rental agreements demand, poses minimal electrical risk, and keeps a clear boundary between the controller and the AC unit’s warranty.
Line-level installation is a last resort, necessary only for AC systems without a standard wall thermostat, like units with built-in mechanical knobs. In these rare cases, professional installation is non-negotiable, and you must get your landlord’s approval first. The decision is simple: if you have a wall thermostat, go with a low-voltage installation.
Protecting Your Warranty
The fear of voiding an HVAC warranty is valid. A failed compressor can cost thousands to replace. However, not every interaction with an AC system is a “modification.” The key distinction is whether you alter the unit’s internal components or simply manage the external signals it receives.
An occupancy controller like the Rayzeek falls into the second category. It doesn’t require you to open the AC’s casing, change internal parts, or touch the sealed refrigerant system. It sits upstream, in the control path, deciding whether to pass along the thermostat’s call for cooling. This is exactly how a programmable thermostat works. Manufacturers don’t void warranties for using a third-party thermostat because it’s an external accessory, not an internal modification.
To be safe, follow these steps. First, choose the low-voltage method so you don’t have to open the AC unit. Second, document the installation with photos showing the controller installed externally near the thermostat. Third, if you’re highly concerned, check your warranty documents or call the manufacturer to confirm their policy on external control devices. If a dispute ever arises, this proof that your installation was reversible, external, and equivalent to a standard thermostat is your best defense.
Mounting for Reversibility and Reliable Detection
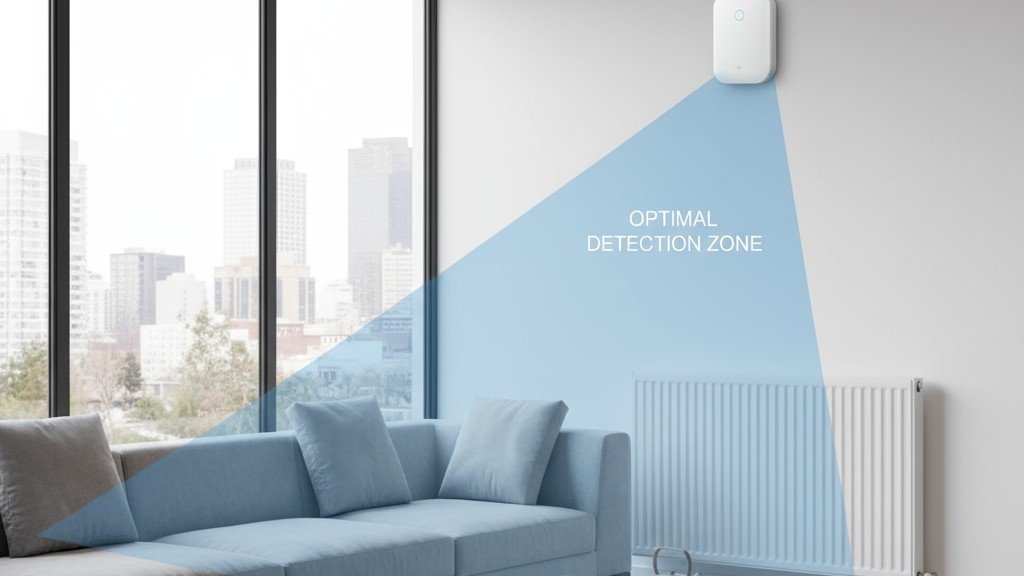
Placing the controller is a balancing act. You need convenient access to wiring and an optimal line of sight for the sensor. In a low-voltage installation, this usually means mounting it near the existing thermostat. The ideal spot is on a wall four to six feet high, with a clear view of the room’s main activity areas.
For rentals, reversibility is key. Strong adhesive mounting strips can work on smooth, clean walls, avoiding the need for screws. However, they can fail over time, especially in hot or humid conditions. A few small finish screws in drywall are more secure and leave tiny holes that are easily patched with spackle when you move out. Your choice depends on your lease and your landlord.
Accurate motion detection depends entirely on sensor placement. The controller uses a passive infrared (PIR) sensor, which sees changes in heat. It needs a clear line of sight; furniture, curtains, and other objects create blind spots. Don’t mount it facing a window or a heat source like a radiator, as this can cause false triggers. The sensor typically covers a cone-shaped area extending 15 to 20 feet. A common mistake is to mount the controller in a spot that’s easy for wiring but points the sensor at a corner, rendering it useless.
こちらの商品もおすすめです

- 電圧: 単4形乾電池 2本
- 昼/夜モード
- タイマー設定時間: 15分、30分、1時間(デフォルト)、2時間

- 無電圧接点リレー出力付き天井取り付け型PIR人感センサー
- 12/24VDCまたは12/24VAC低電圧電源
- EMS、HVAC、および建物制御入力用COM、NO、NC絶縁リレー接点

- 低電圧DC天井埋め込み型マイクロ波人感センサースイッチ
- 10~30 VDC範囲の12 VDC / 24 VDC入力
- 調整可能なタイムラグ、照度(Lux)閾値、感度を備えた最大動作電流10A仕様
- 高負荷対応型 埋込型天井取付けマイクロ波人感センサースイッチ
- 100-265 VAC 商用電源入力、10Aモデル
- 調整可能なタイムラグ、照度(Lux)閾値、感度を備えた5.8 GHzマイクロ波検知
- 埋込型天井取付けマイクロ波人感センサースイッチ
- 100-265 VAC商用電圧入力、5Aモデル
- 調整可能なタイムラグ、照度(Lux)閾値、感度を備えた5.8 GHzマイクロ波検知
- 220V電源対応 天井取付けRZ037 PIR(赤外線)人感センサー調光器
- 定格負荷660W、最大動作電流3A
- LUXボタンによる照度センサーのON/OFFおよびユーザー設定の調光明るさ制御
- 110V電源対応 天井取付けRZ037 PIR(赤外線)人感センサー調光器
- 定格負荷330W、最大動作電流3A
- LUXボタンによる照度センサーのON/OFFおよびユーザー設定の調光明るさ制御

- 低電圧DC対応 天井取付けマイクロ波人感センサースイッチ
- 10~30 VDC範囲の12 VDC / 24 VDC入力
- 調整可能なタイムラグ、照度(Lux)閾値、感度を備えた最大動作電流10A仕様
- 高負荷対応 天井取付型マイクロ波人感センサースイッチ
- 100-265 VAC 商用電源入力、10Aモデル
- 調整可能なタイムラグ、照度(Lux)閾値、感度を備えた5.8 GHzマイクロ波検知
- 天井取り付け型マイクロ波人感センサースイッチ
- 100-265 VAC商用電圧入力、5Aモデル
- 調整可能なタイムラグ、照度(Lux)閾値、感度を備えた5.8 GHzマイクロ波検知

- 低電圧DC埋込型天井PIR人感センサースイッチ
- 10~30 VDC範囲の12 VDC / 24 VDC入力
- 最大動作電流10A(調整可能なタイムラグ、照度閾値、感度設定付き)

- 高負荷対応 埋込型天井PIR人感センサースイッチ
- 100-265 VAC 商用電源入力、10Aモデル
- 360度検知(調整可能なタイムラグ、照度閾値、感度設定付き)
- 埋込型天井PIR人感センサースイッチ
- 100-265 VAC商用電圧入力、5Aモデル
- 360度検知(調整可能なタイムラグ、照度閾値、感度設定付き)

- 屋内用照明ON/OFF制御ワイヤレススイッチ&受信機キット
- 100-230VAC、50/60Hz、定格電流5A受信機
- 2.4GHz通信対応 CR2032電池駆動ワイヤレススイッチ
- Occupancy(自動点灯/自動消灯)
- 12–24V DC (10–30VDC)、最大10A
- 360°検知エリア、直径8–12m
- タイムラグ 15秒–30分
- 照度センサー オフ/15/25/35 Lux
- 高/低感度
- 自動点灯/自動消灯人感モード
- 100–265V AC, 10A(中性線必須)
- 360°検知範囲、検知直径8–12 m
- タイムデレイ15秒–30分、Lux OFF/15/25/35、感度 高/低
- 自動点灯/自動消灯人感モード
- 100–265V AC, 5A(中性線必須)
- 360°検知範囲、検知直径8–12 m
- タイムデレイ15秒–30分、Lux OFF/15/25/35、感度 高/低
Setting Timeouts: Balancing Savings and Comfort
The timeout duration—the period of inactivity before the AC shuts off—is the most critical setting. It determines whether the system feels helpful or just annoying.
An aggressive timeout of five minutes might maximize energy savings, but it guarantees the AC will shut off while you’re reading, working at a desk, or sleeping. The system will feel broken, leading to frustration and manual overrides.
Always start with a conservative timeout of 15 to 30 minutes. This ensures that brief periods of stillness don’t trigger a shutdown. The automation only kicks in during genuine, extended absences, preventing hours of wasted cooling each day, not just minutes. This approach is perfect for rental units, as it dramatically reduces the chance of tenant complaints.
Moderate settings of 10 to 15 minutes can work for users who want slightly more savings and don’t mind an occasional, brief interruption. Aggressive settings below 10 minutes should only be used in high-activity spaces like workshops, or after you’ve tested the system and understand the trade-offs. The principle is simple: start conservatively. It’s much easier to shorten a timeout that’s too long than to win back trust after setting one that’s too aggressive.
Why a Non-Networked Design Is a Feature, Not a Flaw
The smart home boom has taught us to expect every device to be app-controlled and connected to the cloud. While useful in a stable, owner-occupied home, these features introduce fragility into rental situations. The Rayzeek controller’s non-networked design is a deliberate choice for reliability.
人感センサーを活用した省エネソリューションをお探しですか?
PIR人感センサー、人感センサー搭載省エネ製品、人感センサースイッチ、商業施設向けOccupancy/Vacancy(在室/不在)ソリューションについては、お気軽にお問い合わせください。
When a tenant moves out, every networked device must be reset and reconfigured for the new resident’s Wi-Fi and accounts. If the old tenant forgets to deregister a device, it can become a useless brick. This administrative hassle is a common reason that smart devices in rentals are eventually abandoned.
Furthermore, internet dependency is a single point of failure. A cloud-reliant controller stops working during internet outages or when a tenant changes their router. The Rayzeek operates entirely locally. Its sensor, timer, and relay are self-contained. No internet, no app, no cloud. This simplicity is its strength. The trade-off is you lose remote control and data logs. For landlords and tenants, it’s a worthy exchange for a system that just works, no setup or troubleshooting required. It’s less like a smart hub and more like a motion-sensing light switch: simple, passive, and reliable.
DIY vs. Pro: Making the Call
The choice between a DIY installation and hiring an electrician comes down to three things: the installation method, your comfort with electrical work, and your lease.
A low-voltage installation is often a perfectly reasonable DIY project. If you’ve ever replaced a thermostat or a ceiling fan, you likely have the necessary skills: identifying wires, making secure connections, and confirming power is off before you start. The voltage is low, so the main risk is a short circuit, not personal injury.
However, you should always hire a professional in certain scenarios. If you must do a line-level installation, the high voltage and code compliance requirements demand a licensed electrician. If the thermostat wiring is a confusing, unlabeled mess, an electrician can diagnose it safely. Finally, if your lease requires all electrical work to be done by a licensed professional, that rule overrides your personal skill. The cost of a professional is cheap insurance against damaging the HVAC system or violating your lease.
If you need your landlord’s approval, approach them with clear documentation. Show them the product specs and explain that the installation is external, reversible, and functionally the same as a programmable thermostat. If you hire a pro, give your landlord a copy of the work order stating it was done to code. Frame it as a mutual benefit: the controller lowers utility bills and will be removed without a trace when you move out.







