

The call always comes in the dead of winter, usually around 2:00 AM. A studio owner stands in the freezing rain while the fire department clears a building that is completely empty. The alarm panel screams that there was motion in the main workroom. The owner insists the system is broken because nobody was there.

But the system isn’t broken. It’s working perfectly. The sensor saw exactly what it was designed to see: a massive, turbulent plume of heat rising from a cooling kiln. To a standard motion detector, a cooling 2,000-degree ceramic oven isn’t a static object. It is a violent, blinking lighthouse of infrared energy. To the sensor, that heat plume looks physically indistinguishable from a person sprinting across the room.
This misunderstanding leads to thousands of dollars in false alarm fines and endless frustration with lighting controls in makerspaces and art studios. We treat motion sensors like cameras that “see” people, but they are nothing of the sort. They are rudimentary thermal contrast detectors. When you place one in a room with a Skutt 1027 kiln, a soldering bench with fume extractors, or even a large south-facing window in a converted industrial loft, you are asking a fifty-dollar plastic box to differentiate between a burglar and a column of hot air.
It can’t do that. Software sensitivity settings can’t fix this, either. If you turn the sensitivity down enough to ignore a kiln, you’ve turned it down enough to ignore an intruder. You haven’t fixed the sensor; you’ve just turned it into a wall ornament. You won’t find the solution in a settings menu. It’s in the geometry.
The Physics of the Lie
To solve this, you have to understand why it fails. Most standard security sensors and lighting occupancy switches use Passive Infrared (PIR) technology. Inside that curved white plastic lens sits a pyroelectric element—a material that generates a tiny voltage whenever it’s exposed to a temperature change. The lens itself is a Fresnel array, which is just a fancy way of saying it chops the room into dozens of invisible “fingers” or detection zones.
從 Rayzeek 動態感測器產品組合中獲得靈感。
找不到您想要的產品?別擔心。總有其他方法可以解決您的問題。也許我們的其中一個產品組合可以幫到您。
The sensor doesn’t see a picture. It sees a background baseline. When something with a different temperature than the background moves across those fingers—passing from a “blind” spot to a “seeing” spot—the pyroelectric element gets a zap of differential energy. If that zap hits a certain threshold, the relay clicks. The lights turn on, or the siren wails.
This mechanism is robust in an office hallway or a living room, but in a studio environment, it’s disastrous. Consider the thermal reality of a kiln room. Even hours after a firing is complete, a kiln radiates intense heat. That heat doesn’t stay put. It creates convection currents—swirling, turbulent air masses that rise and drift. When a cloud of 90-degree air drifts across the face of a sensor looking for a 98-degree human body, the pyroelectric element reacts. It doesn’t know the heat source is gas rather than flesh.
This is why “pet immunity” modes are often useless here. Pet immunity works by ignoring the bottom two feet of the room, assuming the dog stays on the floor. But heat rises. A thermal plume from a kiln or a heater moves through the upper volume of the room, right in the “human” zone of the sensor’s vision.
The same physics applies to lighting control, though the stakes are different. In a security system, the failure mode is a false alarm. In lighting, it’s usually “ghost switching”—lights that refuse to turn off because the sensor thinks the cooling equipment is an active occupant. If you have ever walked into a studio where the Lutron Maestro switch is taped over because “it has a mind of its own,” you are looking at a geometry failure. The electrician mounted the switch on a wall facing the heat source. As long as that kiln is warmer than the walls, the sensor sees “movement” in the thermal shimmer.
Geometry Is Free, Hardware Costs Money
The instinct is to buy a “better” sensor. You look for “Pro” models or expensive smart home gear that promises AI filtering. But you cannot buy your way out of bad placement. The most effective fix for a hot room costs zero dollars: you must move the sensor so it physically cannot see the heat source.
This sounds simple, yet it is violated in nearly every failed install. Do not mount the sensor in the corner of the room looking in. That gives the sensor a view of the entire volume, including the kiln, the radiator, and the sunbeam hitting the concrete floor. Instead, you must adopt a “trap” mentality.
Stop trying to monitor the room. Monitor the path. If a burglar enters the studio, they must come through the door or the window. Move the sensor to the wall containing the door, looking inward along the wall, or mount it in the corridor leading to the studio. If you mount a sensor on the same wall as the kiln, facing outward, the kiln is in the sensor’s peripheral blind spot. It can’t trigger on what it can’t see.
This is the “Look Here, Not There” pivot. You sacrifice total volume coverage—perhaps the sensor won’t see someone crawling in the far corner—but you gain absolute reliability. A sensor monitoring a door frame is almost impossible to fool with heat because the background it sees is a static interior wall, not a fluctuating industrial oven.
Before you drill a single hole, perform a thermal walkthrough. Stand where you want to put the sensor. Look at the room. Is there a kiln? A 3D printer bed? A south-facing window? Imagine a cone of chaos expanding up and outward from those objects. If your sensor’s field of view intersects that cone, you will have false alarms. It is that binary. No amount of fiddling with dip switches or app sliders will change the fact that infrared radiation is hitting the lens. If you cannot move the sensor—perhaps the wiring is already behind finished drywall—you have to physically stop the radiation from entering the lens.
您可能也會感興趣

- 電壓:2 粒 AAA 電池
- 日/夜模式
- 延遲時間:15 分鐘、30 分鐘、1 小時(預設)、2 小時

- 吸頂式 PIR 人體感應器,配備乾觸點繼電器輸出
- 12/24VDC 或 12/24VAC 低電壓供電
- 用於 EMS、HVAC 和建築控制輸入的 COM、NO 和 NC 隔離繼電器觸點

- 低壓直流嵌入式天花安裝微波人體感應開關
- 12 VDC / 24 VDC 輸入,支援 10-30 VDC 範圍
- 最大工作電流 10A,配備可調節延時、光感閾值及靈敏度
- 高負載嵌入式天花安裝微波人體感應開關
- 100-265 VAC 市電輸入,10A 型號
- 5.8 GHz 微波感應,配備可調節延時、光感閾值及靈敏度
- 嵌入式天花安裝微波人體感應開關
- 100-265 VAC 市電輸入,5A 型號
- 5.8 GHz 微波感應,配備可調節延時、光感閾值及靈敏度
- 適用於 220V 電源的天花安裝 RZ037 PIR 被動式紅外線佔空感應調光開關
- 最大工作電流 3A,額定負載 660W
- LUX 按鈕控制光線感應器開關及用戶設定之調光亮度
- 適用於 110V 電源的天花安裝 RZ037 PIR 被動式紅外線佔空感應調光開關
- 最大工作電流 3A,額定負載 330W
- LUX 按鈕控制光線感應器開關及用戶設定之調光亮度

- 低壓直流天花安裝微波人體感應開關
- 12 VDC / 24 VDC 輸入,支援 10-30 VDC 範圍
- 最大工作電流 10A,配備可調節延時、光感閾值及靈敏度
- 高負載吸頂式微波動態感應器開關
- 100-265 VAC 市電輸入,10A 型號
- 5.8 GHz 微波感應,配備可調節延時、光感閾值及靈敏度
- 吸頂式微波動態感應器開關
- 100-265 VAC 市電輸入,5A 型號
- 5.8 GHz 微波感應,配備可調節延時、光感閾值及靈敏度

- 低壓直流嵌頂式 PIR 動態感應器開關
- 12 VDC / 24 VDC 輸入,支援 10-30 VDC 範圍
- 最大工作電流 10A,具備可調式時間延遲、光照度閾值及靈敏度

- 高負載嵌頂式 PIR 動態感應器開關
- 100-265 VAC 市電輸入,10A 型號
- 360度偵測,具備可調式時間延遲、光照度閾值及靈敏度
- 嵌頂式 PIR 動態感應器開關
- 100-265 VAC 市電輸入,5A 型號
- 360度偵測,具備可調式時間延遲、光照度閾值及靈敏度

- 用於室內開關照明控制的無線開關及接收器套裝
- 100-230VAC,50/60Hz 接收器,額定電流 5A
- CR2032 電池供電無線開關,採用 2.4GHz 通訊
- 佔用感應(自動開啟/自動關閉)
- 12–24V DC (10–30VDC),最高 10A
- 360° 覆蓋,直徑 8–12 米
- 延遲時間 15 秒至 30 分鐘
- 光感應器 關閉/15/25/35 Lux
- 高/低靈敏度
- 自動開啟/自動關閉佔用模式
- 100–265V AC,10A(需接零線)
- 360° 全方位覆蓋;8–12 米偵測直徑
- 延遲時間 15 秒至 30 分鐘;Lux 關閉/15/25/35;靈敏度 高/低
- 自動開啟/自動關閉佔用模式
- 100–265V AC,5A(需接零線)
- 360° 全方位覆蓋;8–12 米偵測直徑
- 延遲時間 15 秒至 30 分鐘;Lux 關閉/15/25/35;靈敏度 高/低
The Double-Edged Sword of Dual-Tech
There is a technological workaround, but it comes with dangerous nuances. The industry solution for hostile environments is “Dual-Technology” or “Dual-Tech” sensors. These devices combine a standard PIR element with a Microwave Doppler radar. For the alarm to trigger, both sensors must agree. The PIR has to see heat moving, and the Microwave has to see a physical object moving (by bouncing radar waves off it).
This is incredibly effective for kiln rooms because turbulent hot air is invisible to radar. The PIR might be screaming “Fire! Intruder!” because of the heat, but the Microwave sensor says “I don’t see any solid mass moving,” so the alarm stays silent.
However, Dual-Tech sensors are not a magic bullet for the lazy installer. They introduce a new risk: wall penetration. While PIR cannot see through glass or drywall, Microwave energy (specifically K-band radar used in sensors like the Bosch Blue Line or Honeywell DT series) can punch right through standard sheetrock. If you crank the microwave sensitivity to maximum, the sensor will ignore the kiln, but it might detect the plumbing water moving in PVC pipes inside the wall, or a person walking down the hallway outside the studio.
I have seen studios where the motion sensor triggered every time a truck drove by outside. The installer had used a Dual-Tech sensor to solve the heat problem but left the microwave gain at 100%. The radar was looking through the exterior wall and picking up the traffic. If you use Dual-Tech, you must walk-test the microwave range specifically. Most professional units have a potentiometer (a small screw dial) to adjust the radar range. You want it to barely cover the room and stop short of the walls. It is a delicate balance, and unlike PIR, the range isn’t strictly defined—it varies based on your wall density and air humidity.
正在尋找動態感應節能解決方案?
歡迎聯絡我們以獲取完整的 PIR 動態感應器、動態感應節能產品、動態感應器開關以及人體感應/無人感應商業解決方案。
The Tape Solution and The Cooldown
If you are stuck with a standard PIR sensor and cannot move it, there is a field-expedient solution that works better than any software update: electrical tape.
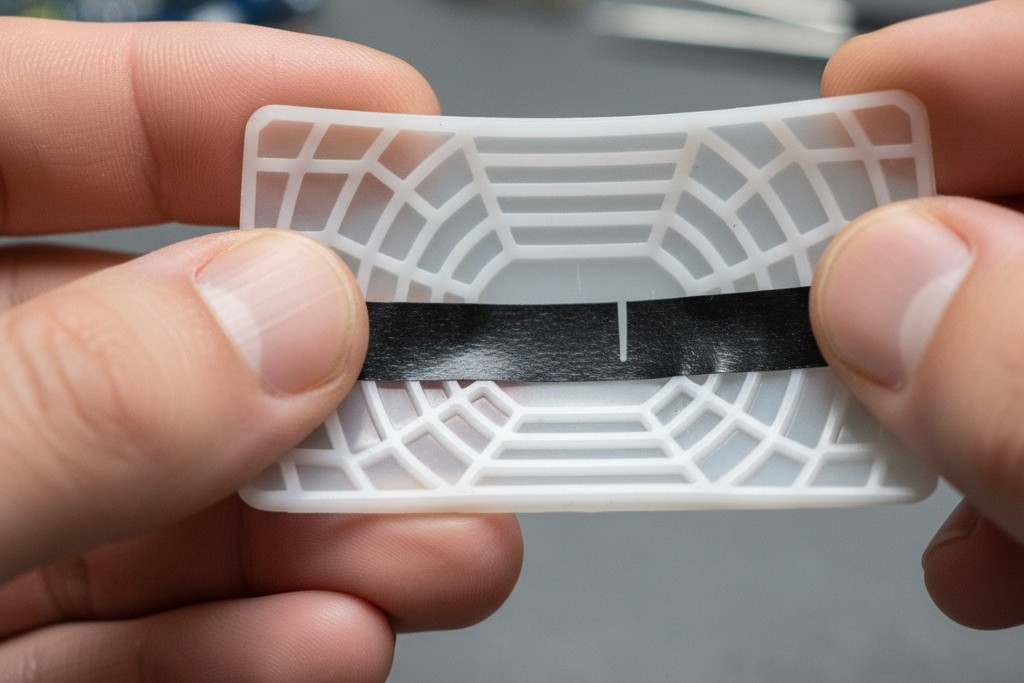
Open the sensor housing. Look at the curved plastic lens from the inside. You can mask off specific segments of that lens with opaque tape (Super 33+ or similar). By taping over the segments that look at the kiln or the heater, you literally blind the sensor to that specific slice of the room while leaving the rest active.
It looks hacky. Clients hate seeing tape on their sleek white devices. But inside the housing, it’s invisible, and physically infallible. If the lens is blocked, the infrared energy cannot reach the pyroelectric element. You can mask out the bottom half of the sensor to ignore a kiln near the floor while still catching a person walking upright. You can mask the left side to ignore a window. It requires patience—apply tape, walk test, apply more tape—but it solves the physics problem by removing the data input entirely.
Finally, respect the cooldown. A large ceramic kiln acts like a thermal battery. It absorbs massive amounts of energy and releases it slowly over six to ten hours. Just because the relay clicked off and the firing is done doesn’t mean the room is “quiet” to a sensor. The thermal decay period is actually the most volatile time for air currents. If you rely on a schedule to arm your system—”Arm at 10 PM because the studio closes at 9″—you are gambling. The kiln might still be 600 degrees at midnight. Reliability here doesn’t require smarter gear. It requires respecting the invisible violence of heat—and getting those plastic eyes out of the line of fire.







