

Many bathrooms have a dedicated timer switch for the exhaust fan, a straightforward way to manage moisture and odors after a shower. But what happens when you want the convenience of a motion-activated light in the same room? Suddenly, you have two automated systems with conflicting goals. The fan timer runs for a fixed duration you set manually. The motion sensor reacts to your presence, turning the light on and off as you come and go.
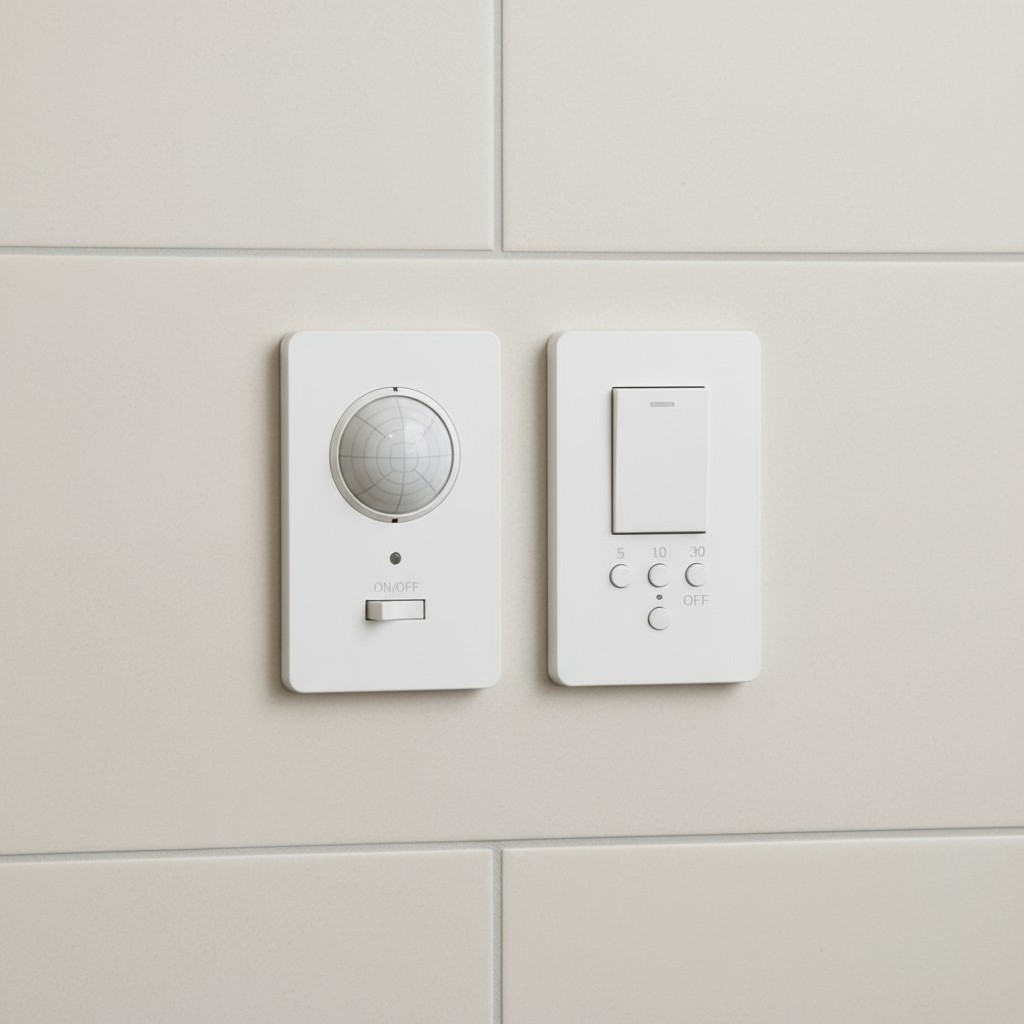
Some installers instinctively try to unify them, using one motion sensor to control both the light and the fan. This is a mistake. The sensor and timer aren’t designed to coordinate, and forcing them onto the same circuit leads to unreliable performance, timing conflicts, and even premature device failure. This guide explains the correct approach: a clean wiring pattern that preserves the independence of each system. The Rayzeek motion sensor will handle the light, and the existing timer will continue to manage the fan. By keeping them separate, you ensure both work predictably and reliably.
The Automation Conflict: Presence vs. Purge Cycles
A bathroom fan timer has one job: to clear moist air. After a shower, you set it to run for ten to thirty minutes, allowing you to leave while it finishes its purge cycle. It’s a manual-on, timed-off system.
A motion sensor switch operates on completely different logic. It uses passive infrared sensing to detect when someone enters the room and then turns on the lights. When it no longer detects movement for a set timeout period, it shuts the lights off to save energy. Its entire purpose is to react dynamically to your presence.
The conflict is unavoidable if these two systems share control. A fan needs to keep running long after the bathroom is empty. A motion-activated light needs to turn off precisely because the bathroom is empty. If a single motion sensor controls both, it will cut power to the fan mid-cycle, defeating its purpose. If a timer controls both, the light will stay on for 30 minutes in an empty room, wasting energy. This isn’t a simple wiring inconvenience; it’s a fundamental clash between two incompatible automation philosophies.
Why Independent Wiring Is the Only Reliable Solution
The solution is to give each device exclusive control over its designated load. The motion sensor controls the light. The timer controls the fan. They operate on parallel paths, never interfering with one another.
This separation prevents two major problems:
กำลังมองหาโซลูชันประหยัดพลังงานทำงานตามการเคลื่อนไหวอยู่ใช่หรือไม่
ติดต่อเราเพื่อรับโซลูชันครบวงจรสำหรับ PIR motion sensor, ผลิตภัณฑ์ประหยัดพลังงานทำงานตามการเคลื่อนไหว, สวิตช์เซนเซอร์ตรวจจับการเคลื่อนไหว และโซลูชัน Occupancy/Vacancy สำหรับเชิงพาณิชย์.
Timing Collisions. A motion sensor’s timeout is usually short—a few minutes at most—to ensure the light doesn’t stay on in an empty room. A fan’s purge cycle is long, often up to 30 minutes, to ensure moisture is fully evacuated. If a motion sensor is wired to control the fan, it will always cut the purge cycle short. Independence allows the fan to complete its job long after the sensor has turned off the light.
Electrical Interference and Load Stress. Motion sensors contain sensitive electronics. Fan motors, especially older models, can create electrical noise or a back-EMF surge when they turn off, which can interfere with the sensor’s circuitry. Forcing a sensor to switch both a lighting load and a fan motor simultaneously can lead to erratic behavior, false triggers, or a shortened lifespan. Likewise, a timer might not be rated for the combined load. Keeping the loads separate ensures each device operates within its designed electrical environment.
The solution, then, is not to force them to cooperate, but to ensure they never have to interact at all.
The Stable Architecture: One Switch, One Job
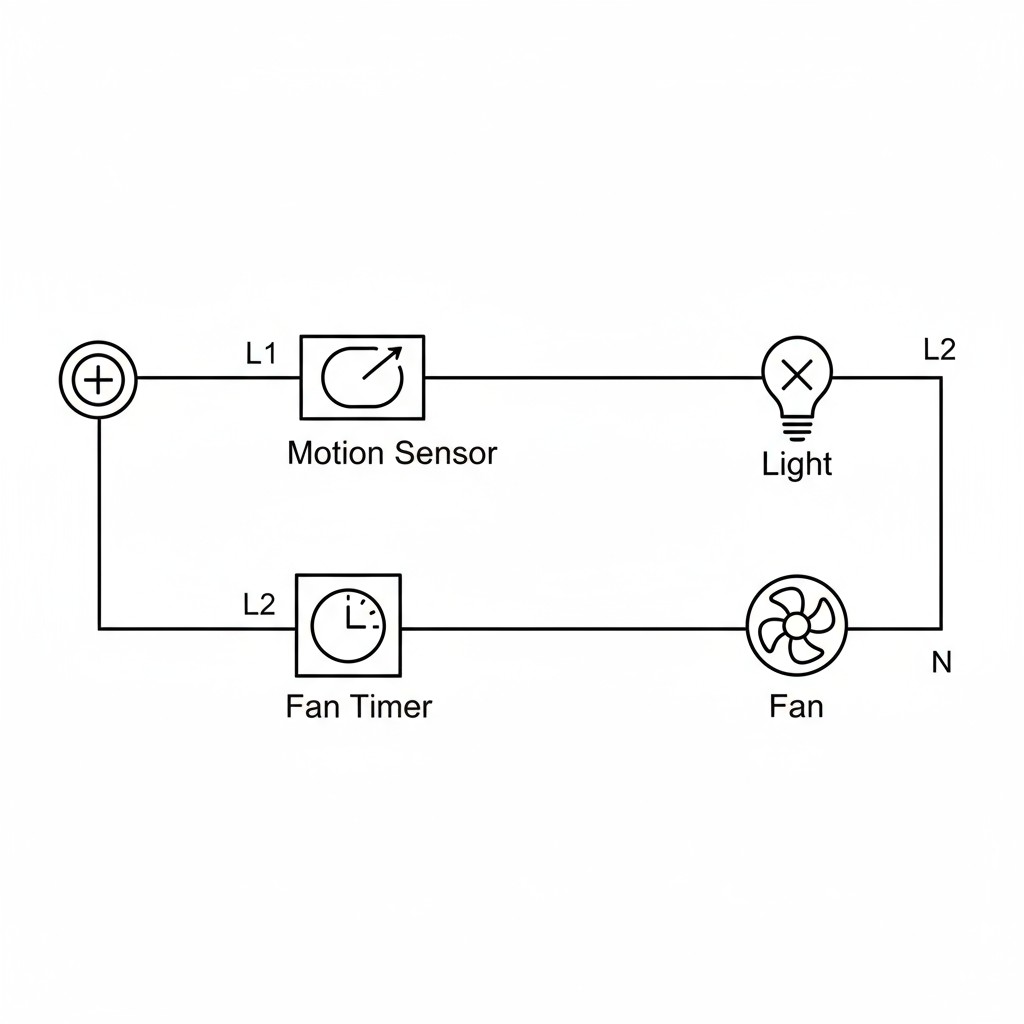
The recommended wiring is simple, assuming your bathroom has two separate switched circuits—one for the light and one for the fan, which is standard in most modern homes.
The Rayzeek motion sensor replaces the existing manual light switch. Its “line” terminal connects to the incoming hot wire, and its “load” terminal connects to the wire running to the light fixture. Once the neutral and ground are connected according to standard practice, the sensor has exclusive control over the lights.
The existing fan timer remains exactly where it is, with its wiring untouched. It continues to control the fan independently. When you activate the timer, the fan runs for its set duration and shuts off. Its operation has no effect on the light circuit, and the motion sensor’s activity has no effect on the fan circuit.
This modular approach also simplifies troubleshooting. If the sensor fails, the fan still works. If the timer breaks, the lights are unaffected. Each system can be serviced or upgraded without disturbing the other.
Essential Circuit Requirements
This setup requires that the Rayzeek sensor has access to a neutral wire. Modern sensors need a neutral connection to power their internal circuitry. In older homes, the switch box might only contain a hot and a switched leg, with the neutral running directly to the fixture. If that’s the case, you’ll either need to pull a neutral wire into the box or choose a sensor model specifically designed for no-neutral wiring. Always verify your wiring before purchasing a device.
คุณอาจสนใจ

- แรงดันไฟฟ้า: ถ่าน AAA 2 ก้อน
- โหมดกลางวัน/กลางคืน
- การหน่วงเวลา: 15 นาที, 30 นาที, 1 ชั่วโมง (ค่าเริ่มต้น), 2 ชั่วโมง

- เซนเซอร์ตรวจจับการถือครองห้อง PIR ติดตั้งบนเพดาน พร้อมเอาต์พุตรีเลย์หน้าสัมผัสแห้ง
- ระบบจ่ายไฟแรงดันต่ำ 12/24VDC หรือ 12/24VAC
- หน้าสัมผัสรีเลย์แบบแยก COM, NO และ NC สำหรับสัญญาณอินพุตของระบบ EMS, HVAC และระบบควบคุมอาคาร

- สวิตช์เซนเซอร์ตรวจจับการเคลื่อนไหวด้วยไมโครเวฟแบบติดเพดานฝังฝ้า ไฟฟ้ากระแสตรงแรงดันต่ำ
- อินพุต 12 VDC / 24 VDC พร้อมช่วงรองรับ 10-30 VDC
- กระแสไฟฟ้าทำงานสูงสุด 10A พร้อมการปรับตั้งค่าเวลาหน่วง เกณฑ์ค่า Lux และความไวในการตรวจจับ
- สวิตช์เซนเซอร์ตรวจจับการเคลื่อนไหวด้วยไมโครเวฟแบบติดเพดานฝังฝ้า สำหรับโหลดสูง
- อินพุตแรงดันสาย 100-265 VAC รุ่น 10A
- ระบบตรวจจับด้วยไมโครเวฟความถี่ 5.8 GHz พร้อมการปรับตั้งค่าเวลาหน่วง เกณฑ์ค่า Lux และความไวในการตรวจจับ
- สวิตช์เซนเซอร์ตรวจจับการเคลื่อนไหวด้วยไมโครเวฟแบบติดเพดานฝังฝ้า
- อินพุตแรงดันสาย 100-265 VAC รุ่น 5A
- ระบบตรวจจับด้วยไมโครเวฟความถี่ 5.8 GHz พร้อมการปรับตั้งค่าเวลาหน่วง เกณฑ์ค่า Lux และความไวในการตรวจจับ
- สวิตช์หรี่ไฟเซนเซอร์ตรวจจับการเข้าใช้พื้นที่ระบบ PIR รุ่น RZ037 แบบติดเพดาน สำหรับระบบไฟฟ้า 220V
- กระแสไฟฟ้าทำงานสูงสุด 3A พร้อมโหลดพิกัด 660W
- ปุ่ม LUX ควบคุมการเปิด/ปิดเซนเซอร์แสง และความสว่างในการหรี่ไฟที่ผู้ใช้กำหนด
- สวิตช์หรี่ไฟเซนเซอร์ตรวจจับการเข้าใช้พื้นที่ระบบ PIR รุ่น RZ037 แบบติดเพดาน สำหรับระบบไฟฟ้า 110V
- กระแสไฟฟ้าทำงานสูงสุด 3A พร้อมโหลดพิกัด 330W
- ปุ่ม LUX ควบคุมการเปิด/ปิดเซนเซอร์แสง และความสว่างในการหรี่ไฟที่ผู้ใช้กำหนด

- สวิตช์เซนเซอร์ตรวจจับการเคลื่อนไหวด้วยไมโครเวฟแบบติดเพดาน ไฟฟ้ากระแสตรงแรงดันต่ำ
- อินพุต 12 VDC / 24 VDC พร้อมช่วงรองรับ 10-30 VDC
- กระแสไฟฟ้าทำงานสูงสุด 10A พร้อมการปรับตั้งค่าเวลาหน่วง เกณฑ์ค่า Lux และความไวในการตรวจจับ
- สวิตช์เซนเซอร์ตรวจจับความเคลื่อนไหวคลื่นไมโครเวฟแบบติดเพดาน รองรับโหลดสูง
- อินพุตแรงดันสาย 100-265 VAC รุ่น 10A
- ระบบตรวจจับด้วยไมโครเวฟความถี่ 5.8 GHz พร้อมการปรับตั้งค่าเวลาหน่วง เกณฑ์ค่า Lux และความไวในการตรวจจับ
- สวิตช์เซนเซอร์ตรวจจับความเคลื่อนไหวคลื่นไมโครเวฟแบบติดเพดาน
- อินพุตแรงดันสาย 100-265 VAC รุ่น 5A
- ระบบตรวจจับด้วยไมโครเวฟความถี่ 5.8 GHz พร้อมการปรับตั้งค่าเวลาหน่วง เกณฑ์ค่า Lux และความไวในการตรวจจับ

- สวิตช์เซนเซอร์ตรวจจับความเคลื่อนไหว PIR แบบฝังฝ้าเพดาน แรงดันไฟฟ้าต่ำ DC
- อินพุต 12 VDC / 24 VDC พร้อมช่วงรองรับ 10-30 VDC
- กระแสไฟฟ้าทำงานสูงสุด 10A พร้อมระบบปรับตั้งเวลาหน่วง ค่าความสว่าง Lux และความไวในการตรวจจับได้

- สวิตช์เซนเซอร์ตรวจจับความเคลื่อนไหว PIR แบบฝังฝ้าเพดาน รองรับโหลดสูง
- อินพุตแรงดันสาย 100-265 VAC รุ่น 10A
- ระบบตรวจจับ 360 องศา พร้อมระบบปรับตั้งเวลาหน่วง ค่าความสว่าง Lux และความไวในการตรวจจับได้
- สวิตช์เซนเซอร์ตรวจจับความเคลื่อนไหว PIR แบบฝังฝ้าเพดาน
- อินพุตแรงดันสาย 100-265 VAC รุ่น 5A
- ระบบตรวจจับ 360 องศา พร้อมระบบปรับตั้งเวลาหน่วง ค่าความสว่าง Lux และความไวในการตรวจจับได้

- ชุดสวิตช์ไร้สายและตัวรับสัญญาณสำหรับควบคุมการเปิด/ปิดไฟภายในอาคาร
- ตัวรับสัญญาณ 100-230VAC, 50/60Hz พิกัดกระแสไฟฟ้า 5A
- สวิตช์ไร้สายใช้พลังงานจากแบตเตอรี่ CR2032 พร้อมการสื่อสารผ่านความถี่ 2.4GHz
- ตรวจจับการใช้งาน (เปิดอัตโนมัติ/ปิดอัตโนมัติ)
- 12–24V DC (10–30VDC), สูงสุด 10A
- ครอบคลุม 360° เส้นผ่านศูนย์กลาง 8–12 ม.
- หน่วงเวลา 15 วินาที–30 นาที
- เซนเซอร์วัดแสง ปิด/15/25/35 Lux
- ความไวสูง/ต่ำ
- โหมดตรวจจับการใช้งาน เปิดอัตโนมัติ/ปิดอัตโนมัติ
- 100–265V AC, 10A (จำเป็นต้องมีสายสายนิวทรัล)
- ครอบคลุม 360°; เส้นผ่านศูนย์กลางการตรวจจับ 8–12 ม.
- หน่วงเวลา 15 วินาที–30 นาที; Lux ปิด/15/25/35; ความไวสูง/ต่ำ
- โหมดตรวจจับการใช้งาน เปิดอัตโนมัติ/ปิดอัตโนมัติ
- 100–265V AC, 5A (จำเป็นต้องมีสายสายนิวทรัล)
- ครอบคลุม 360°; เส้นผ่านศูนย์กลางการตรวจจับ 8–12 ม.
- หน่วงเวลา 15 วินาที–30 นาที; Lux ปิด/15/25/35; ความไวสูง/ต่ำ
Proper grounding is also a non-negotiable safety requirement for both the sensor and the timer.
What to Do With a Single-Circuit Constraint
Older homes sometimes have a single circuit serving both the fan and the light. In this scenario, achieving true independent automation is impossible without rewiring. If the sensor and timer are on the same circuit, the sensor will inevitably cut power to both loads when its timeout expires, defeating the fan timer.
The safest approach here is to compromise. Install the Rayzeek motion sensor to control only the light, giving you the primary convenience benefit. Then, replace the fan timer with a simple manual on-off switch. You’ll lose the timed purge function, but you’ll avoid the reliability issues of a conflicting system. You will simply have to remember to turn the fan off manually.
Avoid the temptation to wire the sensor to control both loads on a single circuit. The incompatible timing logic and risk of electrical interference will lead to unpredictable behavior and user frustration. If automated control of both is a must, the only reliable solution is to run a new circuit—a job best left to a professional electrician.
Installation and Configuration Tips
When installing the Rayzeek sensor, turn off the power at the breaker and use a voltage tester to confirm the circuit is dead.
Sensor Positioning
Place the sensor where its detection field covers the bathroom’s main entry and activity areas. Most sensors use a conical field of view, so mounting it near the door and pointed inward is usually effective. Keep it away from direct shower steam, heating vents, or windows where direct sunlight could cause false triggers.
Timeout and Sensitivity Settings
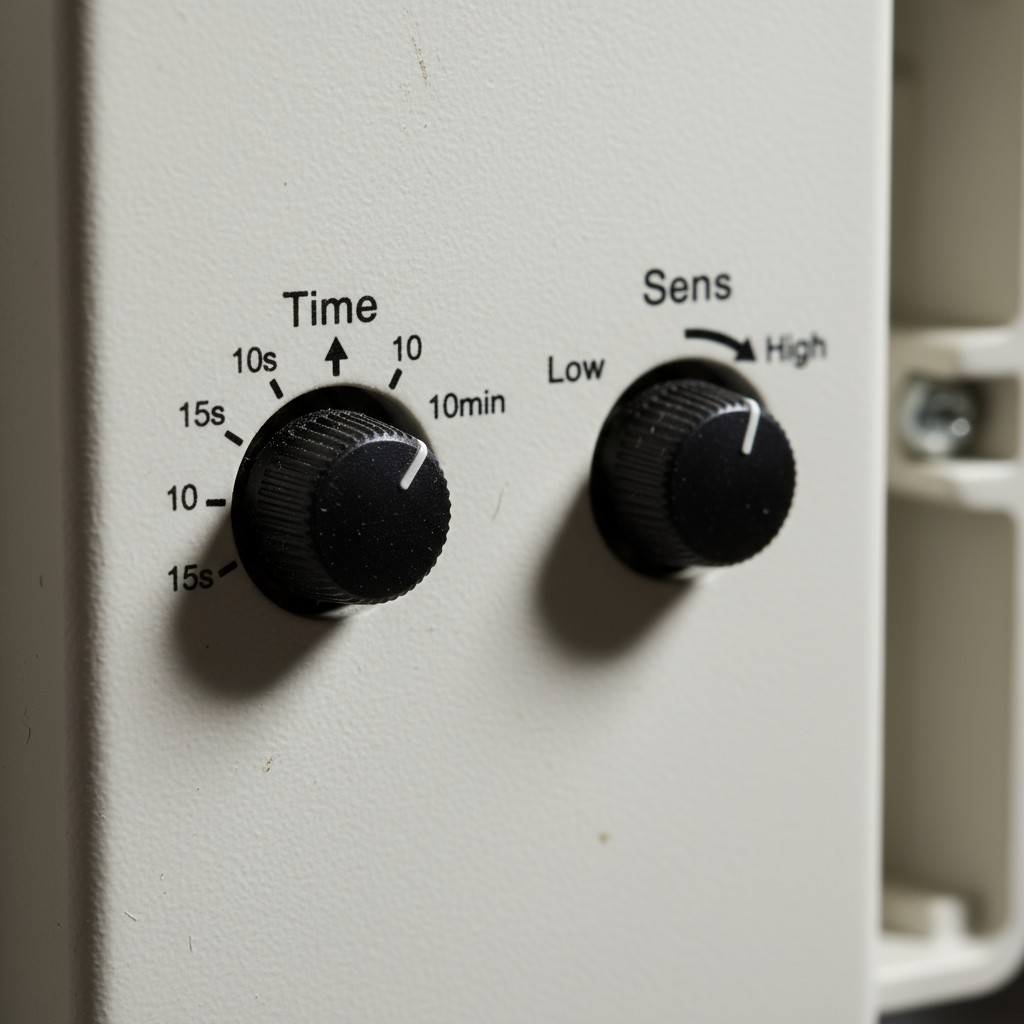
For a bathroom, a longer timeout of one to three minutes is ideal. This prevents the light from shutting off if you’re standing still at the sink or sitting. A timeout that’s too short will force you to wave your arms to turn the light back on, defeating the purpose of the automation.
Start with a moderate sensitivity setting. If the sensor fails to detect you, increase it. If it triggers falsely, reduce it. These settings are typically adjusted with small dials or DIP switches on the device itself. Test the sensor under normal conditions to ensure it activates reliably upon entry and deactivates a few minutes after you leave.
รับแรงบันดาลใจจากกลุ่มผลิตภัณฑ์เซนเซอร์ตรวจจับความเคลื่อนไหว Rayzeek.
ยังไม่พบสิ่งที่ต้องการใช่หรือไม่? ไม่ต้องกังวล เพราะยังมีแนวทางอื่นในการแก้ปัญหาของคุณเสมอ บางทีหนึ่งในกลุ่มผลิตภัณฑ์ของเราอาจช่วยคุณได้.
The One Rule to Follow: Don’t Combine Controls
The most critical mistake is wiring a motion sensor to control both the light and the fan. The sensor’s short timeout logic is fundamentally at odds with the fan’s long purge cycle requirement. It will always shut the fan off too soon, leaving the bathroom humid and prone to mold.
If you encounter unexpected behavior, here’s how to troubleshoot:
- Light turns off while you’re in the room? Your timeout is too short or the sensor isn’t positioned to see the whole space.
- Light and fan both shut off together? This is the classic sign that they’re wired incorrectly to the same sensor. The circuits must be separated.
- Fan doesn’t shut off? The timer itself is likely faulty.
When wired correctly, the system is seamless. The light turns on when you enter and off when you leave. The fan runs for its full cycle when you tell it to. Each device performs its task independently and predictably, giving you a smarter, more convenient bathroom without the headaches.







