
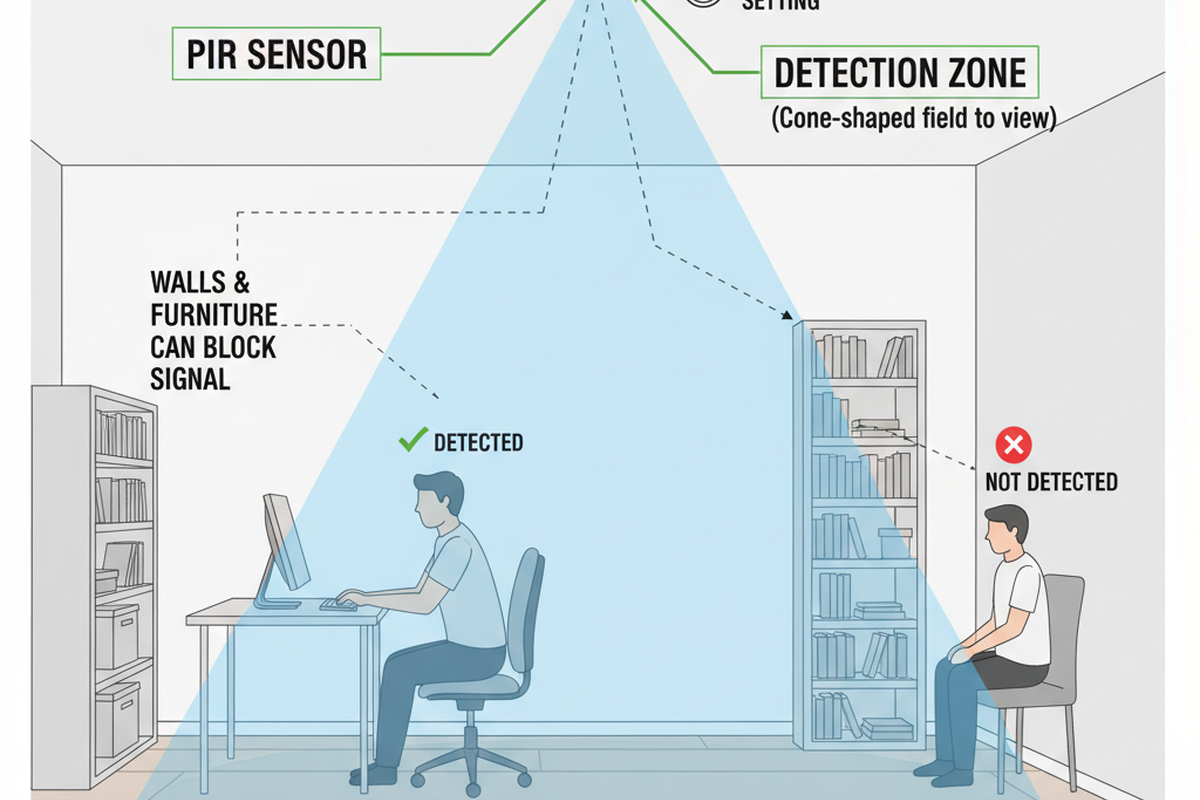
Biura domowe bywają źródłem specyficznej frustracji: czytasz, programujesz lub uczestniczysz w ważnym połączeniu wideo, a światła nagle gasną, jakby pokój uznał, że wyszedłeś. Wtedy następuje wzruszenie ramion, niezgrabne machanie ręką lub podjechanie fotelem – wszystko tylko po to, by utrzymać włączone światło. Wygląda to niedorzecznie i rozprasza uwagę.
Większość ludzi zakłada, że dzieje się tak, ponieważ czujnik jest “słaby” lub “tani”. W pomieszczeniach przeznaczonych do pracy przy biurku czujnik rzadko jest za słaby; zazwyczaj po prostu obserwuje niewłaściwy obszar pokoju. Czas opóźnienia jest ustawiony jak dla korytarza, podczas gdy styl użytkowania jest stacjonarny.
Za pierwszym problemem kryje się drugi. Jeśli spróbujesz go rozwiązać, po prostu “zwiększając czułość”, często wymieniasz jedną uciążliwość (fałszywe wyłączanie) na inną (przypadkowe fałszywe włączanie). Zwierzęta domowe, podmuchy z systemów HVAC i wentylatory sufitowe zaczynają wzbudzać oświetlenie.
Dłuższe opóźnienie czasowe i lepsze “pole widzenia” zazwyczaj rozwiązują ten problem, nie zmieniając biura w nawiedzony pokój.
Problem machania ręką (i dlaczego to zazwyczaj nie jest “zły czujnik”)
Fałszywe wyłączenia podczas pracy przy biurku przebiegają według pewnego wzorca. Przełącznik znajduje się przy drzwiach, biurko stoi w głębi pokoju, a dioda wskaźnika czujnika z łatwością wykrywa ruch — tyle że nie osoby przy klawiaturze. Zgłoszenie to pojawia się w logach serwisowych tak często, że tworzy niemal osobną kategorię: “czujnik w biurze się wyłącza”.”
Aby zrozumieć dlaczego, wyobraź sobie włącznik ścienny jako kamerę zamontowaną przy wejściu. Jeśli ta kamera jest skierowana na pusty środek pokoju, ruch drzwi lub korytarz, może “działać” idealnie, jednocześnie przeoczając istotną aktywność przy biurku. Test siedzenia przy użyciu diody LED ujawnia to natychmiast: jeśli dioda LED z trudem miga podczas pisania, czujnik nie jest za słaby. Po prostu nie widzi ruchu, który ma znaczenie.
Ludzie gubią się również w kwestii trybu nie zdając sobie z tego sprawy. “Włącza się, gdy przechodzę obok” to inny problem niż “wyłącza się, gdy pracuję”.” Tryb obecności (Occupancy) to automatyczne włączanie i wyłączanie. Tryb nieobecności (Vacancy) to ręczne włączanie i automatyczne wyłączanie. W biurach — zwłaszcza tych z oknami wychodzącymi na północ lub gdy partnerzy mają różne harmonogramy — tryb nieobecności jest często dyskretnym rozwiązaniem. Eliminuje irytujące fałszywe włączenia, jednocześnie zapobiegając świeceniu się światła przez całą noc.
Dłuższe opóźnienie to żaden błąd. W małym pokoju z oświetleniem LED różnica w kosztach między 5-minutowym a 15-minutowym opóźnieniem to groszowe sprawy, podczas gdy koszt rozproszenia uwagi jest realny. Rozsądne opóźnienie przywraca zaufanie. Gdy ludzie ufają automatyzacji, przestają ją pomijać za pomocą lampek biurkowych i rozwiązań zastępczych, które ostatecznie świecą się 24/7.
Szybki model myślowy: traktuj czujnik PIR jak kamerę
Czujnik PIR nie mierzy “obecności” w taki sposób, w jaki rozumie ją człowiek. Reaguje na ruch w swoim polu widzenia, a ściślej na ruch, który przecina jego strefy detekcji. Praca przy biurku stanowi wyzwanie, ponieważ pisanie na klawiaturze i używanie myszy to drobne ruchy, często skierowane w stronę czujnika lub od niego, a nie w poprzek jego pola widzenia. Monitory często zasłaniają te części ciała, które poruszają się najbardziej.
Utrzymuj prosty model myślowy: traktuj czujnik jak kamerę ze stałą kadrem. Zadaj sobie trzy pytania:
- What’s in frame? From the switch’s mounting spot, is the sensor staring at the desk, or over it? Is it mostly seeing the doorway, the hall, or a window with shifting light?
- Does the desk motion register? When you are seated, do your natural movements—hands, shoulders, head—cross the sensor’s “grid,” or do they look like nothing?
- Is the background noisy? Is a fan or heater vent competing for attention?
Don’t touch sensitivity yet.
If you change sensitivity first, you often get rewarded in the worst way: the light stays on longer, but for the wrong reasons. In small rooms with glass doors or corridor exposure, max sensitivity makes the sensor pick up movement that isn’t occupancy. The light becomes chatty, turning on when someone walks by or retriggering when a reflection shifts. If you then increase the time delay to stop the false-offs, those wrong triggers keep the light on even longer. That’s how “fix false-off” becomes “now it’s on all day.”
Może Cię również zainteresować

- Napięcie: 2 baterie AAA
- Tryb Dzień/Noc
- Opóźnienie czasowe: 15min, 30min, 1h (domyślnie), 2h

- Sufitowy czujnik obecności PIR z wyjściem przekaźnikowym bezpotencjałowym
- Zasilanie niskonapięciowe 12/24 VDC lub 12/24 VAC
- Izolowane styki przekaźnika COM, NO i NC dla wejść systemów EMS, HVAC i sterowania budynkiem

- Niskonapięciowy, podtynkowy sufitowy mikrofalowy czujnik ruchu DC
- Wejście 12 VDC / 24 VDC w zakresie 10–30 VDC
- Maksymalny prąd roboczy 10 A z regulowanym opóźnieniem czasowym, progiem Lux i czułością
- Mikrofalowy czujnik ruchu do montażu podtynkowego w suficie o podwyższonej obciążalności
- Zasilanie sieciowe 100-265 VAC, model 10A
- Detekcja mikrofalowa 5,8 GHz z regulowanym opóźnieniem czasowym, progiem Lux i czułością
- Mikrofalowy czujnik ruchu do montażu podtynkowego w suficie
- Zasilanie sieciowe 100-265 VAC, model 5A
- Detekcja mikrofalowa 5,8 GHz z regulowanym opóźnieniem czasowym, progiem Lux i czułością
- Sufitowy czujnik obecności PIR ze ściemniaczem RZ037 do zasilania 220V
- Maksymalny prąd roboczy 3A przy obciążeniu znamionowym 660W
- Przycisk LUX steruje włączeniem/wyłączeniem czujnika światła oraz ustawionym przez użytkownika poziomem jasności
- Sufitowy czujnik obecności PIR ze ściemniaczem RZ037 do zasilania 110V
- Maksymalny prąd roboczy 3A przy obciążeniu znamionowym 330W
- Przycisk LUX steruje włączeniem/wyłączeniem czujnika światła oraz ustawionym przez użytkownika poziomem jasności

- Niskonapięciowy DC sufitowy mikrofalowy czujnik ruchu
- Wejście 12 VDC / 24 VDC w zakresie 10–30 VDC
- Maksymalny prąd roboczy 10 A z regulowanym opóźnieniem czasowym, progiem Lux i czułością
- Sufitowy mikrofalowy czujnik ruchu o podwyższonej obciążalności
- Zasilanie sieciowe 100-265 VAC, model 10A
- Detekcja mikrofalowa 5,8 GHz z regulowanym opóźnieniem czasowym, progiem Lux i czułością
- Sufitowy mikrofaliowy czujnik ruchu z przełącznikiem
- Zasilanie sieciowe 100-265 VAC, model 5A
- Detekcja mikrofalowa 5,8 GHz z regulowanym opóźnieniem czasowym, progiem Lux i czułością

- Niskonapięciowy prądu stałego (DC) przełącznik z czujnikiem ruchu PIR do montażu podtynkowego w suficie
- Wejście 12 VDC / 24 VDC w zakresie 10–30 VDC
- Maksymalny prąd roboczy 10A z regulacją opóźnienia czasowego, progu natężenia światła (Lux) oraz czułości

- Przełącznik z czujnikiem ruchu PIR o wyższym obciążeniu, do montażu podtynkowego w suficie
- Zasilanie sieciowe 100-265 VAC, model 10A
- Detekcja w promieniu 360 stopni z regulacją opóźnienia czasowego, progu natężenia światła (Lux) oraz czułości
- Przełącznik z czujnikiem ruchu PIR do montażu podtynkowego w suficie
- Zasilanie sieciowe 100-265 VAC, model 5A
- Detekcja w promieniu 360 stopni z regulacją opóźnienia czasowego, progu natężenia światła (Lux) oraz czułości

- Zestaw bezprzewodowego przełącznika i odbiornika do wewnętrznego sterowania oświetleniem WŁ./WYŁ.
- Odbiornik 100-230VAC, 50/60Hz o prądzie znamionowym 5A
- Przełącznik bezprzewodowy zasilany baterią CR2032 z komunikacją 2.4GHz
- Tryb obecności (Auto-ON/Auto-OFF)
- 12–24V DC (10–30VDC), do 10A
- Zasięg 360°, średnica wykrywania 8–12 m
- Opóźnienie czasowe 15 s–30 min
- Czujnik światła Wył./15/25/35 Lux
- Wysoka/Niska czułość
- Automatyczny tryb obecności (Auto-ON/Auto-OFF)
- 100–265V AC, 10A (wymagany przewód neutralny)
- Zasięg 360°; średnica wykrywania 8–12 m
- Opóźnienie czasowe 15 s–30 min; Lux WYŁ./15/25/35; Czułość Wysoka/Niska
- Automatyczny tryb obecności (Auto-ON/Auto-OFF)
- 100–265V AC, 5A (wymagany przewód neutralny)
- Zasięg 360°; średnica wykrywania 8–12 m
- Opóźnienie czasowe 15 s–30 min; Lux WYŁ./15/25/35; Czułość Wysoka/Niska
Keep the problem tight. Change only two knobs at first: what the sensor can see (aim, coverage, placement) and the time delay. Lock everything else for a couple of days. Measure one thing: how many nuisance shutoffs happen per day during real work. Once that stabilizes, sensitivity becomes last-mile tuning rather than desperate guessing.
The 60-Second Sit-Test (Before Buying Anything)
The sit-test is embarrassingly simple, which is why it works.
Sit exactly how you actually work: hands on keyboard, eyes on screen, shoulders relaxed. Don’t “perform motion.” Watch the sensor’s indicator LED. If it barely reacts during normal work, the diagnosis is practically done: the sensor’s frame isn’t intersecting with meaningful motion.
From there, treat the fix like a controlled experiment. Pick two variables to adjust and leave the rest alone:
- The sensing geometry: Aim the sensor down or across the desk plane if adjustable. Avoid aiming into the doorway or hall. If you can mask the coverage pattern, favor the desk and block the corridor.
- The time delay: Choose a starting point that fits cognitive work, not hallway traffic—often 10 to 20 minutes. Adjust based on real annoyance, not theory.
Write down the number of nuisance shutoffs for 48 hours. A sticky note works. You don’t need a spreadsheet; you just need to break the loop of changing five settings at once and learning nothing.
HVAC and fans matter more than people expect. If a register blows warm air across the sensor, or a ceiling fan creates moving thermal patterns, high sensitivity will read that as “motion.” This looks like random false-ons at night or retriggers when the room is empty. Run the sit-test with the fan on and then off, or with the heat cycling. If the sensor behavior changes, don’t crank the sensitivity. Aim away from the vent, narrow the field, and keep the sensitivity sane.
Zainspiruj się portfolio czujników ruchu Rayzeek.
Nie znajdujesz tego, czego szukasz? Bez obaw. Zawsze istnieją alternatywne sposoby rozwiązania Twoich problemów. Może jedno z naszych portfolio okaże się pomocne.
Once the sit-test shows what the sensor sees, the effective levers become obvious: mode, delay, and geometry. Sensitivity is not the hero of this story.
The Bad Advice Trap: “Just Crank Sensitivity”
The internet loves one-liner fixes, and “turn it up to max” is the most common.
In real rooms, this reliably creates new problems. A glass door facing a hallway makes a high-sensitivity sensor feel haunted. A 35 lb dog moving through the edge of the room triggers it. A ceiling fan or a warm air plume becomes a motion source the sensor can’t ignore. When you eventually extend the time delay to stop the lights from dying, those false-ons keep the system running longer and more often.
The rebuild is boring, but effective: narrow what the sensor can see, put the desk into that view, pick a humane delay, and only then nudge sensitivity if the room is unusually calm. Sensitivity is a finishing touch, not the foundation.
Start-Here Configuration (Office Defaults That Don’t Punish Stillness)
For a typical desk-bound home office with LED lighting (often pulling just 9–12 watts), the goal isn’t maximum theoretical energy savings. The goal is a control system that respects focus and doesn’t get disabled out of spite.
A “start here” configuration that behaves like a human expects looks like this:
- Use vacancy mode (manual-on, auto-off). Essential if the office gets daylight or if the door faces a busy hallway.
- Set a humane delay. Start with 10–20 minutes for quiet work. Shorten it later only if the office proves it can reliably detect seated work without arm-waving.
- Keep sensitivity in the middle. Unless you have a strong reason to change it, leave it alone. In offices with pets or vents, high sensitivity is the fastest route to false-ons.
- Prioritize the desk view. If the device allows masking or aiming, use it to keep cross-traffic out of frame.
This setup is opinionated for a reason: people disable automation they don’t trust. A long delay in a private office isn’t “waste” if it prevents the user from ripping the sensor out or leaving a separate lamp on all day because the overhead is unreliable.
Respect the coupling, though. If the office door opens straight to a corridor, a longer delay can amplify the pain of false-ons. Control the field of view first (what it sees), then extend the delay (how long it stays on). Otherwise, the system becomes generous to the wrong triggers.
Live with the new settings for 48 hours. The room needs time to show its real behavior during actual work, not during a five-minute tweak session.
Troubleshooting Path: If It Still Times Out (Or Starts Turning On Randomly)
If the system still misbehaves, don’t try every setting in the menu. Observe and change one thing at a time.
Confirm detection during the sit-test, adjust geometry so the desk is in view, and extend the delay. If the sensor cannot reliably “see” meaningful seated motion, stop expecting the menu to fix physics.
Occlusion is often the deciding factor. Tall monitors, partitions, and built-in desk niches create dead zones. A wall switch at the doorway may only see the entrance, while you sit in a small cave of cabinetry and screens. In that layout, even a generous 20-minute timeout is just a bandage. The real fix is adding a second viewpoint—often a discreet corner-mounted or ceiling-adjacent sensor aimed across the desk plane. It sounds like “more stuff,” but it’s often cheaper and calmer than endless settings roulette.
Szukasz energooszczędnych rozwiązań aktywowanych ruchem?
Skontaktuj się z nami w sprawie czujników ruchu PIR, energooszczędnych produktów aktywowanych ruchem, przełączników z czujnikiem ruchu oraz komercyjnych rozwiązań typu Occupancy/Vacancy.
If you are renting or can’t change the wiring, the architecture changes but the goal remains the same. A renter-safe path might be a plug-in lamp on a controlled outlet paired with a better-placed sensor at desk height. The important shift is accepting constraints instead of fighting them with hacks. If you aren’t sure about line-voltage work, hire a licensed electrician. The goal is a reliable office, not a risky DIY story.
If the problem is “it turns on by itself,” treat HVAC and background motion as suspects before blaming the device. Look for vents, fans, or doorways exposing the sensor to heat signatures. Lowering sensitivity and narrowing coverage often improves behavior more than any “micro-motion” setting. Solving false-ons makes it easier to choose a longer delay without feeling like the light is staying on all day for no reason.
If you’re thinking, “Fine, I’ll just buy an mmWave presence sensor,” that can be a valid escalation. But treat it as an escalation, not a default. Presence sensors introduce their own maintenance costs: firmware changes, router reboots, and platform updates. Before adding that complexity, confirm whether a simple vacancy-mode setup plus correct geometry would have solved it. Many “PIR failures” are actually just bad camera angles.
What “Success” Looks Like
Success in a home office isn’t a sensor that impresses guests. It’s a room where you can sit for a long stretch—reading, thinking, typing—and never once notice the lights. The best configuration is the one that becomes boring.
The only metric worth tracking is nuisance shutoffs per day. If it’s still more than zero after a geometry fix and a humane delay, something is still misaligned. There isn’t a universal perfect number for delay; that’s why ranges exist and why a 48-hour trial beats a confident guess.
This guide skips the deep theory of PIR internals and Fresnel lens physics because knowing it rarely changes what fixes a desk-bound office. The practical levers are view, mode, and delay. If those are right and the room still times out, adding a second sensor viewpoint stops being an upsell and starts being the clean fix.







