

There is a specific smell associated with a bathroom that relies on human memory for ventilation. It is the faint, earthy scent of damp drywall that never quite dries out between showers, mixed with the lingering humidity of a towel left on the floor.

The problem is rarely the fan itself—most modern fans move enough air. The problem is the switch on the wall and the person operating it. You walk in, flip the toggle, shower, towel off, and flip the toggle off as you leave. The fan ran for twelve minutes. To actually purge the moisture and prevent mold from eating the vanity backing, it needed to run for thirty.
But you can’t expect a guest, or even a teenager, to stand in the dark for twenty minutes just to let the fan finish its job.
This is where the single-toggle switch fails. It bundles two completely opposing needs: the light, which should be on only when a human is present, and the fan, which needs to run based on the physics of air exchange, not human presence. If you install a standard motion sensor without understanding this conflict, you just automate the annoyance. The light turns off while you are brushing your teeth, or the fan roars to life at 3 AM when you only wanted a sip of water. Buying a sensor is the easy part. The real solution lies in configuring the logic to separate these two timelines.
The Two-Clock Problem
A bathroom is a machine that manages two different commodities: lumens and cubic feet of air. They do not operate on the same clock.
When you enter a room, you need light immediately. When you leave, you want that light gone almost instantly to save energy. The fan is different. According to ASHRAE 62.2 ventilation standards, clearing the moisture load from a hot shower requires a sustained air exchange rate that extends well past the moment the water stops running. If you tie the fan and light to the same motion sensor with the same timeout—say, five minutes—you fail the building. The moisture stays, condenses on the cold mirror, and eventually drips behind the baseboards.
If you swing the other way and set the sensor timeout to thirty minutes to satisfy the fan, you fail the human. Now, every time someone walks in to wash their hands, the light and the noisy fan blaze away for a half-hour after they leave. This is why people disable sensors. They get tired of the fan droning on while they are trying to read in the next room.
¿Busca soluciones de ahorro de energía activadas por movimiento?
Póngase en contacto con nosotros para obtener sensores de movimiento PIR completos, productos de ahorro de energía activados por movimiento, interruptores con sensor de movimiento y soluciones comerciales de presencia/vacancia.
There is also the issue of detection dead zones, often called the “Shower Wave.” Passive Infrared (PIR) sensors detect heat differentials—a warm body moving against a cooler background. Glass shower doors are excellent insulators; they block infrared heat signatures. If your sensor is set to a short timeout and cannot “see” through the glass, you end up waving a soapy arm over the curtain rod just to trigger the lights back on. A properly configured Rayzeek sensor deals with this not by seeing through glass (it can’t), but by using a time delay buffer that outlasts the average shower, or by using sensitivity settings that catch the micro-movements of you stepping out to grab a towel.
Wiring Reality: The Neutral Wire Check
Before you even look at the Rayzeek model numbers, you have to look inside your wall. The most common reason a bathroom sensor install fails is not the sensor, but the wiring in the box.
Older homes, particularly those built before the NEC updates in the 2010s required a neutral wire in switch boxes, often use “switch loops.” You might open the box and see only two wires: a black and a white. Do not assume the white is a neutral. In a switch loop, that white wire is likely a “hot” wire carrying power down from the light fixture, while the black wire carries it back up.
This matters because standard smart switches and motion sensors need to consume a tiny amount of power to stay “alive” and watch for motion. They need a complete circuit. If you have a neutral wire (usually a bundle of white wires capped together in the back of the box), you can use the standard Rayzeek models that tie into that neutral. This is the gold standard. It is stable, reliable, and doesn’t care what kind of light bulb you use.
If you do not have a neutral, you are in the “No-Neutral” landscape. You must select a model specifically designed for this, often using a “ground leakage” method or a capacitor bypass. Be very careful here. Some no-neutral sensors will cause low-wattage LED vanity bulbs to flicker or glow faintly when they are supposed to be off, because the switch is leaking a small amount of current through the bulb just to stay powered. If you see the lights pulsing like a disco at 20% brightness, you have a minimum load issue. You may need to install a bypass capacitor at the fixture or upgrade to a sensor model that uses a battery-operated relay—though replacing batteries in a switch is a maintenance chore you generally want to avoid.
Under the Faceplate: Configuration Is Everything
Most people install the switch, screw on the faceplate, and walk away. Big mistake. The default settings on a Rayzeek unit (often set to “Occupancy Mode” with a 15-second test timer) are for verifying the install, not for living with it. You need to pry off the small cover plate—there is usually a small notch for a flathead screwdriver—to access the DIP switches or dials that control the logic.
The first decision is the “Mode.” You will likely see options for Occupancy (Auto-ON / Auto-OFF) and Vacancy (Manual-ON / Auto-OFF).
For a residential bathroom, Modo de vacancia is almost always superior. In Occupancy mode, the light triggers automatically the moment you cross the threshold. This sounds convenient until you walk past the open bathroom door at night and trigger a floodlight that wakes up your spouse. Or you stumble in at 3 AM for a bathroom break and are blinded by 5000K daylight LEDs. Vacancy mode requires you to tap the button to turn the light on—preserving your night vision if you don’t need it—but will still turn it off automatically when you leave. You control the start; the machine handles the finish.
Quizás le interese

- Tensión: 2 pilas AAA
- Modo Día/Noche
- Temporización: 15 min, 30 min, 1 h (por defecto), 2 h

- Sensor de presencia PIR para montaje en techo con salida de relé de contacto seco
- Alimentación de baja tensión de 12/24VDC o 12/24VAC
- Contactos de relé aislados COM, NO y NC para entradas de EMS, HVAC y control de edificios

- Interruptor con sensor de movimiento por microondas empotrable en techo de baja tensión DC
- Entrada de 12 VDC / 24 VDC con rango de 10-30 VDC
- Corriente de funcionamiento máxima de 10A con retardo de tiempo, umbral de Lux y sensibilidad ajustables
- Interruptor con sensor de movimiento por microondas empotrable en techo para cargas más elevadas
- Entrada de tensión de red de 100-265 VAC, modelo de 10A
- Detección por microondas de 5,8 GHz con temporizador, umbral Lux y sensibilidad ajustables
- Interruptor con sensor de movimiento por microondas empotrable para techo
- Entrada de tensión de red de 100-265 VAC, modelo de 5A
- Detección por microondas de 5,8 GHz con temporizador, umbral Lux y sensibilidad ajustables
- Regulador con sensor de presencia PIR RZ037 de techo para alimentación de 220V
- Corriente de funcionamiento máxima de 3A con carga nominal de 660W
- El botón LUX controla el encendido/apagado del sensor de luz y la regulación de brillo ajustada por el usuario
- Regulador con sensor de presencia PIR RZ037 de techo para alimentación de 110V
- Corriente de funcionamiento máxima de 3A con carga nominal de 330W
- El botón LUX controla el encendido/apagado del sensor de luz y la regulación de brillo ajustada por el usuario

- Interruptor con sensor de movimiento por microondas de techo para CC de bajo voltaje
- Entrada de 12 VDC / 24 VDC con rango de 10-30 VDC
- Corriente de funcionamiento máxima de 10A con retardo de tiempo, umbral de Lux y sensibilidad ajustables
- Interruptor con sensor de movimiento por microondas de techo para mayor carga
- Entrada de tensión de red de 100-265 VAC, modelo de 10A
- Detección por microondas de 5,8 GHz con temporizador, umbral Lux y sensibilidad ajustables
- Interruptor con sensor de movimiento por microondas de techo
- Entrada de tensión de red de 100-265 VAC, modelo de 5A
- Detección por microondas de 5,8 GHz con temporizador, umbral Lux y sensibilidad ajustables

- Interruptor con sensor de movimiento PIR para montaje empotrable en techo de CC de bajo voltaje
- Entrada de 12 VDC / 24 VDC con rango de 10-30 VDC
- Corriente máxima de trabajo de 10 A con tiempo de retardo, umbral de luxes y sensibilidad ajustables

- Interruptor con sensor de movimiento PIR empotrable en techo para mayor carga
- Entrada de tensión de red de 100-265 VAC, modelo de 10A
- Detección de 360 grados con tiempo de retardo, umbral de luxes y sensibilidad ajustables
- Interruptor con sensor de movimiento PIR empotrable en techo
- Entrada de tensión de red de 100-265 VAC, modelo de 5A
- Detección de 360 grados con tiempo de retardo, umbral de luxes y sensibilidad ajustables

- Kit de emisor inalámbrico y receptor para el control de iluminación de encendido/apagado en interiores
- Receptor de 100-230 V CA, 50/60 Hz con corriente nominal de 5 A
- Interruptor inalámbrico alimentado por CR2032 con comunicación de 2,4 GHz
- Presencia (encendido automático/apagado automático)
- 12–24 V CC (10–30 V CC), hasta 10 A
- Cobertura de 360°, 8–12 m de diámetro
- Tiempo de retardo de 15 s a 30 min
- Sensor de luz Desactivado/15/25/35 Lux
- Sensibilidad alta/baja
- Modo de presencia con encendido/apagado automático
- 100–265V CA, 10A (requiere neutro)
- Cobertura de 360°; diámetro de detección de 8–12 m
- Temporización: 15 s–30 min; Lux OFF/15/25/35; Sensibilidad Alta/Baja
- Modo de presencia con encendido/apagado automático
- 100–265V CA, 5A (requiere neutro)
- Cobertura de 360°; diámetro de detección de 8–12 m
- Temporización: 15 s–30 min; Lux OFF/15/25/35; Sensibilidad Alta/Baja
Then there are the dials: Temporización and Sensibilidad.
The Time Delay is your buffer against the shower problem. If this sensor controls the light and the fan together (not ideal, but often necessary), you have to compromise. Fifteen minutes is the floor. Anything less, and you risk the “Shower Wave.” Anything more, and you are wasting heat or AC by venting conditioned air for too long.
The Sensitivity dial is often overlooked. If the bathroom is near a hallway, a high sensitivity setting will trigger the sensor every time a cat walks by the door. Dial it down so it only catches deliberate entry, not casual passing.
The Advanced Fix: Separating the Loads
If you want to truly solve the “Two-Clock” problem—light for 5 minutes, fan for 30—you need to separate the loads.
Inspírese con los portafolios de sensores de movimiento Rayzeek.
¿No encuentra lo que busca? No se preocupe. Siempre existen formas alternativas de resolver sus problemas. Quizá alguno de nuestros portafolios pueda ayudarle.
In many bathrooms, the fan and light are wired together on a single switch leg. When one turns on, the other must follow. This is the root of the “fan noise fatigue” complaint; people stop using the fan because they don’t want the noise just to wash their hands.
The professional fix is to separate these wires. This might involve fishing a new wire leg from the fan to the switch box, or if you are lucky, finding that they are already separate in the box but just wire-nutted together. Once separated, you can install two distinct controls in a double-gang box.
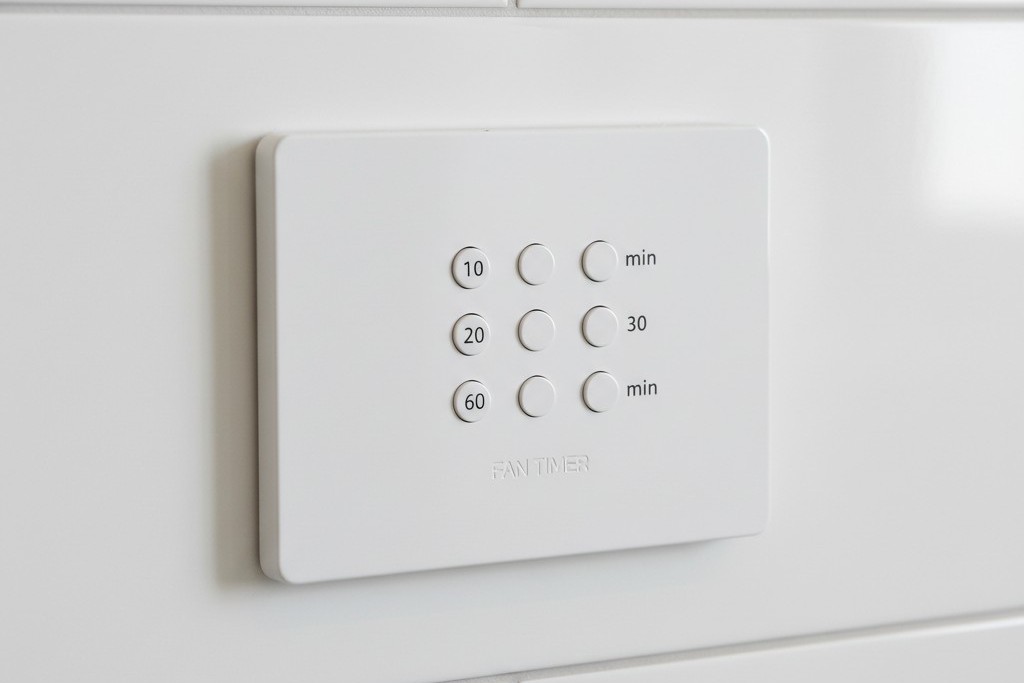
Ideally, you put the vanity light on a Rayzeek motion sensor set to Modo de vacancia (Manual ON) with a short timeout (5 minutes). This ensures lights are never left on but gives you manual control. Then, you put the exhaust fan on a separate countdown timer switch—one of those with the buttons for 10, 20, 30, or 60 minutes.
This is the “Guest-Proof” standard. The guest hits the light (Manual ON). They shower. They hit the “30 Min” button on the fan timer as they leave. The light turns itself off after 5 minutes of no motion. The fan runs for the full 30 minutes to purge the moisture, then cuts out. No mold, no wasted electricity, no 3 AM noise.
Why Not Just Use a Humidity Sensor?
You might ask why we don’t just use a humidity-sensing switch for the fan. In theory, they are perfect: they detect steam and turn on.
In practice, they are often frustrating. In humid climates, a humidity sensor can trigger on a muggy July day just because the window is open, pulling out your expensive air conditioning. Conversely, in winter, they might not trigger fast enough before condensation has already formed on the walls. A motion sensor (triggering the event) plus a guaranteed timer (sustaining the event) is a deterministic logic. It doesn’t guess if it’s humid; it knows you were there, and it knows the code requires air exchange.
The Guest-Proof Standard
The goal of any bathroom automation is that it should work for your grandmother without explanation. If she has to wave her arms to keep the lights on, the design failed. If she has to read a manual to turn on the fan, the design failed.
By using a high-quality Rayzeek sensor for the lighting load—specifically configured for Manual-ON and a generous timeout—and separating the ventilation logic where possible, you move from a “smart home” gadget to actual building infrastructure. The bathroom stays dry, the energy bill stays down, and nobody gets blinded at midnight.







