
A pantry with elegant glass French doors is a classic design choice that can create a maddening home automation problem. The light, meant for convenience, flashes on and off every time someone walks down the hall. This isn’t a flaw in the motion sensor; it’s a symptom of a common installation that ignores the physics of how these devices actually work.
Fortunately, achieving a seamless, intelligent pantry is a matter of precision. By understanding how a sensor perceives its environment, you can create a detection zone perfectly contained within the pantry walls. This guide outlines the definitive method for installing a Rayzeek motion sensor to activate only when you need it and ignore hallway traffic completely.
The Hallway Problem: Why Glass Doors Cause False Triggers
First, let’s correct a common misconception: the sensor is not “seeing” through the glass. While transparent to us, standard glass is almost completely opaque to the long-wave infrared radiation your body emits. The technology at the heart of most motion sensors is Passive Infrared (PIR), which is designed specifically to detect this thermal energy.
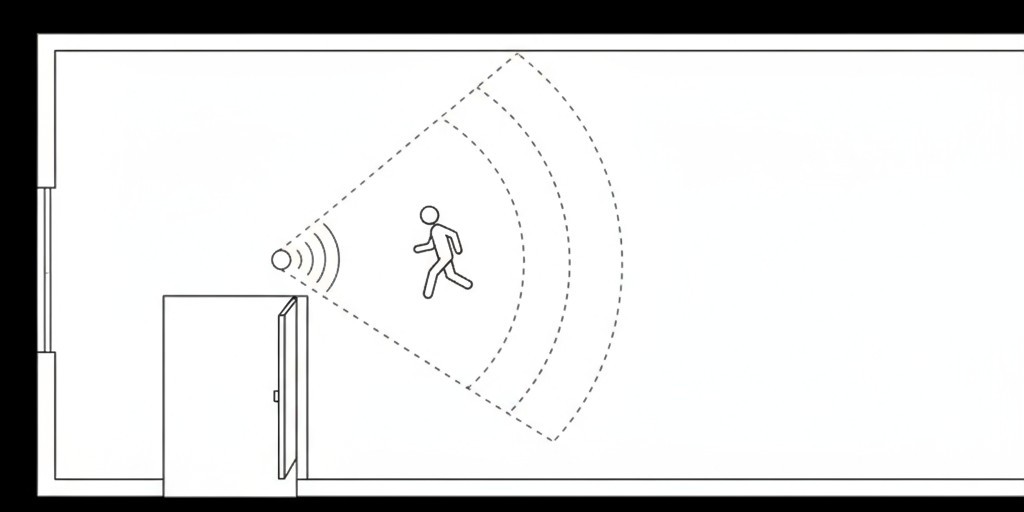
A PIR sensor works by monitoring a room’s ambient infrared signature. When a heat source like a person moves into its field of view, the rapid change in that signature is interpreted as motion, triggering the light. The problem with a glass-door pantry is one of geometry. A sensor placed on the ceiling or a back wall has a wide, conical field of view that spills past the door frame and into the hallway. Its peripheral vision catches a passerby, causing the false trigger.
The Flawed Approach: Debunking the Behind-the-Glass Mount
An instinctive but flawed solution is to mount the sensor inside the pantry directly behind a glass pane, hoping it can “look” into the room. This approach fundamentally misunderstands how PIR technology works.
Inspírese con los portafolios de sensores de movimiento Rayzeek.
¿No encuentra lo que busca? No se preocupe. Siempre existen formas alternativas de resolver sus problemas. Quizá alguno de nuestros portafolios pueda ayudarle.
Because glass blocks the necessary infrared wavelengths, a sensor placed behind it is effectively blind to the thermal signature of a person entering the room. This installation simply guarantees failure and misses the opportunity for a truly responsive system.
The Strategic Solution: Inside-Corner Placement and Sightline Control
The most effective strategy is careful physical placement. The goal is to position the sensor so its natural field of view is directed away from the doorway and contained entirely within the pantry. The ideal location is an inside corner on the wall adjacent to the door.
Identifying the Optimal Corner
Stand in the pantry doorway and look inside. The best corners for mounting are on the front wall, to the left or right of the door frame. A sensor placed here will naturally look back into the pantry, across the shelves. Its line of sight will be parallel to the doorway, not pointing out of it. This simple change in position solves the vast majority of false triggers.
Angling for a Contained Detection Zone
Once you’ve selected a corner, angle the sensor slightly inward and downward. Aim the center of its detection cone toward the far, back corner of the pantry. This ensures the widest part of its coverage is deep inside the space, while the edges of its view remain well within the pantry walls and far from the hallway.
Quizás le interese

- Tensión: 2 pilas AAA
- Modo Día/Noche
- Temporización: 15 min, 30 min, 1 h (por defecto), 2 h

- Sensor de presencia PIR para montaje en techo con salida de relé de contacto seco
- Alimentación de baja tensión de 12/24VDC o 12/24VAC
- Contactos de relé aislados COM, NO y NC para entradas de EMS, HVAC y control de edificios

- Interruptor con sensor de movimiento por microondas empotrable en techo de baja tensión DC
- Entrada de 12 VDC / 24 VDC con rango de 10-30 VDC
- Corriente de funcionamiento máxima de 10A con retardo de tiempo, umbral de Lux y sensibilidad ajustables
- Interruptor con sensor de movimiento por microondas empotrable en techo para cargas más elevadas
- Entrada de tensión de red de 100-265 VAC, modelo de 10A
- Detección por microondas de 5,8 GHz con temporizador, umbral Lux y sensibilidad ajustables
- Interruptor con sensor de movimiento por microondas empotrable para techo
- Entrada de tensión de red de 100-265 VAC, modelo de 5A
- Detección por microondas de 5,8 GHz con temporizador, umbral Lux y sensibilidad ajustables
- Regulador con sensor de presencia PIR RZ037 de techo para alimentación de 220V
- Corriente de funcionamiento máxima de 3A con carga nominal de 660W
- El botón LUX controla el encendido/apagado del sensor de luz y la regulación de brillo ajustada por el usuario
- Regulador con sensor de presencia PIR RZ037 de techo para alimentación de 110V
- Corriente de funcionamiento máxima de 3A con carga nominal de 330W
- El botón LUX controla el encendido/apagado del sensor de luz y la regulación de brillo ajustada por el usuario

- Interruptor con sensor de movimiento por microondas de techo para CC de bajo voltaje
- Entrada de 12 VDC / 24 VDC con rango de 10-30 VDC
- Corriente de funcionamiento máxima de 10A con retardo de tiempo, umbral de Lux y sensibilidad ajustables
- Interruptor con sensor de movimiento por microondas de techo para mayor carga
- Entrada de tensión de red de 100-265 VAC, modelo de 10A
- Detección por microondas de 5,8 GHz con temporizador, umbral Lux y sensibilidad ajustables
- Interruptor con sensor de movimiento por microondas de techo
- Entrada de tensión de red de 100-265 VAC, modelo de 5A
- Detección por microondas de 5,8 GHz con temporizador, umbral Lux y sensibilidad ajustables

- Interruptor con sensor de movimiento PIR para montaje empotrable en techo de CC de bajo voltaje
- Entrada de 12 VDC / 24 VDC con rango de 10-30 VDC
- Corriente máxima de trabajo de 10 A con tiempo de retardo, umbral de luxes y sensibilidad ajustables

- Interruptor con sensor de movimiento PIR empotrable en techo para mayor carga
- Entrada de tensión de red de 100-265 VAC, modelo de 10A
- Detección de 360 grados con tiempo de retardo, umbral de luxes y sensibilidad ajustables
- Interruptor con sensor de movimiento PIR empotrable en techo
- Entrada de tensión de red de 100-265 VAC, modelo de 5A
- Detección de 360 grados con tiempo de retardo, umbral de luxes y sensibilidad ajustables

- Kit de emisor inalámbrico y receptor para el control de iluminación de encendido/apagado en interiores
- Receptor de 100-230 V CA, 50/60 Hz con corriente nominal de 5 A
- Interruptor inalámbrico alimentado por CR2032 con comunicación de 2,4 GHz
- Presencia (encendido automático/apagado automático)
- 12–24 V CC (10–30 V CC), hasta 10 A
- Cobertura de 360°, 8–12 m de diámetro
- Tiempo de retardo de 15 s a 30 min
- Sensor de luz Desactivado/15/25/35 Lux
- Sensibilidad alta/baja
- Modo de presencia con encendido/apagado automático
- 100–265V CA, 10A (requiere neutro)
- Cobertura de 360°; diámetro de detección de 8–12 m
- Temporización: 15 s–30 min; Lux OFF/15/25/35; Sensibilidad Alta/Baja
- Modo de presencia con encendido/apagado automático
- 100–265V CA, 5A (requiere neutro)
- Cobertura de 360°; diámetro de detección de 8–12 m
- Temporización: 15 s–30 min; Lux OFF/15/25/35; Sensibilidad Alta/Baja
Strategies for Challenging Layouts
In very small, narrow, or shallow pantries, a corner mount might still allow the sensor’s view to clip the doorway. In these cases, the best position is often on the ceiling but pushed as far back into the pantry as possible. From here, angled back toward the door, the sensor’s view will primarily cover the floor and lower shelves at the rear. A person must be fully inside the pantry to be detected, ignoring any motion at the threshold.
Refining the Detection Zone with Lens Masking
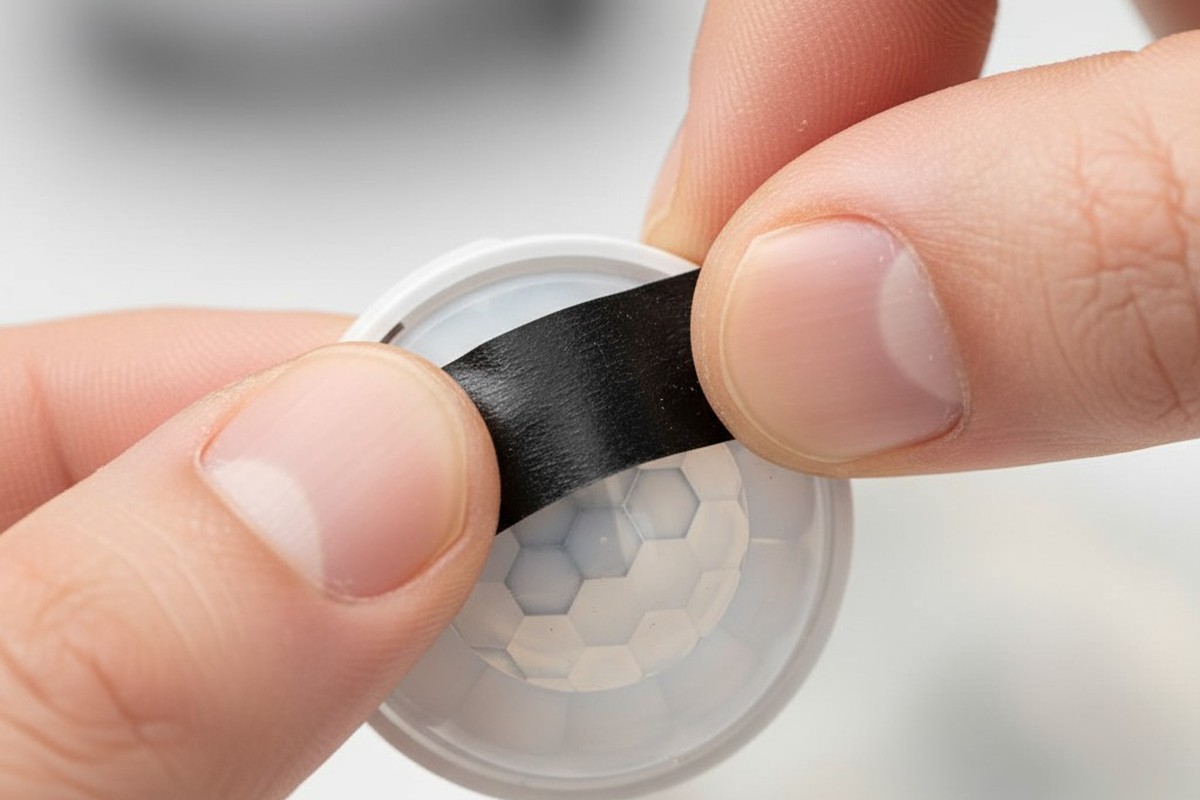
For installations that demand surgical precision, lens masking offers another layer of control. A sensor’s lens is a series of Fresnel segments, each focusing infrared light from a specific direction onto the detector. By physically blocking some of these segments, you can blind the sensor to unwanted areas.
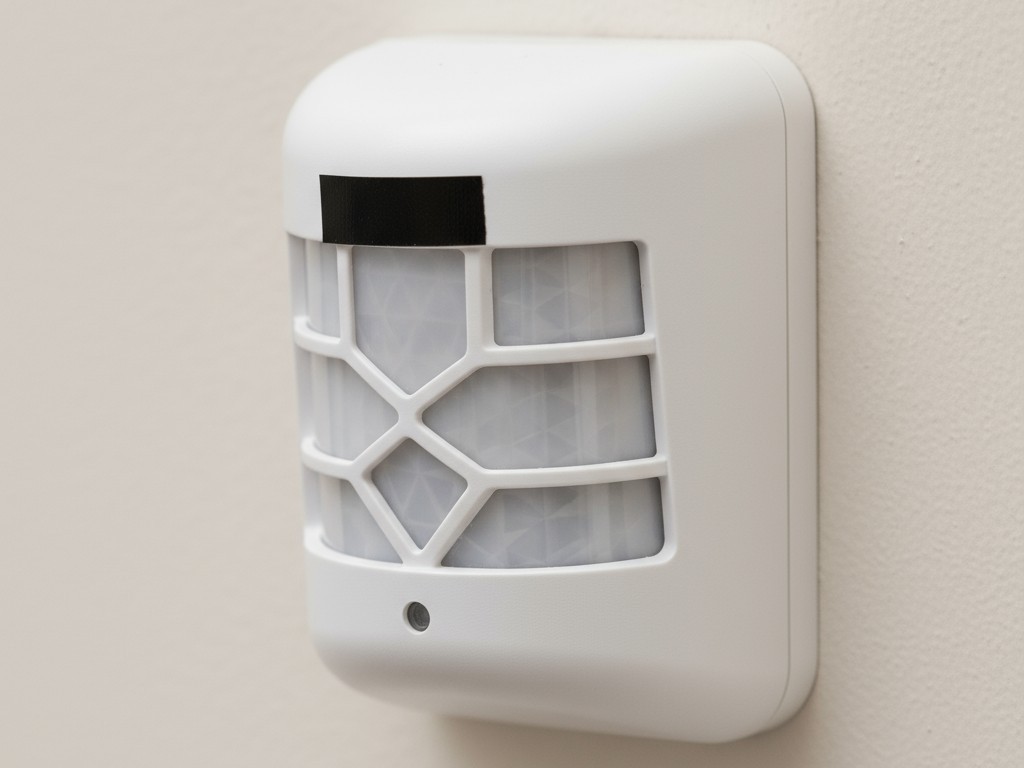
A small, carefully cut piece of opaque electrical tape is all you need. Observe which part of the lens is oriented toward the hallway and apply the tape directly to that segment. This physically prevents the sensor from detecting any thermal change in that direction, creating a custom-shaped detection zone that perfectly matches the pantry’s interior.
Adding Intelligence: Fine-Tuning Sensor Settings
With the physical installation dialed in, you can use the sensor’s built-in settings to further refine its behavior. Rayzeek sensors offer adjustable controls that are critical for perfecting a pantry setup.
¿Busca soluciones de ahorro de energía activadas por movimiento?
Póngase en contacto con nosotros para obtener sensores de movimiento PIR completos, productos de ahorro de energía activados por movimiento, interruptores con sensor de movimiento y soluciones comerciales de presencia/vacancia.
Using Lux Thresholds to Operate Only When Needed
A pantry with glass doors often gets plenty of ambient light. The sensor’s integrated lux detector can prevent the light from activating needlessly. By setting a low lux threshold, you instruct the sensor to trigger only when the pantry is dark. The light will come on at night or on a cloudy day but will conserve energy by staying off when the room is already bright.
Setting an Appropriate Time Delay for Quick Visits
Pantry trips are typically brief—grab an item and leave. A long time delay is unnecessary and wasteful. A short delay of one to five minutes is ideal. This ensures the light stays on while you’re there but turns off promptly after you leave, maximizing both convenience and energy efficiency.







